Try Transformer for Snowflake
This tutorial covers the steps needed to try Transformer for Snowflake. You will learn how to work with the Control Hub user interface, build a basic Transformer for Snowflake pipeline, preview pipeline activity, and run a job.
Although the tutorial provides a simple use case, keep in mind that IBM StreamSets is a powerful platform that enables you to build and run large numbers of complex pipelines.
To complete this tutorial, you must have an existing IBM StreamSets account. If you do not have one, use the following URL to sign up for a free trial:
https://cloud.login.streamsets.com/signup
When you sign up, your user account receives all of the roles required to complete the tasks in this tutorial. If you are invited to join an existing organization, your user account requires the Pipeline Editor and Job Operator roles to complete tutorial tasks.
Complete Prerequisite Tasks
- Verify Snowflake requirement for network policies
- If you are just starting to use Transformer for Snowflake, and your Snowflake account uses network policies, complete the Snowflake requirement.
- Verify user permissions
-
Make sure that the user account for the tutorial has the following permissions on the database where you create the tables:
- Read
- Write
- Create Table
- Create source tables
- Use the following SQL queries to create and populate two tables in Snowflake.
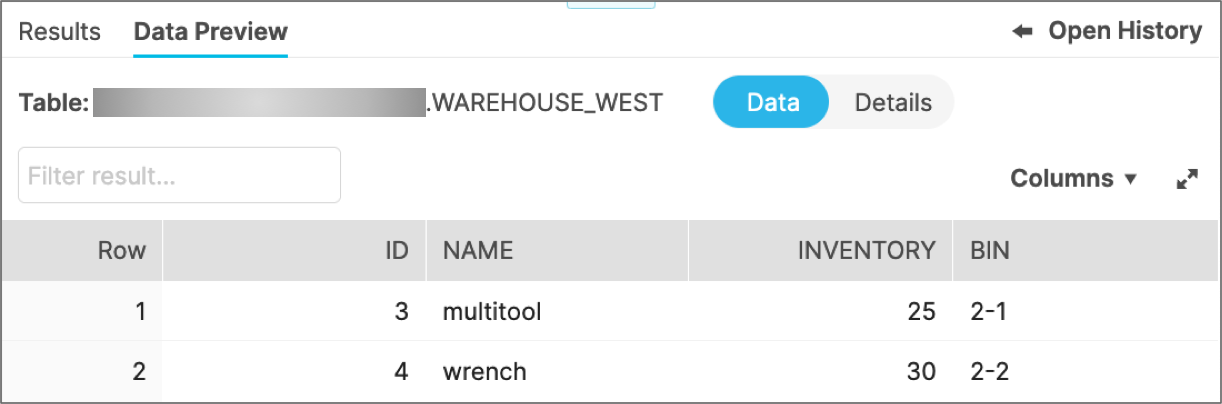
- Notice that the WAREHOUSE_WEST table has a
Bincolumn that the WAREHOUSE_EAST table does not.- WAREHOUSE_EAST table
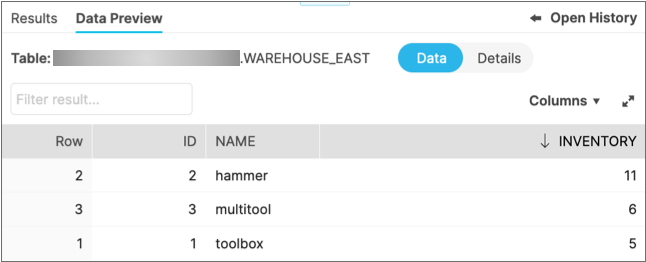
CREATE OR REPLACE TABLE warehouse_east (
    id integer,
    name string,
    inventory integer
);
INSERT INTO warehouse_east VALUES (1, 'toolbox', 5), (2, 'hammer', 11), (3, 'multitool', 6);In the Snowflake console, the resulting table should look like this:
- WAREHOUSE_WEST table
CREATE OR REPLACE TABLE warehouse_west (
    id integer,
    name string,
    inventory integer,
    bin string
);
INSERT INTO warehouse_west VALUES (3, 'multitool', 25, '2-1'), (4, 'wrench', 30, '2-2');In the Snowflake console, the resulting table should look like this:
- WAREHOUSE_EAST table
Build a Snowflake Pipeline
With these steps, you build a Transformer for Snowflake pipeline that uses two Snowflake Table origins to read from the two source tables that you created, a Union processor to merge the data, and a Snowflake Table destination to write to a new output table.
You also preview the pipeline to verify how the stages process data.
-
Use the following URL to log in to Control Hub: https://cloud.login.streamsets.com/
Control Hub displays the Welcome view.
-
If this is your first login, click . A blank pipeline named New Pipeline < timestamp
> opens in the canvas.
If you have not saved your Snowflake account URL or credentials to your IBM StreamSets account, the Snowflake Credentials dialog box appears. Enter the following information to enable access to Snowflake. The information is validated, then stored in your IBM StreamSets account for use with all of your subsequent connections.
Snowflake Credentials Property Description Snowflake URL Default Snowflake URL to use. For example: https://<yourcompany>.snowflakecomputing.com/
Username Snowflake user name. Authentication Method Authentication method to use: password or private key. Password Password for the Snowflake account. Available when using password authentication.
Private Key Private key for the Snowflake account. Enter a PKCS#1 or PKCS#8 private key and include the key delimiters. For example, when entering a PKCS#8 private key, include the
-----BEGIN PRIVATE KEY-----and-----END PRIVATE KEY-----key delimiters.Available when using private key authentication.
- On the General tab of the pipeline properties, rename the pipeline to Snowflake Tutorial.
-
Specify the following Snowflake properties, as needed.
If you have already created pipelines and configured Snowflake settings in your IBM StreamSets account, the following properties might already be configured with default properties. Update them as needed.
If you have not saved Snowflake pipeline defaults to your IBM StreamSets account, the Snowflake URL, role, warehouse, database, and schema that you specify below are also saved to your account for use with subsequent pipelines.
General Property Description Snowflake URL If empty, enter your Snowflake account URL. For example: https://<yourcompany>.snowflakecomputing.com
If this property is already configured, update it as needed.
Role Use the default Public role, select the role to use to access your Snowflake account, or use the Select Role icon to select the role to use. Then, click Save. Note: For this tutorial, the role must have the following permissions:- Read
- Write
- Create Table
Warehouse Select the warehouse where you created the tutorial tables, or click the Select Warehouse icon to select the warehouse to use. Then, click Save. Pipeline Working Schema Select a database and schema for temporarily storing data preview transient tables and for retrieving pipeline execution metrics from the Snowflake Information Schema. Or, click the Select Schema icon to explore your Snowflake account for the database and schema to use. Then, click Save. Transient tables are removed when you stop the preview.
You can use the database and schema where you created the tutorial tables.
-
In the canvas, click the Add Stage icon (
 ) to
open the stage selector.
) to
open the stage selector.
-
Select Snowflake Table.
The origin appears on the canvas with the Table tab displaying.
-
For the Table property, click the Select
Table icon (
 ). Navigate to the schema and database
where you created the tutorial tables, select the
WAREHOUSE_EAST table, then click
Save.
). Navigate to the schema and database
where you created the tutorial tables, select the
WAREHOUSE_EAST table, then click
Save.
Notice how the database, schema, and table display in separate text boxes in the Table property. You can use those text boxes to select different values. When needed, you can use the X icon to clear all three boxes.
Also notice that the table name becomes the name of the origin.
We want to read all data in the table, so no other properties are needed.
-
To add another origin, in the toolbar above the canvas, click the
Add Stage icon. Click Origins,
and then select Snowflake Table.
Do not use the Add Stage icon linked to the existing origin. That icon generates a list that omits origins, since it is linked to an origin.Select the second origin and drag it below the first origin in the pipeline canvas.
-
For the Table property, click the first text box and
select the database to use. Click the second text box and select the schema to
use. Click the third text box and select the
WAREHOUSE_WEST table.
Notice how the stage is now named after the table.We want to read all data in the table, so no other properties are needed.
- Click the Add Stage icon connected to the first origin. In the stage selector, scroll down and select the Union processor.
-
Click the General tab for the processor, then name the
processor
Union All.Using the stage selector connects the new stage with the selected stage. Connect the other origin by clicking on the output of the origin, then dropping it over the processor.The input order is irrelevant in this case, but to change the order, select the processor, then in the pop-up menu select the Reorder icon: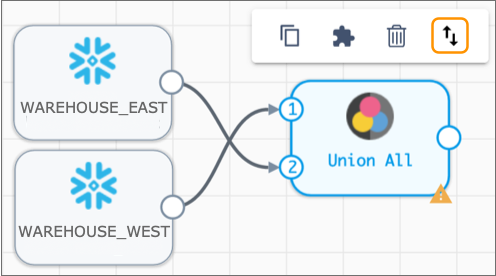
-
Click the Union tab, then configure the following
properties:
Union Property Value Operation Union Column Handling Pass all Columns This passes all columns from both origins and ensures that all rows have the superset of columns passed into the processor. That is, any columns that exist only in one set of rows are added to the other rows. These new columns are populated with null values.
Now let's use data preview to see how rows of data change as they pass through the pipeline. You can preview partial and complete pipelines.
-
In the toolbar, click the Preview icon:
 .
.
One of the origins is selected in the pipeline canvas, and preview displays several rows of output data read by the origin.
-
In the canvas, select the other origin to view the output for that origin.
Then, select the processor so you can review the processed output.
Notice how the two input streams are merged. Rows from
WAREHOUSE_EASThave a newBincolumn with null values, because theBincolumn existed in theWAREHOUSE_WESTdata.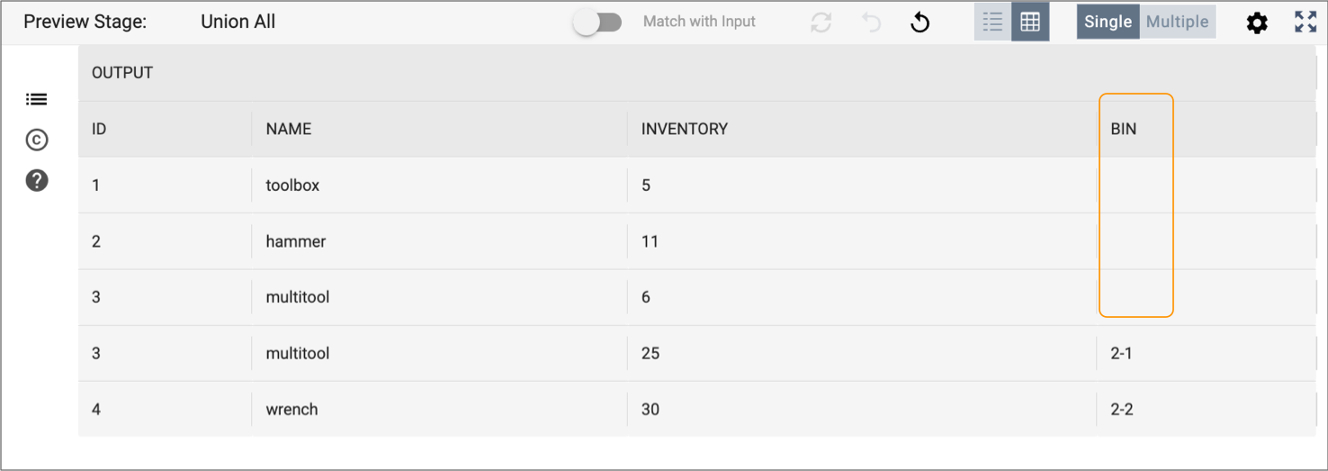
-
Click Close Preview to close the preview.
Now let's finish configuring the pipeline.
- Click the Add Stage icon connected to the processor. In the stage selector, click Destinations, and then select the Snowflake Table destination.
-
On the Table tab, click the first text box of the
Table property and select the database to use. Click
the second text box and select the schema to use. Since you are not writing to
an existing table, in the third text box, enter a new table name, such as
TUTORIAL_OUTPUT.
Notice that the table name becomes the name of the destination, like for the origins.
-
Configure the following additional properties:
Snowflake Table Value Write Mode Overwrite Table This ensures that if you run this pipeline again, you receive the expected results.
Overwrite Mode Drop Table -
Use the default values for all remaining properties.
Note that Create Table is enabled by default so that the destination creates the TUTORIAL_OUTPUT table before writing to it.
Run a Job
Jobs are the execution of a dataflow that is represented in a pipeline.
When pipeline development is complete, you check in the pipeline to indicate that the pipeline is ready to be added to a job and run. When you check in a pipeline, you enter a commit message. Control Hub maintains the commit history of each pipeline.
When the Transformer for Snowflake engine is hosted, job configuration is simple. You can use the default values when creating the job.
-
With your tutorial pipeline open in the canvas, click the Check
In icon:

-
Enter a commit message. You can use the default: New
Pipeline.
As a best practice, state what changed in each subsequent pipeline version so you have a meaningful commit history for the pipeline.
-
Click Publish and Next.
The Share Pipeline step displays. You can skip this step for now. When additional users join your organization, you can share the pipeline to grant them access.
-
Click Save & Create New Job.
The Create Job Instances wizard appears.
- In the Define Job step, you can update the name of the job, then click Next.
-
In the Select Pipeline step, notice the job is for your
tutorial pipeline, then click Next.
The wizard skips over the Configure Job step for Transformer for Snowflake pipelines.
-
In the Review & Start step, click Start
& Monitor Job.
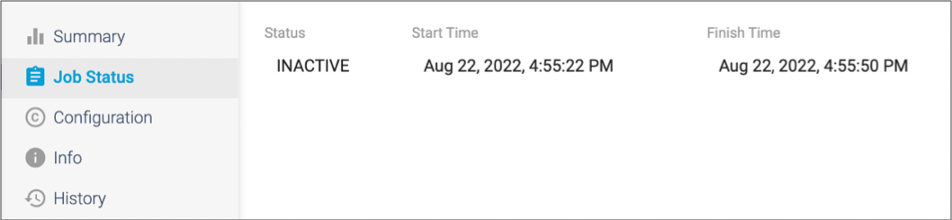
The job displays in the canvas, and Control Hub indicates that the job is active. When the job completes, the job has an Inactive status and displays the time that the job started and stopped.
-
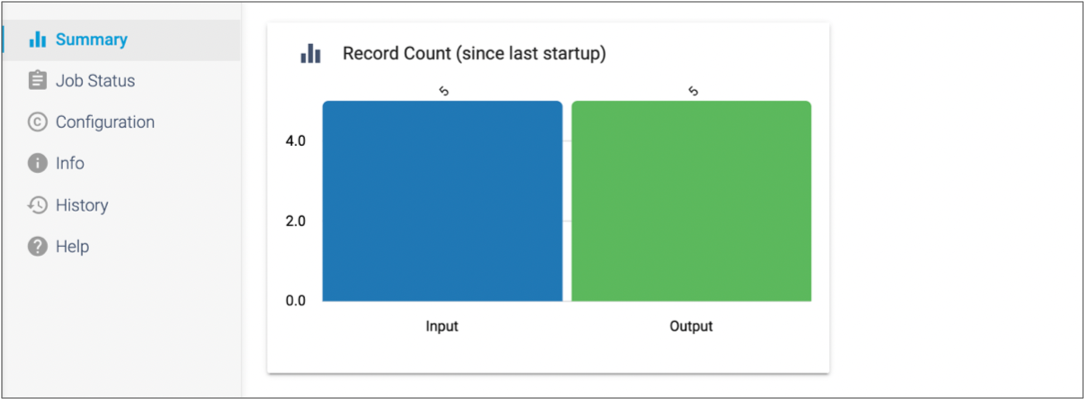
Click the Summary tab to view the input and output
row count for the completed job.
-
To view the results of the pipeline, go to your Snowflake console and navigate
to the database, warehouse, and schema that you used for the tutorial. Notice
that the pipeline created a new table for your tutorial output.
When you preview the data in the table, it should look like this:
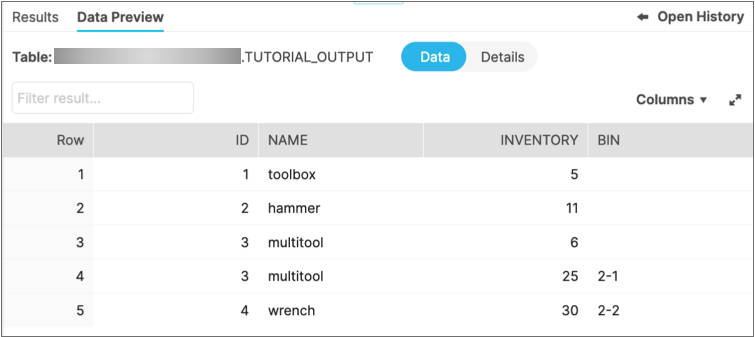
Notice the table includes a
Bincolumn that only existed in theWAREHOUSE_WESTtable. And as you saw when previewing the pipeline processing, rows that did not haveBindata now have nulls in that column.Congratulations on building and running your first Transformer for Snowflake pipeline!
Next Steps
- Modify the tutorial pipeline
- Add a couple processors to the tutorial pipeline to see how easily you can
add a wide range of processing to the pipeline:
- Add a Filter processor to remove the
multitoolrows from the data set. - Use a Column Transformer processor to double the inventory values, and overwrite the existing values.
- To see how the data drift feature works, change the destination
Overwrite Mode property from
Drop TabletoTruncate Table. Then, add a Column Renamer processor to rename theBincolumn.
- Add a Filter processor to remove the
- Create a new pipeline
- Create a new pipeline using your own Snowflake data or the Snowflake sample
data. You might explore some of the following functionality:
- If you have a Snowflake query that you want to enhance, use the Snowflake Query origin to generate data for the pipeline, then add processors to perform additional processing.
- Use the Join processor to join data from two Snowflake tables or views.
- As you develop the pipeline, use the Trash destination with data preview to see if the pipeline processes data as expected. For more information about data preview, see the Control Hub documentation.
- Explore useful features
-
- Use a pipeline to create a Snowflake view.
- Try using an existing user-defined-function (UDF) or define one in the pipeline.
- If you have an entire pipeline that you want to run with small changes, use runtime parameters to easily reuse and adapt pipeline logic.
- If you have a series of stages that you want to reuse in multiple pipelines, try creating a pipeline fragment.
- Use a Snowflake Notification executor to send an email after a pipeline run completes.
- Configure Snowflake pipeline defaults to make configuring pipelines easier when you use the same Snowflake details in all or most of your pipelines.
- Learn more about Control Hub
-
- Become more familiar with the Control Hub pipeline canvas.
- Learn how Control Hub tracks pipeline version history and gives you full control of the evolving development process.
- Need to import data to Snowflake? You can use pipelines that run on Data Collector or Transformer engines to make that happen.
- Add users to your organization
-
- Invite other users to join your organization and collaboratively manage pipelines as a team.
- To create a multitenant environment within your organization, create groups of users. Grant roles to these groups and share objects within the groups to grant each group access to the appropriate objects.