Snowflake View Destination
The Snowflake View destination creates a Snowflake view based on the data passed to the destination by the pipeline. To create additional views, add additional destinations.
When you configure the Snowflake View destination, you specify the location and name for the view to create, and whether to replace a view of the same name in the specified location. By default, the destination creates a standard Snowflake view. You can configure the destination to create a secure view, a materialized view, or a secure materialized view.
For more information about Snowflake views, see the Snowflake documentation.
Using the Destination
The Snowflake View destination creates a view based on the data passed to the destination.
Unlike the Snowflake Table destination, the Snowflake View destination does not perform a write. Use the destination to create a Snowflake view to be used in other pipelines or to be directly queried within Snowflake.
Pipeline Tips
Snowflake views are typically composed of a combination or subset of data from Snowflake tables.
When you create a pipeline for the Snowflake View destination, you can include any appropriate stage to help define the columns and rows to include in the view. For example, you might use a JSON Parser processor to parse JSON and include the extracted columns in the data flow, or a Column Renamer processor to update column names before creating a view.
- Subset of columns in table
- To create a view that includes only a subset of columns in a table, you might use one of the following approaches, depending on your preference or use case:
- Data from multiple tables
- To create a view that includes data from multiple tables you might use one of the following approaches, depending on your use case:
- Subset of data in pipeline
- To create a view that includes only a subset of data in the pipeline, you might use a Filter processor to specify the conditions to use for the data. The destination applies the defined filter to the view.
Example
The following pipeline creates a view that includes data from two tables with corresponding data where the profit is greater than 50,000:
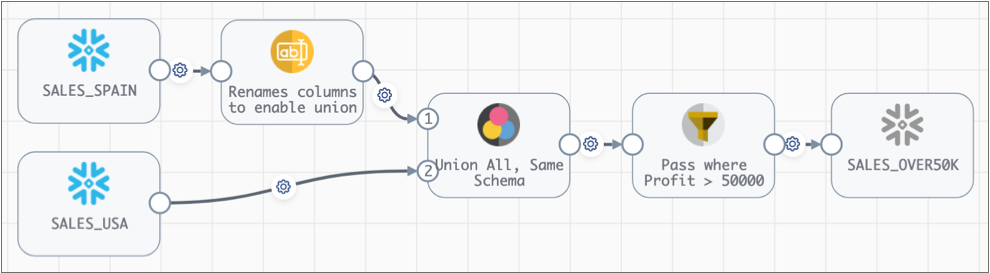
The pipeline uses a Column Renamer processor to rename columns from the
SALES_SPAIN table that are named differently from the
SALES_USA table. The Union processor merges the data from both
tables. Then, a Filter processor passes only data where Profit >
50000 to the Snowflake View destination.
The resulting view includes the columns from both tables, with only rows where the
Profit column is greater than 50,000.
View Creation
The Snowflake View destination creates a Snowflake view based on logic defined in the pipeline, as shown in the example above.
When you configure the Snowflake View destination to write to a view that does not exist, it creates a view based on the specified view name and the data passed to the destination.
- Replace if Exists - Replaces an existing view of the specified name. Use to create a new view with a different configuration, such as creating a secure or materialized view or a view composed from different tables and columns.
- Secure View - Creates a Snowflake secure view.
For more information about secure views, see the Snowflake documentation.
- Materialize View - Creates a Snowflake materialized view for faster queries of the
pre-computed data set.
This functionality requires Snowflake Enterprise Edition. If your Snowflake account is not Enterprise Edition, the pipeline generates errors at runtime.
For more information about materialized views, see the Snowflake documentation.
Configuring a Snowflake View Destination
Configure a Snowflake View destination to create a Snowflake view.
-
On the General tab, configure the following
properties:
General Property Description Name Stage name. Description Optional description. -
On the View tab, configure the following properties:
View Property Description View Name of the view to create. Use one of the following methods to define this property: - Select from lists - Click the first text box and select the database to use. Click the second text box and select the schema to use. Click the third text box and select the view to use. Or, if the view does not exist, enter the name of the view to create.
- Explore and select - Click the Select View icon to explore your Snowflake account and navigate to the view to use.
The specified view becomes the name of the stage. When needed, you can manually enter a stage name on the General tab. If you select a new view for the stage, the name of the selected view overrides the manually-entered stage name.
Replace if Exists Replaces an existing view of the specified name. Use to create a new view with a different configuration, such as creating a secure or materialized view or a view composed from different tables and columns. If a view of the specified name exists and this property is not enabled, the destination generates an error.
Secure View Creates a Snowflake secure view. For more information about secure views, see the Snowflake documentation.
Materialize View Creates a Snowflake materialized view for faster queries of the pre-computed data set. This functionality requires Snowflake Enterprise Edition. If your Snowflake account is not Enterprise Edition, the pipeline generates errors at runtime.
For more information about materialized views, see the Snowflake documentation.