Snowflake Notification Executor
The Snowflake Notification executor sends an email based on a condition defined in the stage properties. The executor sends the email after all pipeline writes are complete.
Use the Snowflake Notification executor to notify email recipients of details about the pipeline run. For example, you might use the executor to notify a team when a data condition, such as an error threshold, has been met.
The executor uses a Snowflake email notification integration to send email to ensure that sensitive details are not inadvertently sent to non-Snowflake users. The Snowflake Notification executor can send email to any of the recipients associated with the notification integration, and Snowflake notification integrations send notifications only to Snowflake users in your account. Before you use the executor, complete the prerequisite tasks.
When you configure the Snowflake Notification executor, you select an available Snowflake notification integration to use. You select the email addresses to send email to, then specify the subject and text of the email message. You can optionally include rows of data in the text of the email.
You define the condition for the executor to send the email – with every pipeline run or after the executor receives a specified number of rows. When the condition for sending the email is met, the executor sends the email to the designated recipients after all pipeline writes are complete.
Prerequisites
- Provide access to a Snowflake notification integration
- Provide access to an email notification integration by completing the
following steps, as needed:
- If necessary, create an email notification integration.
For information about creating an email notification integration, see the Snowflake documentation. At this time, creating a notification integration requires the Snowflake Create Integration privilege.
- Ensure that the role specified in the pipeline has the Snowflake
Usage privilege for the email notification integration.
For example, you might use the following command to grant the privilege:
GRANT USAGE ON INTEGRATION <integration name> TO ROLE <role name>;For information about granting privileges, see the Snowflake documentation.
- If necessary, create an email notification integration.
- Add email recipients to the notification integration
- Email recipients must be included in the list of allowed recipients in the
Snowflake notification integration. Add all intended email recipients to the
ALLOWED_RECIPIENTSparameter of the email notification integration. - Ensure that each recipient email address is verified
- Snowflake email notification integrations require verified email addresses. Before you configure the Snowflake Notification executor to send an email, ensure that the intended recipients have verified their email addresses.
Implementation Examples
When you add the Snowflake Notification executor to a pipeline, carefully consider how you define the pipeline logic.
When enabled, the Snowflake Notification executor sends email after the specified executor condition is met. The executor can either send an email with each successful pipeline run, or when the executor receives more than the specified number of rows.
The Snowflake Notification executor does not pass data downstream. As a result, the only reason to pass data to the executor is to trigger the sending of an email after all pipeline writes are complete.
Configure the pipeline so it triggers the executor only when you want it to send an email. For example, if you want the executor to send an email after the data matches a certain condition, you might place a Filter processor before the executor to ensure that only records that match the data condition pass to the executor.
The following examples illustrate a few ways to use the executor:
Low Inventory Warning
Say you want to receive an email when the inventory for an item goes below 100 so you
can order more, and you want the email to include the data that triggers the email.
The details are in an InStock column in an
INVENTORY table.
- Add a Filter processor after the Snowflake Table origin that reads from the
INVENTORYtable.Configure the processor to pass only records where the value in the
InStockcolumn is less than 100. With this configuration, whenever a record includes anInStockvalue of less than 100, the record passes downstream. - Connect the Filter processor to a Snowflake Notification executor.
- Configure the Snowflake Notification executor, specifying the email
notification integration email to use, the users to receive the email, and
the email subject and body.
Then, set the following properties:
- Send Email: Require Minimum Number of Rows
- Required Minimum Number of Rows: 1
- Rows to Include in Email: 50
With this configuration, the executor sends an email when the
InStock column is less than 100, and includes up to 50 rows in
each email, which is the maximum number of rows that can be included.
Note that you can add this executor logic to any pipeline that processes data from
the INVENTORY table.
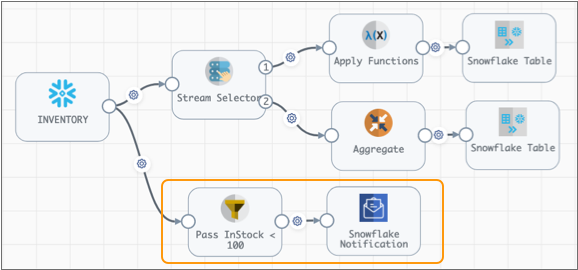
For example, the following pipeline performs calculations on inventory data and
writes to two tables. It also sends an email where InStock < 100
using the highlighted pipeline logic:
High Incidence Warning
Say you want to receive an email when there are more than 10 null values in the
TransactionType column of a SALES table
because this indicates a potential problem with upstream applications.
- Add a Filter processor after the Snowflake Table origin that reads from the
SALEStable.Configure the Filter processor to pass only records where
TransactionTypecolumn is null. - Connect the Filter processor to a Snowflake Notification executor.
- Configure the Snowflake Notification executor, specifying the email
notification integration email to use, the users to receive the email, and
the email subject and body.
Then, set the following properties:
- Send Email: Require Minimum Number of Rows
- Required Minimum Number of Rows: 10
With this configuration, the executor sends an email only when it receives 10 or more rows.
Like above, you can add this logic to any pipeline that processes the
SALES table.
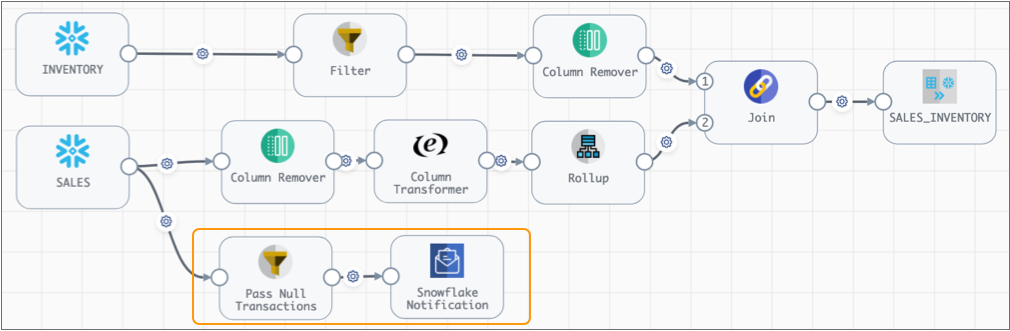
For example, the following pipeline processes data from the
INVENTORY and SALES tables and writes to
another Snowflake table. It also sends an email when the
TransactionType column from the SALES table is
null for more than 10 rows:
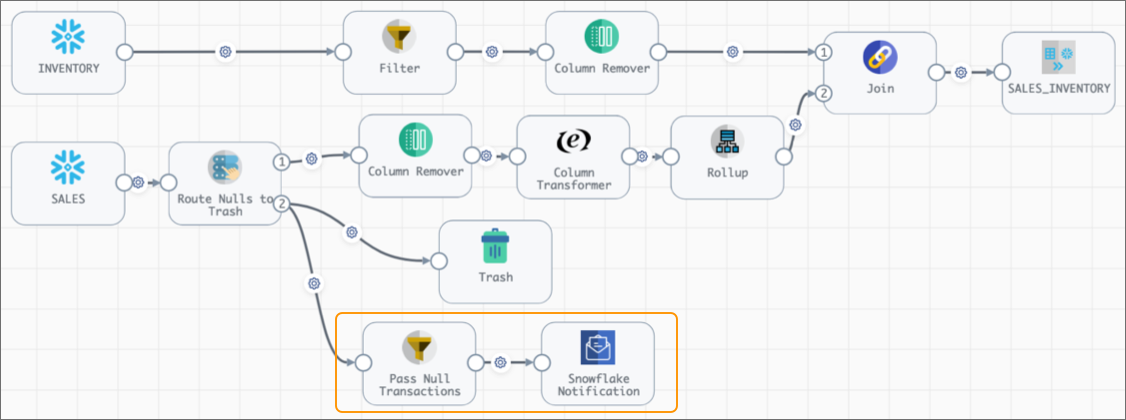
If you also wanted to remove those null transaction type rows from the pipeline, you
could add a Stream Selector processor to route rows where the
TransactionType column is null to the Trash destination, which
drops the rows from the pipeline.
Then, you add the same executor logic to the pipeline, as follows:
The executor is triggered in the same way as the example above, but the pipeline
logic also removes all rows where the TransactionType column in the
SALES table is null.
Send Pipeline Totals
- Add an Aggregate processor that performs a SUM of the
Transaction_Totalcolumn in theSALEStable. - Connect the Aggregate processor to a Snowflake Notification executor.
- Configure the Snowflake Notification executor, specifying the email
notification integration email to use, the users to receive the email, and
the email subject and body.
Then, set the following properties:
- Send Email: Always Send
- Rows to Include in Email: 1
With this configuration, the executor sends an email every time that a pipeline runs and includes the results of the aggregation in the email.
You can add this logic to any pipeline that processes the SALES
table.
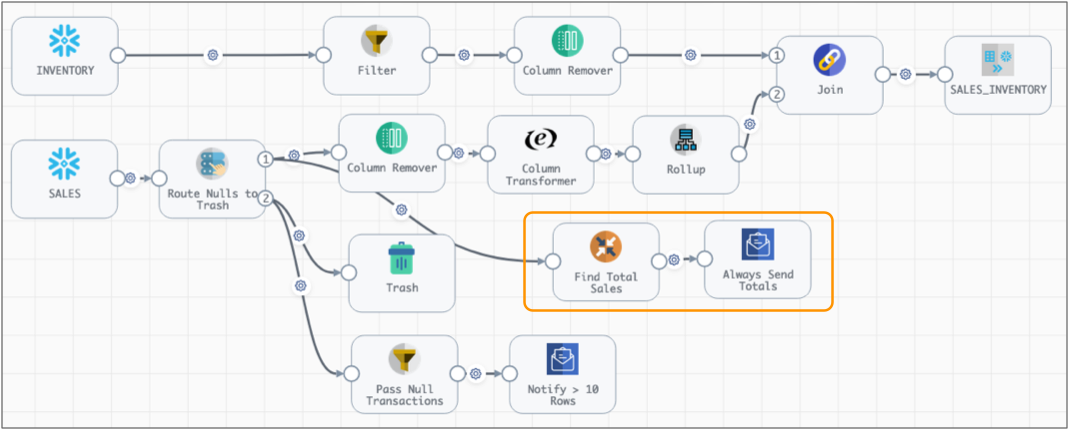
For example, you can add the logic to the high-incidence pipeline, above, that
processes data from the INVENTORY and SALES tables
and writes to another Snowflake table. Then, the Always Send Totals executor sends
an email every time that you run the pipeline, and includes a total of the sales
transactions processed during the pipeline run. Also, the Notify > 10 Rows executor
sends an email when the TransactionType column from the
SALES table is null for more than 10 rows:
Testing Executor Configuration
The Snowflake Notification executor sends email when you run a successful job and the condition specified in the executor has been met.
The executor does not send email when you preview data. However, it does send email when you use a draft run to test pipeline logic.
Create a functioning test pipeline.
Use a small data set to ensure a quick job run.
If you do not have a functioning test pipeline, you can create a simple pipeline with an origin that connects to both the Trash destination and the Snowflake Notification executor.- In the test pipeline, use the same role that you plan to use in a production pipeline.
- Configure the executor to use the same Snowflake email notification integration,
recipients, and notification condition that you want to use for the test. Tip: Specify appropriate text for the test email so recipients are not confused by the test email.
- Click the Draft Run menu in the toolbar, and then select
one of the following options:
- Start Pipeline
- Start with Parameters
The executor should send the email after all pipeline writes complete. If recipients do not receive the email, use these troubleshooting tips to troubleshoot the problem.
Troubleshooting
When the Snowflake Notification executor does not send email as expected, review the logs for the job run, then use the following tips to resolve the problem.
To access job logs, go to the Job Instance page and select the job to view. Then, in the Run History list, click View Summary for the appropriate job run.
- The pipeline completed, but I didn't receive an email (integration not accessible)
- If you see the following message, Transformer for Snowflake cannot contact the email notification integration specified in the
executor:
Failed to send notification.... Integration '<notification integration name>' does not exist or not authorized.... - The pipeline completed, but I didn't receive an email (integration accessible)
- If you see the following message, Transformer for Snowflake can access the email notification object, but the email notification
integration cannot send email.
Failed to send notification... Email recipients in the given list at indexes [<index>] are not allowed. Either these email addresses are not yet validated or do not belong to any user in the current account. - The pipeline completed, but I didn't receive an email (executor not triggered)
- If you see the following message, the specified condition for the Snowflake
Notification executor was not
met:
Notification executor condition is not satisfied. - The executor used to send email, but no longer does
- Check if the executor has been disabled. If needed, select the Enabled property, then check in the pipeline and update the job.
- The executor sends email fine for jobs, but not when I run preview
- Though you can use data preview to test pipeline logic, the executor does not send email when you preview pipeline data. However, the executor does send email when you use a draft run to test pipeline logic.
- The job run log indicates that an email was sent, but I did not receive it
- Check your spam folder or other automatic email routing systems that you use.
Configuring a Snowflake Notification Executor
Configure a Snowflake Notification executor to send an email based on a specified condition after all pipeline writes are complete.
Before you use this executor, complete the prerequisite tasks.
-
On the General tab, configure the following
properties:
General Property Description Name Stage name. Description Optional description. -
On the Email tab, configure the following
properties:
Email Property Description Enabled Enables the executor to send email. Default is enabled. Use to disable the executor to prevent it from sending email without having to remove the executor from the pipeline.
Snowflake Email Integration Name of the Snowflake email notification integration to use. Enter the name of the email notification integration to use. Or, click the Select Snowflake Email Integration icon to explore your Snowflake account and select the notification integration to use.
For information about ensuring access to a valid email notification integration, see Prerequisites.
Email Recipients Email addresses to send email notifications to. Specify the email addresses to use or click the Select Email icon to explore your Snowflake account and select the email addresses to use.
All addresses must be Snowflake users with verified email addresses that are listed in the specified email notification integration. For more information, see Prerequisites.
Important: If one or more of the email addresses are not verified Snowflake user email addresses or not included in the specified notification integration, the executor generates an error and does not send email to any of the listed recipients.Email Subject Subject for the email message. Enter an informative email subject. Email Body Text of the email message to send. You might include useful details such as the pipeline or job name, and the reason why the email has been sent. This property does not support attachments.
Send Email Condition for sending the email: - Always send - Sends the email with each pipeline run.
- Require minimum number of rows - Sends the email only if the specified minimum number of rows is passed to the executor.
Required Minimum Number of Rows Minimum number of rows that must be passed to the executor for the executor to send an email. Available when Send Email is set to Require Minimum Number of Rows. Default is 1.
Rows to Include in Email Number of rows from the data to include in the body of the email. The executor includes up to 10 columns for each row and up to 20 characters for each column.
Maximum rows is 50. Default is 10.