AWS Environments
Applies to: IBM StreamSets as a Service
An Amazon Web Services (AWS) environment represents the Amazon virtual private cloud (VPC) in your AWS account where engines are deployed.
Your AWS administrator must create a VPC in your AWS account and configure automatic or manual AWS credentials for Control Hub to use. You then create an AWS environment in Control Hub that represents the VPC. When you activate the environment, Control Hub connects to the VPC using the configured credentials, provisions the AWS resources needed to run engines, and deploys engine instances to those resources.
While the environment is in an active state, Control Hub periodically verifies that the Amazon VPC exists and that the credentials are valid. Control Hub does not provision engine resources in the VPC until you create and start a deployment for this environment.
Before you create an AWS environment, your AWS administrator must complete several prerequisites.
Feature Versions
When you create an AWS environment, you select the feature version to use for that environment and for all deployments created for the environment. Later feature versions typically require additional permissions in AWS or require a restart of engines belonging to the deployments.
When creating a new environment, use the latest feature version. When a new feature version is available, change your existing environments to use the new feature version as soon as possible.
When needed, you can change an existing environment to use a previous feature version. However, changing to a previous feature version disables any newer features not available in the selected feature version.
AWS environments include the following feature versions:
| Feature Version | Description |
|---|---|
| AWS_2023_12_15 | Includes all features available in the initial feature version, as
well as support for the following enhancements:
|
| AWS_2021_06_01 | Initial version. |
Required Permissions
IAM Policy for AWS_2023_12_15
Use the following sample IAM policy for the AWS_2023_12_15 feature version:
{
    "Version": "2012-10-17",
    "Statement": [
        {
            "Sid": "0",
            "Effect": "Allow",
            "Action": [
                "ec2:DescribeImages",
                "autoscaling:DescribeScalingActivities",
                "ec2:DescribeVpcs",
                "autoscaling:DescribeAutoScalingGroups",
                "ec2:DescribeRegions",
                "autoscaling:DescribeLaunchConfigurations",
                "ec2:DescribeInstanceTypes",
                "ec2:DescribeInstanceTypeOfferings",
                "ec2:DescribeSubnets",
                "ec2:DescribeKeyPairs",
                "ec2:DescribeSecurityGroups",
                "ec2:DescribeInstances",
                "autoscaling:DescribeScheduledActions",
                "autoscaling:DescribeWarmPool",
                "ec2:CreateLaunchTemplate",
                "ec2:DeleteLaunchTemplate",
                "ec2:CreateLaunchTemplateVersion",
                "ec2:DeleteLaunchTemplateVersions",
                "ec2:DescribeLaunchTemplates",
                "ec2:DescribeLaunchTemplateVersions",
                "ec2:RunInstances"
            ],
            "Resource": "*"
        },
        {
            "Sid": "1",
            "Effect": "Allow",
            "Action": [
                "cloudformation:DescribeStacks",
                "cloudformation:CreateStack",
                "cloudformation:DeleteStack",
                "cloudformation:UpdateStack",
                "cloudformation:DescribeStackEvents"
            ],
            "Resource": "arn:aws:cloudformation:*:<ACCOUNT_ID>:stack/StreamSets-*/*"
        },
        {
            "Sid": "2",
            "Effect": "Allow",
            "Action": [
                "ssm:GetParameters",
                "ssm:GetParameter",
                "ssm:PutParameter",
                "ssm:DeleteParameter",
                "ssm:ListTagsForResource",
                "ssm:AddTagsToResource",
                "ssm:RemoveTagsFromResource"
            ],
            "Resource": "arn:aws:ssm:*:<ACCOUNT_ID>:parameter/*"
        },
        {
            "Sid": "3",
            "Effect": "Allow",
            "Action": [
                "autoscaling:CreateLaunchConfiguration",
                "autoscaling:DeleteLaunchConfiguration",
                "autoscaling:UpdateAutoScalingGroup",
                "autoscaling:DeleteAutoScalingGroup",
                "autoscaling:TerminateInstanceInAutoScalingGroup",
                "autoscaling:CreateAutoScalingGroup",
                "autoscaling:CreateOrUpdateTags",
                "autoscaling:DescribeTags",
                "autoscaling:DeleteTags",
                "autoscaling:SetDesiredCapacity"
            ],
            "Resource": [
                "arn:aws:autoscaling:*:<ACCOUNT_ID>:autoScalingGroup:*:autoScalingGroupName/StreamSets-*",
                "arn:aws:autoscaling:*:<ACCOUNT_ID>:launchConfiguration:*:launchConfigurationName/StreamSets-*"
            ]
        },
        {
            "Sid": "4",
            "Effect": "Allow",
            "Action": "iam:PassRole",
            "Resource": "arn:aws:iam::<ACCOUNT_ID>:role/<INSTANCE_PROFILE_NAME>"
        },
        {
            "Sid": "5",
            "Effect": "Allow",
            "Action": "iam:CreateServiceLinkedRole",
            "Resource": "arn:aws:iam::<ACCOUNT_ID>:role/aws-service-role/autoscaling.amazonaws.com/AWSServiceRoleForAutoScaling"
        }
    ]
}
IAM Policy for AWS_2021_06_01
Use the following sample IAM policy for the AWS_2021_06_01 feature version:
{
    "Version": "2012-10-17",
    "Statement": [
        {
            "Sid": "0",
            "Effect": "Allow",
            "Action": [
                "ec2:DescribeImages",
                "autoscaling:DescribeScalingActivities",
                "ec2:DescribeVpcs",
                "autoscaling:DescribeAutoScalingGroups",
                "ec2:DescribeRegions",
                "autoscaling:DescribeLaunchConfigurations",
                "ec2:DescribeInstanceTypes",
                "ec2:DescribeInstanceTypeOfferings",
                "ec2:DescribeSubnets",
                "ec2:DescribeKeyPairs",
                "ec2:DescribeSecurityGroups",
                "ec2:DescribeInstances",
                "autoscaling:DescribeScheduledActions",
                "autoscaling:DescribeWarmPool"
            ],
            "Resource": "*"
        },
        {
            "Sid": "1",
            "Effect": "Allow",
            "Action": [
                "cloudformation:DescribeStacks",
                "cloudformation:CreateStack",
                "cloudformation:DeleteStack",
                "cloudformation:UpdateStack",
                "cloudformation:DescribeStackEvents"
            ],
            "Resource": "arn:aws:cloudformation:*:<ACCOUNT_ID>:stack/StreamSets-*/*"
        },
        {
            "Sid": "2",
            "Effect": "Allow",
            "Action": [
                "ssm:GetParameters",
                "ssm:GetParameter",
                "ssm:PutParameter",
                "ssm:DeleteParameter",
                "ssm:ListTagsForResource",
                "ssm:AddTagsToResource",
                "ssm:RemoveTagsFromResource"
            ],
            "Resource": "arn:aws:ssm:*:<ACCOUNT_ID>:parameter/*"
        },
        {
            "Sid": "3",
            "Effect": "Allow",
            "Action": [
                "autoscaling:CreateLaunchConfiguration",
                "autoscaling:DeleteLaunchConfiguration",
                "autoscaling:UpdateAutoScalingGroup",
                "autoscaling:DeleteAutoScalingGroup",
                "autoscaling:TerminateInstanceInAutoScalingGroup",
                "autoscaling:CreateAutoScalingGroup",
                "autoscaling:CreateOrUpdateTags",
                "autoscaling:DescribeTags",
                "autoscaling:DeleteTags",
                "autoscaling:SetDesiredCapacity"
            ],
            "Resource": [
                "arn:aws:autoscaling:*:<ACCOUNT_ID>:autoScalingGroup:*:autoScalingGroupName/StreamSets-*",
                "arn:aws:autoscaling:*:<ACCOUNT_ID>:launchConfiguration:*:launchConfigurationName/StreamSets-*"
            ]
        },
        {
            "Sid": "4",
            "Effect": "Allow",
            "Action": "iam:PassRole",
            "Resource": "arn:aws:iam::<ACCOUNT_ID>:role/<INSTANCE_PROFILE_NAME>"
        },
        {
            "Sid": "5",
            "Effect": "Allow",
            "Action": "iam:CreateServiceLinkedRole",
            "Resource": "arn:aws:iam::<ACCOUNT_ID>:role/aws-service-role/autoscaling.amazonaws.com/AWSServiceRoleForAutoScaling"
        }
    ]
}
Changing to the AWS_2023_12_15 Feature Version
To change an existing AWS environment to use the AWS_2023_12_15 feature version, you must log in to the AWS Management Console and update the IAM policy for credentials created for the IBM StreamSets AWS environment. Then, you log in to IBM StreamSets and edit the AWS environment to enable the feature version.
After saving the edited environment, Control Hub restarts all deployments belonging to the environment, causing AWS CloudFormation to replace all of the existing EC2 instances.
- Log in to the AWS Management Console.
- Locate the IAM policy for credentials created for the IBM StreamSets AWS environment.
-
Add the permissions in bold to the following section of the existing IAM
policy:
... { "Sid": "0", "Effect": "Allow", "Action": [ "ec2:DescribeImages", "autoscaling:DescribeScalingActivities", "ec2:DescribeVpcs", "autoscaling:DescribeAutoScalingGroups", "ec2:DescribeRegions", "autoscaling:DescribeLaunchConfigurations", "ec2:DescribeInstanceTypes", "ec2:DescribeInstanceTypeOfferings", "ec2:DescribeSubnets", "ec2:DescribeKeyPairs", "ec2:DescribeSecurityGroups", "ec2:DescribeInstances", "autoscaling:DescribeScheduledActions”, "autoscaling:DescribeWarmPool", "ec2:CreateLaunchTemplate", "ec2:DeleteLaunchTemplate", "ec2:CreateLaunchTemplateVersion", "ec2:DeleteLaunchTemplateVersions", "ec2:DescribeLaunchTemplates", "ec2:DescribeLaunchTemplateVersions", "ec2:RunInstances" ], "Resource": "*" }, ... - Log in to IBM StreamSets.
- In the Control Hub Navigation panel, click , click the AWS environment name, and then click Edit.
-
For the Feature Version property, select AWS_2023_12_15
and then click Save.
Control Hub restarts all deployments belonging to the environment.
- Optionally, an organization administrator can update the default feature version to use for all new AWS environments.
Credential Types
You grant Control Hub access to your AWS account using a cross-account role or access keys. Control Hub uses the credentials to access and provision resources in your Amazon VPC. Use a cross-account role for production.
You can configure the credential types in the following ways:
- Automatic cross-account role
-
When you configure an automatic cross-account role, Control Hub prompts you to log in to your AWS account and create a CloudFormation stack named StreamSets-CAR-<Control Hub environment ID>. The CloudFormation stack then automatically generates the following credential resources:
- Cross-account role that Control Hub assumes to perform tasks in your AWS account
- IAM policy for the cross-account role
The IAM policy includes the required permissions for the feature version selected for the AWS environment.
- Default instance profile for the EC2 instances provisioned by child deployments
- IAM policy for the default instance profile
- Manual cross-account role or manual access keys
-
When you configure a manual cross-account role or manual access keys, your AWS administrator must manually create the required credential resources, including IAM policies, instance profiles, and a cross-account role or access keys.
When you delete an AWS environment configured to use manual credentials, your AWS administrator must manually delete the corresponding credential resources created in your AWS account.
The prerequisites that your AWS administrator completes differ, depending on how you choose to configure the credentials.
Prerequisites
- Create an Amazon VPC for the IBM StreamSets AWS environment to use.
- Configure the required credentials that Control Hub uses to access and provision resources in your Amazon VPC. The prerequisites differ, depending on how you choose to configure the credentials:
Create an Amazon VPC
Create an Amazon virtual private cloud (VPC) in your AWS account.
You can use an existing VPC. However, as a best practice, create a new VPC for the exclusive use of each IBM StreamSets AWS environment.
You can use private or public subnets within the VPC network, as long as the subnets can send outbound traffic to the internet.
For instructions on creating a VPC and on allowing subnets internet access, see the Amazon VPC documentation.
Security Group
Assign a security group to the VPC that defines the required inbound and outbound rules. You can use an existing security group or create a new group.
- Inbound and outbound connections required by IBM StreamSets engines, as described in Firewall Configuration.
- Outbound connections to AWS Systems Manager. Add the IP address of the
ssm.<region>.amazonaws.comhost as an allowed destination.For the list of AWS IP addresses, see the AWS documentation.
Automatic Credential Type
When you configure automatic cross-account role credentials, Control Hub prompts you to log in to your AWS account and create a CloudFormation stack. The CloudFormation stack then automatically generates the required credential resources.
Configure a user account with access to the AWS Management Console with the IAM permissions required to create the CloudFormation stack.
The AWS user account requires all permissions listed in this sample IAM policy:
{
   "Version": "2012-10-17",
   "Statement": [
       {
         "Sid": "Statement2",
         "Effect": "Allow",
         "Action": [
             "cloudformation:CreateStack",
             "cloudformation:DeleteStack",
             "cloudformation:CreateChangeSet",
             "cloudformation:GetTemplateSummary",
             "cloudformation:ListStacks",
             "cloudformation:DescribeStacks",
             "cloudformation:DescribeStackEvents",
             "cloudformation:ListStackResources",
             "cloudformation:GetStackPolicy",
             "iam:CreateRole",
             "iam:PassRole",
             "iam:GetRole",
             "iam:DeleteRole",
             "iam:DeleteRolePolicy",
             "iam:PutRolePolicy",
             "iam:GetRolePolicy",
             "iam:AttachRolePolicy",
             "iam:CreateInstanceProfile",
             "iam:DeleteInstanceProfile",
             "iam:AddRoleToInstanceProfile",
             "iam:RemoveRoleFromInstanceProfile"
         ],
         "Resource": "*"
      }
   ]
}
Manual Credential Types
To configure manual credential types, complete the following prerequisites:
- Configure instance profiles to associate with the provisioned EC2 instances.
- Configure the AWS credentials that Control Hub uses to access and provision resources in your Amazon VPC.
Configure Instance Profiles for EC2 Instances
Configure instance profiles for EC2 instances in your AWS account. When Control Hub provisions EC2 instances for an Amazon EC2 deployment belonging to this environment, it associates these instance profiles with the EC2 instances.
- Configure a default instance profile for the environment
- Configure a default instance profile for the parent AWS environment. When you create an Amazon EC2 deployment for this environment, you can simply use the default instance profile configured for the environment.
- Configure a unique instance profile for each deployment
- Do not configure a default instance profile for the parent AWS environment. When you create an Amazon EC2 deployment for this environment, you must configure the instance profile to use for the deployment.
- Configure a default instance profile and override as needed
- Configure a default instance profile for the parent AWS environment. When you create an Amazon EC2 deployment for this environment, you can use the default instance profile configured for the environment, or you can override the default and configure a different instance profile for the deployment to use.
Regardless of how you configure the instance profile for the EC2 instances, you must create the IAM policy and attach it to an instance profile as an AWS environment prerequisite. When you create the IAM policy that you attach to the AWS credentials that Control Hub uses to access your AWS account, you must include the Amazon resource name (ARN) of all instance profiles in that policy. This grants Control Hub the ability to associate the instance profiles with the EC2 instances.
- Create an IAM policy that grants limited access to the provisioned EC2 instances.
- Use the IAM policy with an instance profile.
Create an IAM Policy
Create an IAM policy in AWS that grants limited access to the provisioned EC2 instances. Use the sample policy provided below. You can make compatible changes to the policy as needed.
- In the AWS Console, go to the IAM service.
- In the navigation pane, click Policies, and then click Create policy.
-
In the policy editor, click the JSON tab and paste the
contents of the following sample policy:
{ "Version": "2012-10-17", "Statement": [ { "Sid": "0", "Effect": "Allow", "Action": "ssm:GetParameter", "Resource": "arn:aws:ssm:*:<ACCOUNT_ID>:parameter/StreamSets-Deployment-Token-*" }, { "Sid": "2", "Effect": "Allow", "Action": "s3:*Object*", "Resource": [ "arn:aws:s3:::cloudformation-waitcondition-*" ] } ] } -
Replace the
<ACCOUNT_ID>parameter in the sample policy with your 12-digit AWS account ID. -
When Amazon EC2 deployments managed by this environment are configured to use
an external resource archive file stored in a private Amazon S3 bucket, add the
following additional statement to the IAM policy:
         {
             "Sid": "1",
             "Effect": "Allow",
             "Action": "s3:GetObject*",
             "Resource": [
                  "arn:aws:s3:::*"
             ]
         }
Or, instead of granting read access to all Amazon S3 buckets, restrict access to a specific bucket, as follows:"arn:aws:s3:::<bucket_name>/*"For more information about configuring external resources for deployments, see External Resources.
- Make additional compatible changes to the policy as needed.
- Click Next: Tags.
- Click Review policy.
-
On the Review page, enter a policy name.
For example, to designate that this policy is for the instance profiles used by IBM StreamSets, you might enter the name StreamSets-Instance-Profile-Policy.
- Click Create policy.
Use the Policy with an Instance Profile
In AWS, create an instance profile to associate with the provisioned EC2 instances. You can create a single default instance profile to use for all deployments belonging to the parent environment, or you can create a unique instance profile for each deployment.
- In the AWS Console, go to the IAM service.
- In the navigation pane, click Roles, and then click Create role.
- Select AWS service as the type of trusted entity, and then choose EC2 as the use case.
- Click Next: Permissions.
-
Search for and then select the policy that you created for IBM StreamSets instance profiles.
For example, select StreamSets-Instance-Profile-Policy.
-
Attach any additional policies required by the StreamSets engines running on
the EC2 instances.
For example, if your pipelines process Amazon S3 data, attach an S3 policy to the role as well.
- Click Next: Tags.
- Click Next: Review.
-
On the Review page, enter a role name.
For example, to designate that this role is for IBM StreamSets EC2 deployments, you might enter the name StreamSets-Deployment-EC2-Instance-Profile.
- Click Create role.
-
Click the name of the role to view its details, and then copy the instance
profile ARN.
Be sure to copy the instance profile ARN, and not the role ARN. You will enter this instance profile ARN when you create the AWS environment or Amazon EC2 deployment in Control Hub.
- To use a unique instance profile for each deployment, simply repeat these steps to create another instance profile and attach the same IAM policy to it.
Configure AWS Credentials
You can grant Control Hub access to your AWS account using a manual cross-account role or access keys. Control Hub uses the credentials to access and provision resources in your Amazon VPC. Use a cross-account role for production.
Complete the following steps to configure manual AWS credentials for Control Hub:
- Create an IAM policy that delegates limited access to Control Hub. Create the same policy when using either authentication method.
- Use the IAM policy with a cross-account role or with access keys.
Create an IAM Policy
For either authentication method, create an IAM policy in AWS that delegates limited access to Control Hub. Use the sample policy required for the feature version you plan to use. You can make compatible changes to the policy as needed.
-
Copy one of the following sample policies, based on the feature version that
you plan to use for the AWS environment:
Note: When creating a new environment, use the latest feature version.
- In the AWS Console, go to the IAM service.
- In the navigation pane, click Policies, and then click Create policy.
- In the policy editor, click the JSON tab and paste the contents of the sample IAM policy that you copied in step 1.
-
Replace the following parameters in the sample policy:
Parameter Replacement Value <ACCOUNT_ID>Your 12-digit AWS account ID. <INSTANCE_PROFILE_NAME>Name of the instance profile that you created for EC2 instances provisioned by StreamSets. For example, enter
StreamSets-Deployment-EC2-Instance-Profile.You can make compatible changes to the policy as needed.
-
If you created multiple instance profiles, add each instance profile to the
sample policy as follows, replacing the
<INSTANCE_PROFILE_NAME_n>parameters with the name of each profile that you created:... { "Sid": "4", "Effect": "Allow", "Action": "iam:PassRole", "Resource": [ "arn:aws:iam::<ACCOUNT_ID>:role/<INSTANCE_PROFILE_NAME_1>", "arn:aws:iam::<ACCOUNT_ID>:role/<INSTANCE_PROFILE_NAME_2>" ] }, ...For example, if you created a default instance profile for the environment and then created a second instance profile that one deployment will use to override the default profile, enter both profile names here.
- Click Next: Tags.
- Click Review policy.
-
On the Review page, enter a policy name.
For example, to designate that this policy is for IBM StreamSets environments, you might enter the name StreamSets-Environment-Policy.
- Click Create policy.
Use the Policy with a Cross-Account Role
For cross-account role authentication, create a cross-account role and attach the IAM policy that you created to this role. Control Hub assumes this role to perform tasks in your AWS account.
-
To create a cross-account role, first retrieve the unique external ID generated
for your Control Hub organization.
Important: Using the generated external ID prevents the confused deputy problem and ensures that Control Hub can assume this role only when acting on behalf of your organization.
-
In the Control Hub Navigation panel, click and then click the Create
Environment icon:
 .
.
-
In the Control Hub Navigation panel, click and then click the Create
Environment icon:
- In the AWS Console, go to the IAM service.
- In the navigation pane, click Roles, and then click Create role.
- Select Another AWS account as the type of trusted entity.
-
In the Account ID property, enter the IBM StreamSets AWS account ID based on the Control Hub instance that you use:
- For the ap102.hub.streamsets.com, eu101.hub.streamsets.com, or
na100.hub.streamsets.com instances, use
156041411084as the ID. - For all other instances, use 632637830840 as the ID.
- For the ap102.hub.streamsets.com, eu101.hub.streamsets.com, or
na100.hub.streamsets.com instances, use
- Select Require external ID and paste the external ID that you retrieved from Control Hub.
- Click Next: Permissions.
-
Search for and then select the policy that you created for IBM StreamSets environments.
For example, select StreamSets-Environment-Policy.
- Click Next: Tags.
- Click Next: Review.
-
On the Review page, enter a role name.
For example, to designate that this role is for IBM StreamSets environments, you might enter the name StreamSets-Environment-Role.
- Click Create role.
-
Click the name of the role to view its details, and then copy the role
ARN.
You will enter this ARN when you create the AWS environment in Control Hub.
Use the Policy with Access Keys
For access keys authentication, create an IAM user with programmatic access that uses access keys, and attach the IAM policy that you created to this user. Control Hub uses these access keys to perform tasks in your AWS account.
- In the AWS Console, go to the IAM service.
- In the navigation pane, click Users, and then click Add user.
-
Enter a user name.
For example, to designate that this user is for IBM StreamSets environments, you might enter the name StreamSets-Environment-User.
- For Access type, select Programmatic access.
- Click Next: Permissions.
- Select Attach existing policies directly.
-
Search for and then select the policy that you created for IBM StreamSets environments.
For example, select StreamSets-Environment-Policy.
- Click Next: Tags.
- Click Next: Review.
- Click Create User.
-
Click Download .csv to download a CSV file that contains
the access key ID and secret access key.
You will enter these access keys when you create the AWS environment in Control Hub.
Configuring an AWS Environment
Configure an AWS environment to define where to deploy IBM StreamSets engines in your AWS account.
To create a new environment, click in the Navigation panel, and then click the Create
Environment icon: ![]() . Or, if you saved an incomplete environment when you retrieved the information
required by the prerequisites, simply edit that environment.
. Or, if you saved an incomplete environment when you retrieved the information
required by the prerequisites, simply edit that environment.
To edit an existing environment, click in the Navigation panel, click the environment name, and then click Edit.
Define the Environment
Define the environment essentials, including the environment name and type, and optional tags to identify similar environments.
-
Configure the following properties:
Define Environment Property Description Environment Name Name of the environment. Use a brief name that informs your team of the environment use case.
Environment Type Select one of the following types: Once saved, you cannot change the environment type.
Environment Tags Optional tags that identify similar environments within Control Hub. Use environment tags to easily search and filter environments. Enter nested tags using the following format:
<tag1>/<tag2>/<tag3>Feature Version Feature version to use for the environment and all deployments created for the environment. Each feature version typically requires different permissions or a restart of engines belonging to the deployments.
When creating a new environment, use the latest feature version. When a new feature version is available, change your existing environments to use the new feature version as soon as possible.
-
Optionally, click Show Advanced Options and configure
the following advanced property:
Define Environment Advanced Property Description Allow Nightly Builds Allows deployments for this environment to use nightly engine builds in addition to released engine versions. Also allows Kubernetes environments to use nightly IBM StreamSets Kubernetes agent builds. Nightly builds are for testing features under development and should not be used in production systems.
The version number of a nightly build includes a -SNAPSHOT suffix and the build number. For example, 5.2.0-SNAPSHOT (Build 1013).
-
If creating the environment, click one of the following buttons:
- Cancel - Cancels creating the environment and exits the wizard.
- Save & Next - Saves the environment and continues.
- Save & Exit - Saves the environment and exits the wizard, displaying the incomplete environment in the Environments view.
Configure AWS Credentials
You grant Control Hub access to your AWS account using a cross-account role or access keys. You can configure a cross-account role automatically or manually. You can configure access keys manually only. Control Hub uses the credentials to access and provision resources in your Amazon VPC. Use a cross-account role for production.
For more information about each credential option, see Credential Types.
Configuring Automatic Cross-Account Role
You can use the automatic cross-account role credential type to configure the credentials that Control Hub uses to access and provision resources in your AWS account.
- For the Credential Type property, select Automatic Cross-Account Role.
- Click Generate Cross-Account Role.
-
Sign in to the AWS Management Console using the user account configured as a
prerequisite by your AWS
administrator.
The Quick create stack page displays with the required values automatically populated. Do not change the values.
-
Select the AWS CloudFormation acknowledgement, and then click Create
stack.
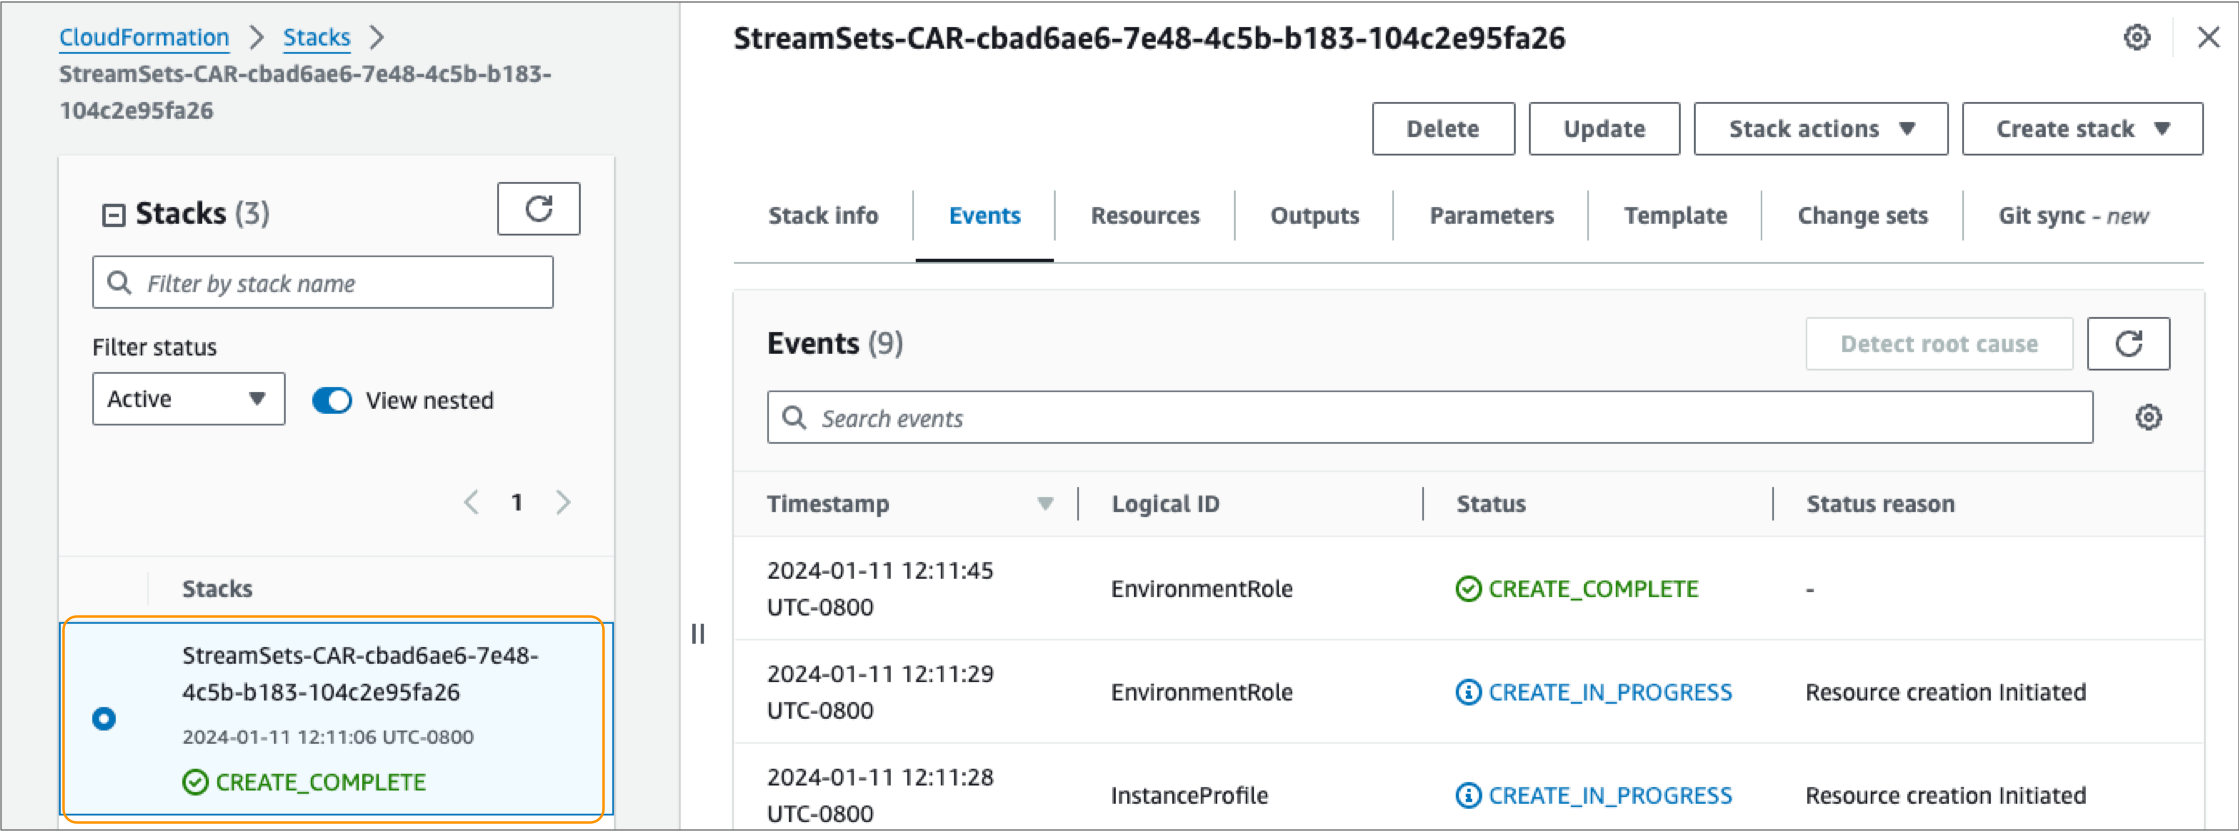
A CloudFormation stack is created with a name StreamSets-CAR-<Control Hub environment ID>.
It can take a few minutes for the CloudFormation stack to generate the required resources. When finished, the stack displays a Create Complete status as follows:
-
Optionally, make compatible changes to the generated IAM policy attached to the
default instance profile.
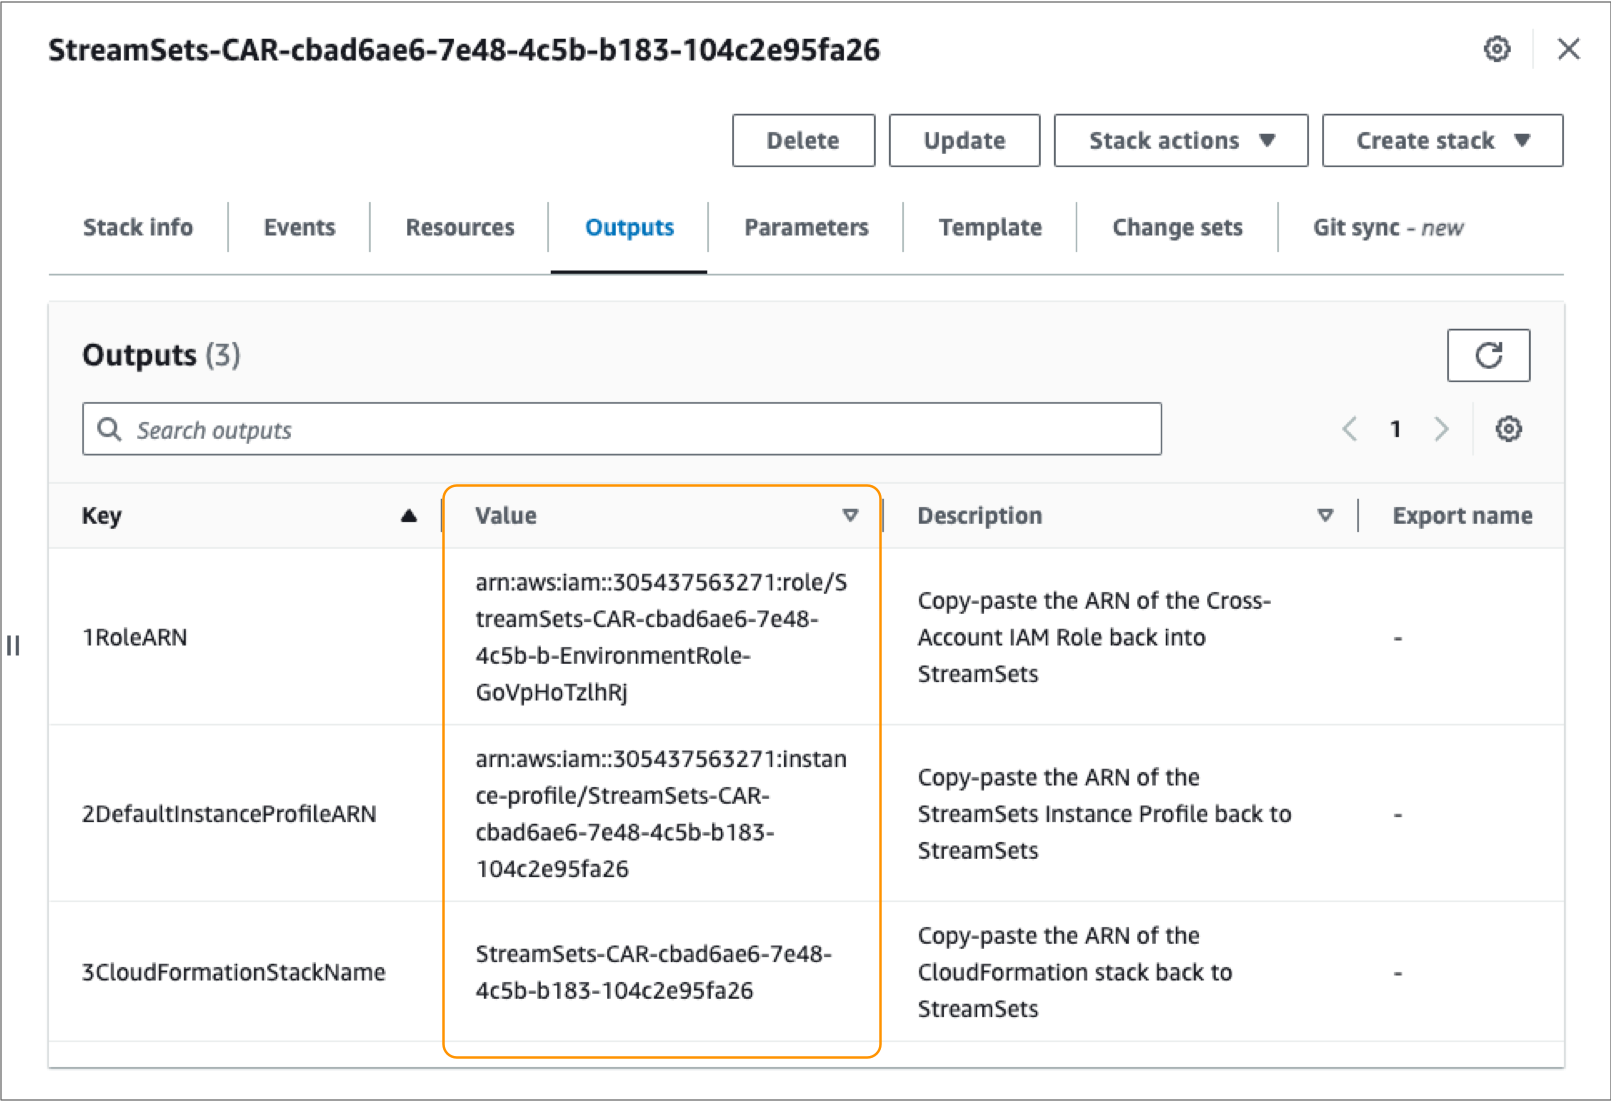
- Click the Outputs tab.
-
Copy the following values:
- Role ARN
- Default Instance Profile ARN
- CloudFormation Stack Name
-
In the StreamSets Control Hub New Environment wizard, paste the values into the following properties:
Credentials Property Description Role ARN Amazon resource name (ARN) of the cross-account role automatically generated in your AWS account. Enter using the following format: arn:aws:iam::<account_id>:role/<role_name>Default Instance Profile Default instance profile to associate with the EC2 instances provisioned for all deployments belonging to this environment. Enter the instance profile ARN of the instance profile automatically generated in your AWS account. Use the following format: arn:aws:iam::<account_id>:instance-profile/<role_name>CloudFormation Stack Name Name of the CloudFormation stack automatically generated in your AWS account. Control Hub manages this stack for you. -
When needed, you can reset the configured credentials by clicking the
Delete icon (
 ) next to the Credential Type property.
Note: Resetting the credentials simply clears the configured credential values in the deployment wizard. Your AWS administrator must manually delete the previously generated CloudFormation stack created in your AWS account.
) next to the Credential Type property.
Note: Resetting the credentials simply clears the configured credential values in the deployment wizard. Your AWS administrator must manually delete the previously generated CloudFormation stack created in your AWS account. -
If creating the environment, click one of the following buttons:
- Back - Returns to the previous step in the wizard.
- Save & Next - Saves the environment and continues.
- Save & Exit - Saves the environment and exits the wizard, displaying the incomplete environment in the Environments view.
Configuring Manual Cross-Account Role
You can use the manual cross-account role credential type to configure the credentials that Control Hub uses to access and provision resources in your AWS account.
-
Configure the following properties:
Credentials Property Description Credential Type Type of credentials to authenticate with AWS. Select Manual Cross-Account Role.
External ID Unique ID generated for your organization. Copy the ID so that your AWS administrator can create the cross-account role as an environment prerequisite. Role ARN Amazon resource name (ARN) of the cross-account role created as an environment prerequisite by your AWS administrator. Enter using the following format: arn:aws:iam::<account_id>:role/<role_name>Default Instance Profile Optional instance profile to associate with the EC2 instances provisioned for all deployments belonging to this environment. Enter the instance profile ARN of the instance profile created as a prerequisite by your AWS administrator. Use the following format: arn:aws:iam::<account_id>:instance-profile/<role_name>If you do not define a default instance profile, then you must define an instance profile when you create a deployment for this environment.
-
If creating the environment, click one of the following buttons:
- Back - Returns to the previous step in the wizard.
- Save & Next - Saves the environment and continues.
- Save & Exit - Saves the environment and exits the wizard, displaying the incomplete environment in the Environments view.
Configuring Manual Access Keys
You can use the manual access keys credential type to configure the credentials that Control Hub uses to access and provision resources in your AWS account.
-
Configure the following properties:
Credentials Property Description Credential Type Type of credentials to authenticate with AWS. Select Manual Access Keys.
Access Key ID AWS access key ID downloaded as an environment prerequisite by your AWS administrator. Secret Access Key AWS secret access key downloaded as an environment prerequisite by your AWS administrator. Default Instance Profile Optional instance profile to associate with the EC2 instances provisioned for all deployments belonging to this environment. Enter the instance profile ARN of the instance profile created as a prerequisite by your AWS administrator. Use the following format: arn:aws:iam::<account_id>:instance-profile/<role_name>If you do not define a default instance profile, then you must define an instance profile when you create a deployment for this environment.
-
If creating the environment, click one of the following buttons:
- Back - Returns to the previous step in the wizard.
- Save & Next - Saves the environment and continues.
- Save & Exit - Saves the environment and exits the wizard, displaying the incomplete environment in the Environments view.
Select the AWS Region
Select the AWS region for the Amazon VPC created as a prerequisite by your AWS administrator.
- Select the AWS region where the VPC is located.
-
If creating the environment, click one of the following buttons:
- Back - Returns to the previous step in the wizard.
- Save & Next - Saves the environment and continues.
- Save & Exit - Saves the environment and exits the wizard, displaying the incomplete environment in the Environments view.
Configure the AWS VPC
Select the Amazon VPC created as a prerequisite by your AWS administrator, and optionally define AWS tags to apply to provisioned AWS resources.
-
Configure the following properties:
VPC Property Description VPC ID ID of the Amazon VPC created as an environment prerequisite by your AWS administrator. AWS Tags AWS tags to apply to all AWS resources provisioned for this environment. Enter the tags as key-value pairs. For tag naming requirements, see the AWS documentation.
You can define the tags using simple or bulk edit mode. In simple edit mode, click Add Another to define additional tags. In bulk edit mode, configure tags in JSON format.
Important: These tags are applied to AWS resources, not to Control Hub environments. -
If creating the environment, click one of the following buttons:
- Back - Returns to the previous step in the wizard.
- Save & Next - Saves the environment and continues.
- Save & Exit - Saves the environment and exits the wizard, displaying the incomplete environment in the Environments view.
Configure AWS Subnets
Select the subnets and security group to use within the Amazon VPC created as a prerequisite by your AWS administrator.
-
Configure the following properties:
Subnet Property Description Subnet IDs Subnet IDs within the VPC to use to provision AWS resources. Select one or more available subnet IDs.
Security Group ID Security group ID assigned to the VPC. The security group must meet the requirements as described in Security Group.
-
If creating the environment, click one of the following buttons:
- Back - Returns to the previous step in the wizard.
- Save & Next - Saves the environment and continues.
- Save & Exit - Saves the environment and exits the wizard, displaying the incomplete environment in the Environments view.
Share the Environment
By default, the environment can only be seen by you. Share the environment with other users and groups to grant them access to it.
- In the Select Users and Groups field, type a user email address or a group name.
-
Select users or groups from the list, and then click
Add.
The added users and groups display in the User / Group table.
-
Modify permissions as needed. By default, each added user
or group is granted the following permissions:
- Read - View the details of the environment. Create and edit a deployment for the environment.
- Write - Edit, activate, deactivate, and delete the environment.
For more information, see Environment Permissions.
-
Click one of the following buttons:
- Back - Returns to the previous step in the wizard.
- Save & Next - Saves the environment and continues.
- Save & Exit - Saves the environment and exits the wizard, displaying the incomplete environment in the Environments view.
Review and Activate the Environment
You've successfully finished creating the environment. Activate the environment so that you can create deployments for the environment.
- Exit - Saves the environment and exits the wizard, displaying the Deactivated environment in the Environments view.
- Activate & Add Deployment - Activates the environment and opens the deployment wizard so that you can create a deployment for the environment.
- Activate & Exit - Activates the environment and exits the wizard, displaying the Active environment in the Environments view.