Azure Environments
Applies to: IBM StreamSets as a Service
A Microsoft Azure (Azure) environment represents the Azure virtual network (VNet) in your Azure account where engines are deployed.
Your Azure administrator must create a VNet in your Azure account and configure Azure credentials for Control Hub to use. You then create an Azure environment in Control Hub that represents the VNet. When you activate the environment, Control Hub connects to the VNet using the configured credentials, provisions the Azure resources needed to run engines, and deploys engine instances to those resources.
While the environment is in an active state, Control Hub periodically verifies that the Azure VNet exists and that the credentials are valid. Control Hub does not provision resources in the VNet until you create and start a deployment for this environment.
Before you create an Azure environment, your Azure administrator must complete several prerequisites.
Feature Versions
At this time, Azure environments include the initial AZURE_2022_10_22 feature version that includes all available features for Azure environments and deployments.
Prerequisites
- Register the Azure resource providers for your subscription.
- Create an Azure VNet for the IBM StreamSets Azure environment to use.
- Configure the Azure credentials that Control Hub uses to access and provision resources in your Azure VNet.
- Configure managed identities to associate with the provisioned VM instances.
- Configure resource groups that the provisioned VM instances are assigned to.
Register Azure Resource Providers
Verify that your Azure subscription is registered for the Microsoft.KeyVault resource provider.
For instructions on registering Azure resource providers, see the Azure Resource Manager documentation.
Create an Azure VNet
Create an Azure virtual network (VNet) in your Azure account.
You can use an existing VNet. However, as a best practice, create a new VNet for the exclusive use of each IBM StreamSets Azure environment.
You can use private or public subnets within the VNet, as long as the subnets can send outbound traffic to the internet.
You can configure the VNet to use the default Azure-provided DNS servers or to use custom DNS servers. If using custom DNS servers, then you must include a specific init script for all Azure VM deployments created for this environment.
For instructions on creating a VNet and on allowing subnets internet access, see the Azure Virtual Network documentation.
Network Security Group
Create a network security group that defines the required inbound and outbound rules to the VNet. You can use an existing network security group or create a new group.
- Inbound and outbound connections required by IBM StreamSets engines, as described in Firewall Configuration.
- Outbound connections to Azure Key Vault. Add the IP address of the
https://vault.azure.nethost as an allowed destination.For the list of Azure IP addresses, download the list of Azure IP ranges and service tags from this Microsoft Azure page.
Configure Azure Credentials
You grant Control Hub access to your Azure account using a service principal with a client secret. Control Hub uses the credentials to access and provision resources in your Azure VNet.
Complete the following steps to configure Azure credentials for Control Hub:
- Application (client) ID
- Client secret
- Directory (tenant) ID
- Subscription ID
Register an Application and Create a Service Principal
Use the Azure portal to register a Microsoft Entra ID (previously known as Azure AD) application. When you register an application using the Azure portal, a service principal is created automatically. The service principal functions as the identity of the application instance.
After registering the application, create a client secret for the service principal to use for authentication with Entra ID. Control Hub uses this service principal to perform tasks in your Azure account.
- In the Azure portal, enter Microsoft Entra ID in the services search field.
- Click Microsoft Entra ID.
- In the left navigation, click App registrations.
- Click New registration.
-
Enter a name for the application.
For example, to designate that this application is for IBM StreamSets environments, you might enter the name StreamSets-Environment-Application.
- Under Supported account types, select Accounts in this organizational directory only.
- Click Register.
-
In the Overview tab for the application, copy the following values:
- Application (client) ID
- Directory (tenant) ID
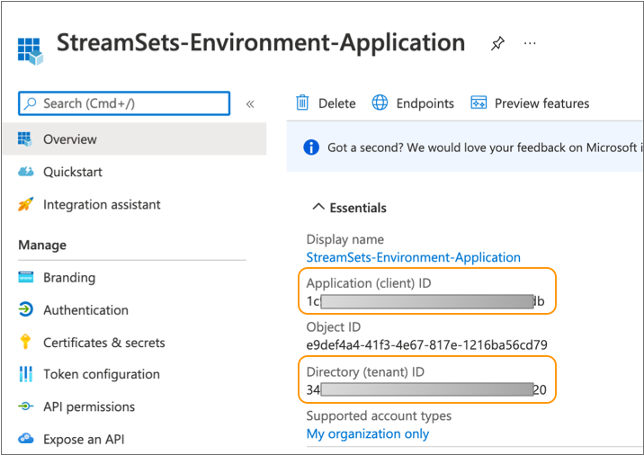
You will enter these values when you create the Azure environment in Control Hub.
- In the left navigation, click Certificates & secrets.
- Under Client secrets, click New client secret.
-
Enter a description for the secret, and select a duration.
Important: Choose a duration that matches the amount of time you anticipate using the Azure environment in Control Hub. When the secret expires, you must create a new secret and then update the environment in Control Hub.
- Click Add.
-
Copy the displayed value for the secret.
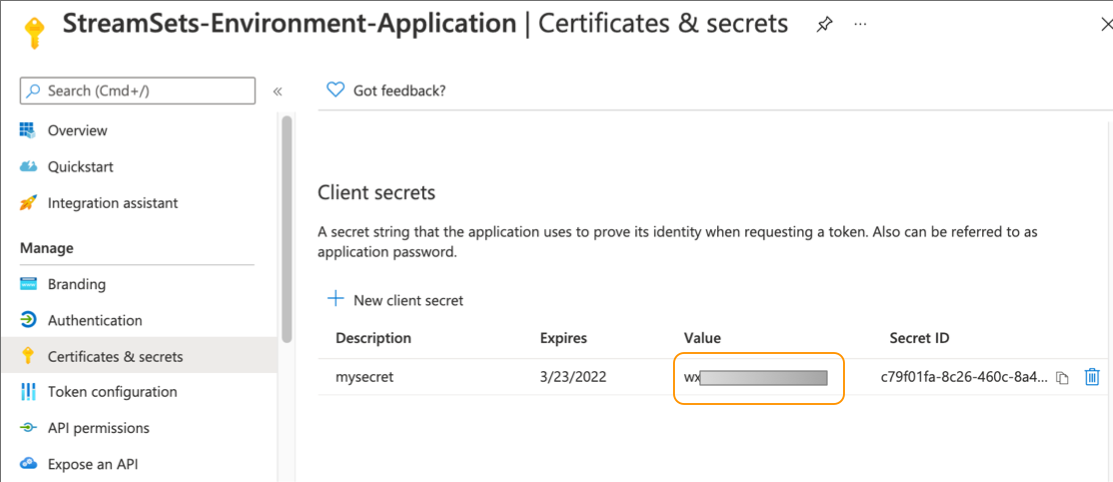
You will enter the client secret when you create the Azure environment in Control Hub.
Create and Assign a Custom Role to the Application
Create a custom role in Azure that delegates limited access to Control Hub. Grant the role the permissions that IBM StreamSets requires. You can make compatible changes to the permissions as needed.
- In the Azure portal, enter Subscriptions in the services search field.
- Click Subscriptions.
-
In the list of subscriptions, copy the subscription ID where you want Control Hub to provision Azure resources.
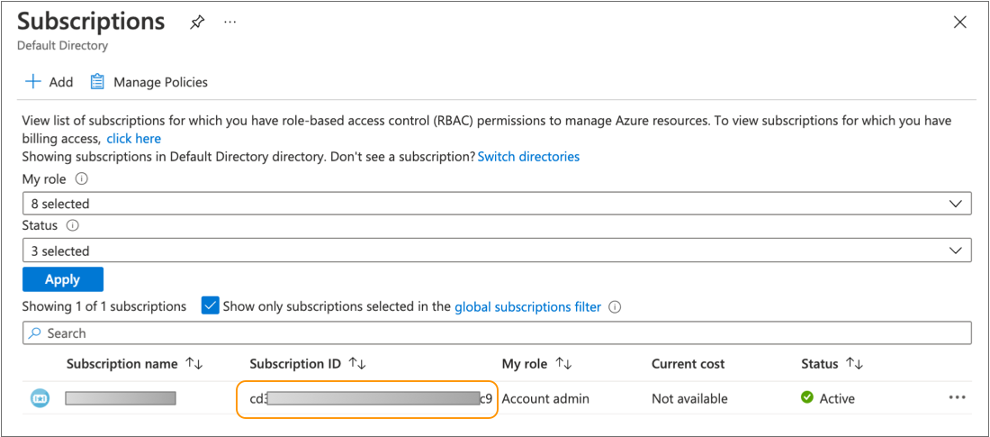
You will enter the subscription ID when you create the Azure environment in Control Hub.
- Click the subscription name.
- In the left navigation, click Access control (IAM).
- Click .
-
Enter a name for the role.
For example, to designate that this role is for IBM StreamSets environments, you might enter the name StreamSets-Environment-Role.
- Click the JSON tab to define the role in JSON format.
- Click Edit to open the JSON editor.
-
Replace the
permissionsproperty with the following required permissions:"permissions": [ { "actions": [ "Microsoft.KeyVault/vaults/read", "Microsoft.KeyVault/vaults/write", "Microsoft.KeyVault/vaults/delete", "Microsoft.KeyVault/locations/deletedVaults/purge/action", "Microsoft.KeyVault/locations/deletedVaults/read", "Microsoft.KeyVault/deletedVaults/read", "Microsoft.ManagedIdentity/userAssignedIdentities/assign/action", "Microsoft.ManagedIdentity/userAssignedIdentities/read", "Microsoft.Network/networkSecurityGroups/read", "Microsoft.Network/virtualNetworks/subnets/read", "Microsoft.Network/publicIPAddresses/write", "Microsoft.Network/publicIPAddresses/read", "Microsoft.Network/publicIPAddresses/delete", "Microsoft.Network/virtualNetworks/read", "Microsoft.Compute/sshPublicKeys/read", "Microsoft.Compute/virtualMachineScaleSets/read", "Microsoft.Compute/virtualMachineScaleSets/write", "Microsoft.Compute/virtualMachineScaleSets/delete", "Microsoft.Resources/subscriptions/resourceGroups/read", "Microsoft.Resources/deployments/read", "Microsoft.Resources/deployments/write", "Microsoft.Resources/deployments/delete", "Microsoft.Resources/deployments/operations/read", "Microsoft.Resources/deployments/operationstatuses/read", "Microsoft.KeyVault/vaults/secrets/write", "Microsoft.KeyVault/vaults/secrets/read", "Microsoft.Network/virtualNetworks/subnets/join/action", "Microsoft.Network/virtualNetworks/join/action", "Microsoft.Network/networkSecurityGroups/join/action", "Microsoft.Network/publicIPAddresses/join/action", "Microsoft.Compute/galleries/images/versions/read", "Microsoft.Compute/galleries/images/read" ], "notActions": [], "dataActions": [], "notDataActions": [] } ]You can make compatible changes to the permissions as needed.
- Click Save.
- Click Next, and then click Create and then OK.
- With Access control (IAM) selected in the left navigation, click .
-
Search for and then select the role that you created for IBM StreamSets environments.
For example, select StreamSets-Environment-Role.
- For Assign access to, select User, group, or service principal.
-
Search for and then select the application or service principal that you
created for IBM StreamSets environments.
For example, select StreamSets-Environment-Application, as follows:
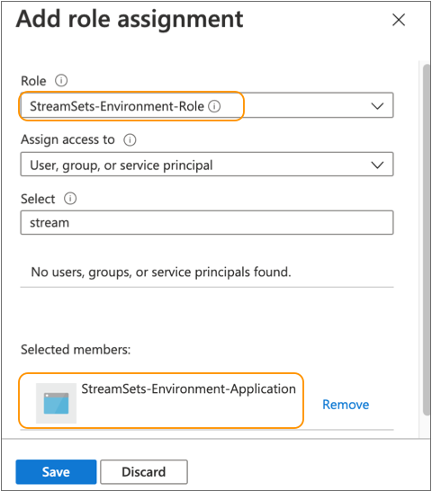
- Click Save.
Configure Managed Identities for VM Instances
Configure user-assigned managed identities for VM instances in your Azure account. When Control Hub provisions VM instances for an Azure VM deployment belonging to this environment, it associates these managed identities with the VM instances.
You can configure the user-assigned managed identity used by a deployment in the following ways:
- Configure a default managed identity for the environment
- Create a default managed identity for the parent Azure environment. When you create an Azure VM deployment for this environment, you can simply use the default managed identity configured for the environment.
- Configure a unique managed identity for each deployment
- Do not configure a default managed identity for the parent Azure environment. When you create an Azure VM deployment for this environment, you must configure the managed identity to use for the deployment.
- Configure a default managed identity and override as needed
- Configure a default managed identity for the parent Azure environment. When you create an Azure VM deployment for this environment, you can use the default managed identity configured for the environment, or you can override the default and configure a different managed identity for the deployment to use.
For more information on Azure managed identities, see the Azure Active Directory documentation.
Create a Managed Identity
In Azure, create a user-assigned managed identity to associate with the provisioned VM instances. You can create a single default managed identity to use for all deployments belonging to the parent environment, or you can create a unique managed identity for each deployment.
Control Hub grants the managed identity the required permissions when it associates the managed identity with the provisioned VM instances.
Additionally, when Azure VM deployments managed by this environment are configured to use an external resource archive file stored in a private Azure Blob Storage or Azure Data Lake Storage Gen2 container, the managed identity requires read access to the container.
- In the Azure portal, enter Managed Identities in the services search field.
- Click Managed Identities.
- Click Create.
- Select the same subscription where you registered the application.
- Select a resource group and region for the managed identity.
-
Enter a name for the managed identity.
For example, to designate that this managed identity is for IBM StreamSets environments, you might enter the name StreamSets-Environment-Managed-Identity.
- Click Review & Create, and then click Create.
-
Optionally, when Azure VM deployments managed by this environment are
configured to use an external resource archive file stored in a private
container, grant the managed identity read access to the container.
You can grant the managed identity the Storage Blob Data Reader built-in role. Or, instead of granting read access to all Azure containers, create a custom role using the following JSON format to restrict access to a specific container, and then assign the custom role to the managed identity:
{
    "id": "/subscriptions/<subscription_ID>/providers/Microsoft.Authorization/roleDefinitions/<role_ID>",
    "properties": {
        "roleName": "<role_name>",
        "description": "",
        "assignableScopes": [
            "/subscriptions/<subscription_ID>/resourceGroups/<resource_group>/providers/Microsoft.Storage/storageAccounts/<container_name>"
        ],
        "permissions": [
            {
                "actions": [],
                "notActions": [],
                "dataActions": [
                    "Microsoft.Storage/storageAccounts/blobServices/containers/blobs/read"
                ],
                "notDataActions": []
            }
        ]
    }
}
For more information about configuring external resources for deployments, see External Resources.
- Click the managed identity name, and then in the left navigation, click .
-
Copy the Resource ID of the managed identity.
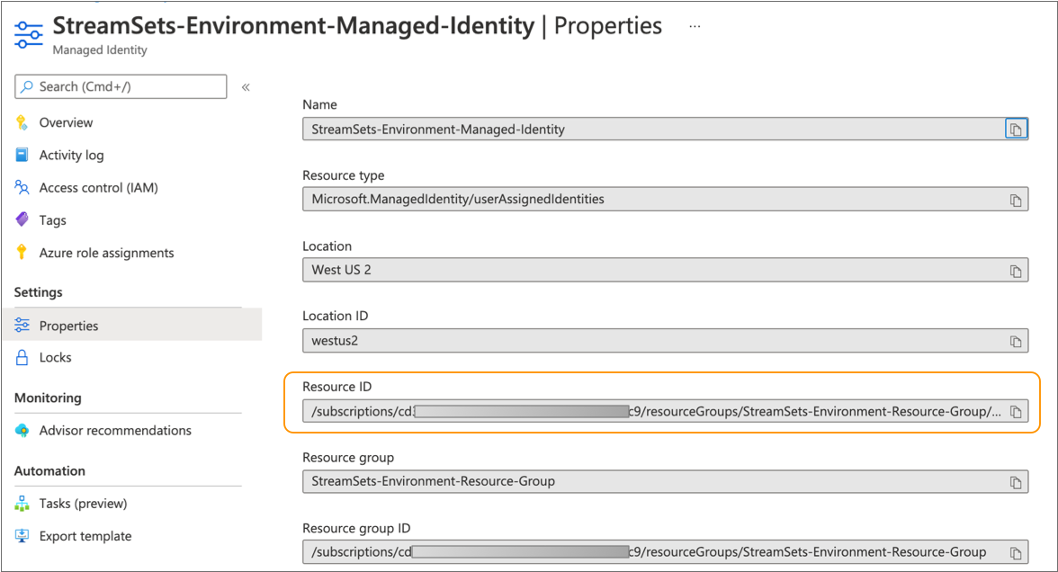
You will enter the managed identity resource ID when you create the Azure environment in Control Hub.
Configure Resource Groups for VM Instances
Configure resource groups for VM instances in your Azure account. When Control Hub provisions VM instances for an Azure VM deployment belonging to this environment, it assigns the VM instances to these resource groups.
You can configure the resource group used by a deployment in the following ways:
- Configure a default resource group for the environment
- Create a default resource group for the parent Azure environment. When you create an Azure VM deployment for this environment, you can simply use the default resource group configured for the environment.
- Configure a unique resource group for each deployment
- Do not configure a default resource group for the parent Azure environment. When you create an Azure VM deployment for this environment, you must configure the resource group to use for the deployment.
- Configure a default resource group and override as needed
- Configure a default resource group for the parent Azure environment. When you create an Azure VM deployment for this environment, you can use the default resource group configured for the environment, or you can override the default and configure a different resource group for the deployment to use.
For instructions on managing Azure resource groups, see the Azure Resource Manager documentation.
Note the names of the resource groups that you configure. You will enter the resource group names when you create Azure environments or deployments in Control Hub.
Configuring an Azure Environment
To create a new environment, click in the Navigation panel, and then click the Create
Environment icon: ![]() .
.
To edit an existing environment, click in the Navigation panel, click the environment name, and then click Edit.
Define the Environment
Define the environment essentials, including environment name and type, and optional tags to identify similar environments.
-
Configure the following properties:
Define Environment Property Description Environment Name Name of the environment. Use a brief name that informs your team of the environment use case.
Environment Type Select Microsoft Azure. Once saved, you cannot change the environment type.
Environment Tags Optional tags that identify similar environments within Control Hub. Use environment tags to easily search and filter environments. Enter nested tags using the following format:
<tag1>/<tag2>/<tag3>Feature Version Feature version to use for the environment and all deployments created for the environment. Each feature version typically requires different permissions or a restart of engines belonging to the deployments.
When creating a new environment, use the latest feature version. When a new feature version is available, change your existing environments to use the new feature version as soon as possible.
-
Optionally, click Show Advanced Options and configure
the following advanced property:
Define Environment Advanced Property Description Allow Nightly Builds Allows deployments for this environment to use nightly engine builds in addition to released engine versions. Nightly builds are for testing features under development and should not be used in production systems.
The version number of a nightly build includes a -SNAPSHOT suffix and the build number. For example, 5.2.0-SNAPSHOT (Build 1013).
-
If creating the environment, click one of the following buttons:
- Cancel - Cancels creating the environment and exits the wizard.
- Save & Next - Saves the environment and continues.
- Save & Exit - Saves the environment and exits the wizard, displaying the incomplete environment in the Environments view.
Configure Azure Credentials
-
Configure the following properties:
Credentials Property Description Credential Type Type of credentials to authenticate with Azure. At this time, StreamSets supports service principal with a client secret authentication.
Client ID Client (application) ID of the Azure application registered as a prerequisite by your Azure administrator. When an application is registered, a service principal is automatically created. The service principal functions as the identity of the application instance.
Client Secret Client secret of the Azure application created as a prerequisite by your Azure administrator. Control Hub uses the service principal with this client secret to authenticate with Azure.
Tenant ID Tenant (directory) ID of the Azure application registered as a prerequisite by your Azure administrator. Subscription ID Subscription ID where you want Control Hub to provision Azure resources for all deployments belonging to this environment. -
If creating the environment, click one of the following buttons:
- Back - Returns to the previous step in the wizard.
- Save & Next - Saves the environment and continues.
- Save & Exit - Saves the environment and exits the wizard, displaying the incomplete environment in the Environments view.
Select the Azure Region
Select the region for the Azure VNet created as a prerequisite by your Azure administrator.
- Select the Azure region where the VNet is located.
-
If creating the environment, click one of the following buttons:
- Back - Returns to the previous step in the wizard.
- Save & Next - Saves the environment and continues.
- Save & Exit - Saves the environment and exits the wizard, displaying the incomplete environment in the Environments view.
Configure Defaults for Azure VM Instances
Optionally, configure the default managed identity and resource group to associate with the VM instances provisioned for all deployments belonging to this environment.
-
Configure the following properties:
Defaults for VM Instances Property Description Default Managed Identity Optional managed identity to associate with the VM instances provisioned for all deployments belonging to this environment. Enter the resource ID of the managed identity created as a prerequisite by your Azure administrator. Use the following format: /subscriptions/<subscription ID>/resourceGroups/<resource group name>/providers/Microsoft.ManagedIdentity/userAssignedIdentities/<managed identity name>If you do not define a default managed identity, then you must define a managed identity when you create a deployment for this environment.
Default Resource Group Optional resource group that the VM instances are assigned to - for all provisioned Azure VM deployments belonging to this environment. Enter the name of the resource group created as a prerequisite by your Azure administrator. If you do not define a default resource group, then you must define a resource group when you create a deployment for this environment.
-
If creating the environment, click one of the following buttons:
- Back - Returns to the previous step in the wizard.
- Save & Next - Saves the environment and continues.
- Save & Exit - Saves the environment and exits the wizard, displaying the incomplete environment in the Environments view.
Configure the Azure VNet
Select the Azure VNet created as a prerequisite by your Azure administrator, and optionally define Azure tags to apply to provisioned Azure resources.
-
Configure the following properties:
VNet Property Description VNet ID ID of the Azure VNet created as an environment prerequisite by your Azure administrator. Azure Tags Tags to apply to all Azure resources provisioned for this environment. Enter the tags as key-value pairs. For tag naming requirements, see the Azure Resource Manager documentation.
You can define the tags using simple or bulk edit mode. In simple edit mode, click Add Another to define additional tags. In bulk edit mode, configure tags in JSON format.
Important: These tags are applied to Azure resources, not to Control Hub environments. -
If creating the environment, click one of the following buttons:
- Back - Returns to the previous step in the wizard.
- Save & Next - Saves the environment and continues.
- Save & Exit - Saves the environment and exits the wizard, displaying the incomplete environment in the Environments view.
Configure the Azure Subnet
Select the subnet and security group to use within the Azure VNet created as a prerequisite by your Azure administrator.
-
Configure the following properties:
Subnet Property Description Subnet ID Subnet ID within the VNet to use to provision Azure resources. Security Group ID Network security group ID to use for the VNet. The network security group must meet the requirements as described in Network Security Group.
-
If creating the environment, click one of the following buttons:
- Back - Returns to the previous step in the wizard.
- Save & Next - Saves the environment and continues.
- Save & Exit - Saves the environment and exits the wizard, displaying the incomplete environment in the Environments view.
Share the Environment
By default, the environment can only be seen by you. Share the environment with other users and groups to grant them access to it.
- In the Select Users and Groups field, type a user email address or a group name.
-
Select users or groups from the list, and then click
Add.
The added users and groups display in the User / Group table.
-
Modify permissions as needed. By default, each added user
or group is granted the following permissions:
- Read - View the details of the environment. Create and edit a deployment for the environment.
- Write - Edit, activate, deactivate, and delete the environment.
For more information, see Environment Permissions.
-
Click one of the following buttons:
- Back - Returns to the previous step in the wizard.
- Save & Next - Saves the environment and continues.
- Save & Exit - Saves the environment and exits the wizard, displaying the incomplete environment in the Environments view.
Review and Activate the Environment
You've successfully finished creating the environment. Activate the environment so that you can create deployments for the environment.
- Exit - Saves the environment and exits the wizard, displaying the Deactivated environment in the Environments view.
- Activate & Add Deployment - Activates the environment and opens the deployment wizard so that you can create a deployment for the environment.
- Activate & Exit - Activates the environment and exits the wizard, displaying the Active environment in the Environments view.