Kubernetes Environments
A Kubernetes environment represents the namespace in your Kubernetes cluster where StreamSets engines are deployed.
Your Kubernetes administrator must create a namespace in the cluster and allow resources that run in that namespace outbound access to Control Hub. You then create a Kubernetes environment in Control Hub that represents the namespace. When you activate the environment, Control Hub generates a StreamSets Kubernetes agent installation script and YAML file. You can use the script or the YAML file to launch an agent in the namespace.
While the environment is in an active state, the StreamSets Kubernetes agent periodically checks with Control Hub to retrieve requests. When you create and start a deployment for the environment, the agent communicates with Control Hub to provision the Kubernetes resources needed to run engines and to deploy engine instances to those resources.
When you deactivate the environment, the IBM StreamSets Kubernetes agent is deleted from the namespace. When you activate the environment again, you must use the agent installation script or YAML file to relaunch the agent.
Before you create a Kubernetes environment, your Kubernetes administrator must complete several prerequisites.
Kubernetes Agent
An IBM StreamSets Kubernetes agent is an application that runs in your Kubernetes cluster. An agent communicates with Control Hub to provision the Kubernetes resources needed to run engines and to deploy engine instances to those resources.
When you activate a Kubernetes environment, Control Hub generates a Kubernetes agent installation script and YAML file. You can use the script or the YAML file to launch the agent in the namespace.
The agent runs as a Kubernetes deployment with a single pod. Each Kubernetes environment that you create in Control Hub corresponds to a single IBM StreamSets Kubernetes agent that runs in the specified Kubernetes namespace. Run only a single agent in each namespace.
The agent uses encrypted REST APIs to communicate with Control Hub, initiating outbound connections to Control Hub over HTTPS. The agent sends requests and information to Control Hub. Control Hub does not directly send requests to the agent. Instead, the agent regularly checks with Control Hub to retrieve requests, such as creating or updating Kubernetes deployments in the namespace.
When you start a Control Hub deployment that belongs to the Kubernetes environment, the agent retrieves that request and creates and monitors a YAML file describing the required resources. The YAML file creates a single Kubernetes deployment and secret in the Kubernetes namespace. The YAML file also creates a horizontal pod autoscaler if the Control Hub deployment is configured to allow legacy autoscaling. The Kubernetes deployment then creates a replica set to ensure that enough pods are created, with each pod running a single engine instance.
When you update a Control Hub deployment that belongs to the Kubernetes environment, the agent retrieves the update request from Control Hub, and then the modified YAML file applies the updates to the engine instances running in the Kubernetes deployment.
Example
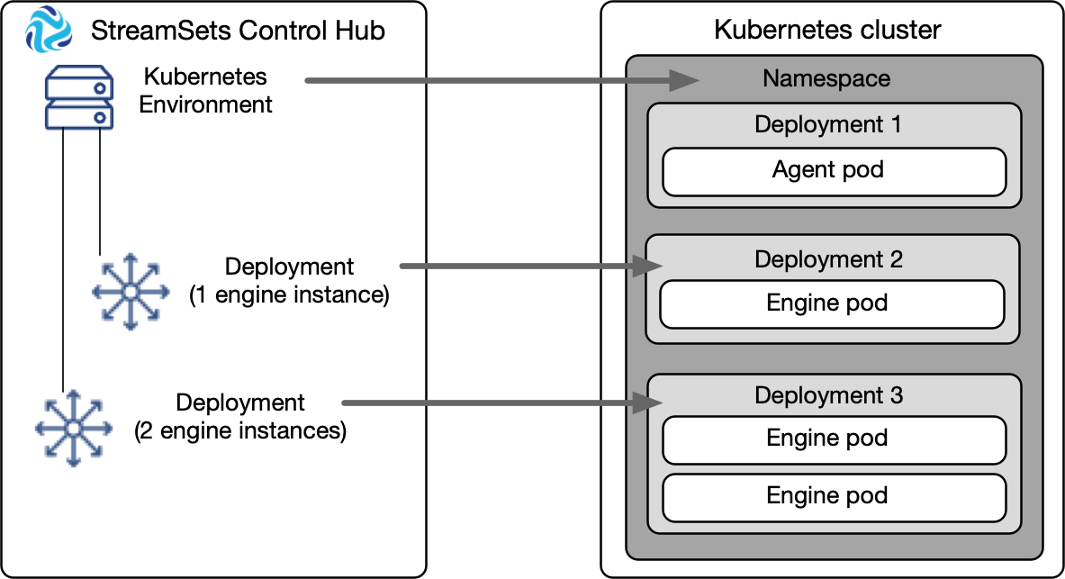
The following diagram illustrates how Control Hub objects correspond to resources in your Kubernetes cluster. In this example, Control Hub includes a single Kubernetes environment and two deployments that belong to that environment. One deployment is configured for one engine instance, and the other is configured for two engine instances.
- Deployment 1 corresponds to the Control Hub Kubernetes environment and includes a single pod that runs the IBM StreamSets Kubernetes agent.
- Deployment 2 corresponds to one child Control Hub deployment and includes a single pod that runs one engine instance.
- Deployment 3 corresponds to the other child Control Hub deployment and includes two replicated pods, each of which runs an identical engine instance.
Kubernetes Agent Versions
When you create a Kubernetes environment, you define the IBM StreamSets Kubernetes agent version to use. As a best practice, use the latest released version.
Version 1.3.0
On March 21, 2025, the IBM StreamSets Kubernetes agent version 1.3.0 was released.
With version 1.3.0, you can configure full autoscaling for Control Hub Kubernetes deployments.
Version 1.3.0 also includes several critical bug fixes and security patches.
Version 1.2.1
On November 11, 2024, the IBM StreamSets Kubernetes agent version 1.2.1 was released.
Version 1.2.1 includes several critical bug fixes and security patches.
Version 1.2.0
On September 9, 2024, the IBM StreamSets Kubernetes agent version 1.2.0 was released.
Version 1.2.0 includes several critical bug fixes and security patches.
Version 1.1.2
On April 10, 2024, the IBM StreamSets Kubernetes agent version 1.1.2 was released.
Version 1.1.2 includes several critical bug fixes and security patches.
Version 1.1.1
On October 18, 2023, the IBM StreamSets Kubernetes agent version 1.1.1 was released.
Version 1.1.1 includes several critical bug fixes and security patches.
Version 1.1.0
On June 29, 2023, the IBM StreamSets Kubernetes agent version 1.1.0 was released.
Version 1.1.0 supports configuring engines to use a proxy server by defining the proxy properties in the Control Hub Kubernetes deployment.
Fixed Issue
- When upgrading an existing Kubernetes agent from version 1.0.0, a significant delay of 5-10 minutes occurs before the upgraded agent reconnects with Control Hub. During that time, the Control Hub Kubernetes environment indicates that the agent has been lost and that any functionality relying on the agent will be delayed until it reconnects. However, existing Control Hub Kubernetes deployments and engines continue to function normally.
Version 1.0.0
On February 10, 2023, the IBM StreamSets Kubernetes agent version 1.0.0 was released.
Known Issue
- Version 1.0.0 does not support configuring engines to use a proxy server by
defining the proxy properties in the Control Hub Kubernetes deployment. Workaround: Upgrade to Kubernetes agent version 1.1.0 or later. Or, complete the following steps to configure engines to use a proxy server:
- Create a YAML file that defines a ConfigMap for the engine proxy
properties, where
<namespace-name>is the Kubernetes namespace where the engines are deployed.For example:apiVersion: v1 data: http.nonProxyHosts: <pipe-separated no proxy hosts> no_proxy: <comma-separated no proxy hosts> http.proxyHost: <proxy host> http.proxyPassword: <password> http.proxyPort: "<port>" http.proxyUser: <proxy user> http_proxy: http://<proxy user>:<password>@<proxy host>:<port> https.proxyHost: <proxy host> https.proxyPassword: <password> https.proxyPort: "<port>" https.proxyUser: <proxy user> https_proxy: http://<proxy user>:<password>@<proxy host>:<port> kind: ConfigMap metadata: name: <config-map-name> namespace: <namespace-name> - Run the following command to apply the YAML and create the ConfigMap
in the Kubernetes
cluster:
kubectl -n <namespace-name> apply -f <config-map-name>.yaml - In Control Hub, edit the Kubernetes deployment. Use advanced
mode to edit the YAML file, adding the following
envFromfield to the deployment container, after the existing- envfield:envFrom: - configMapRef: name: <config-map-name>
- Create a YAML file that defines a ConfigMap for the engine proxy
properties, where
Resources Created for the Agent
- Deployment with a single pod that runs the agent
- Secret that contains the authentication token used by the agent to communicate with IBM StreamSets
- Service account
- Role
- Role binding
When you use Control Hub to deactivate the Kubernetes environment, the agent deployment and secret are deleted. The service account, role, and role binding are not deleted.
When you activate the environment again, you must use the agent installation script or YAML file to relaunch the agent. The script or YAML file recreates the deployment and secret for the agent and then reuses the existing service account, role, and role binding. If those resources have been manually deleted, the script or YAML file creates the resources again.
Permissions Granted to the Agent
| Resource | Permissions |
|---|---|
| Deployments | Get, list, create, patch, delete |
| Replica sets | Get, list, create, patch, delete |
| Pods | Get, list, create, patch, delete |
| Secrets | Get, list, create, patch, delete |
| Horizontal pod autoscalers | Get, list, create, patch, delete Note: Horizontal pod autoscalers are used only when a Control Hub deployment is
configured to use legacy autoscaling. |
Feature Versions
When you create a Kubernetes environment, you select the feature version to use for that environment and for all deployments created for the environment. Later feature versions might require additional Kubernetes permissions or require a restart of engines belonging to the deployments.
When creating a new environment, use the latest feature version. When a new feature version is available, change your existing environments to use the new feature version as soon as possible.
When needed, you can change an existing environment to use a previous feature version. However, changing to a previous feature version disables any newer features not available in the selected feature version.
Kubernetes environments include the following feature versions:
| Feature Version | Description |
|---|---|
| KUBERNETES_2024_06_14 | Includes all features available in the initial feature version, as
well as support for the following enhancements:
|
| KUBERNETES_2023_02_10 | Initial version. |
Changing to a Later Feature Version
To change an existing Kubernetes environment to use a later feature version, you must edit the environment to enable the feature version.
After saving the edited environment, Control Hub restarts all deployments belonging to the environment, causing the StreamSets Kubernetes agent to replace all of the existing pods.
- In the Navigation panel, click , click the Kubernetes environment name, and then click Edit.
-
For the Feature Version property, select a later feature
version and then click Save.
Control Hub restarts all deployments belonging to the environment.
- Optionally, an organization administrator can update the default feature version to use for all new Kubernetes environments.
Prerequisites
- Verify that your existing Kubernetes cluster meets the StreamSets requirements.
- Create a namespace for the exclusive use of the Kubernetes environment.
- Allow the required inbound and outbound traffic to the StreamSets resources that run in the namespace.
- Configure the Kubernetes command-line tool so that it can run commands against the Kubernetes cluster.
Verify Cluster Requirements
- The Kubernetes server must be version 1.22 or later.
- The cluster can access the internet.
- Each node in the cluster is set up with the minimum requirements for the
deployed engine type.
The IBM StreamSets Kubernetes agent deploys engine instances as Docker images. As such, the requirements for a Kubernetes deployment are the same as for a self-managed deployment for a Docker image installation. For the list of minimum requirements for each engine type, see the Data Collector documentation or the Transformer documentation.
- Kubernetes secrets are safely secured in the cluster, which might require additional cluster configuration as described in the Kubernetes documentation.
- If you plan to configure a Control Hub Kubernetes deployment to use legacy
autoscaling, the Kubernetes cluster has a running metrics server or
an equivalent server. Important: Ensure that the metrics server is correctly configured to report accurate and timely metrics. If the server is slow to report metrics, the horizontal pod autoscaler is also slow to adjust to changes in CPU usage.
For more information about metrics servers, see the Kubernetes documentation.
Create a Namespace
Create a namespace in your Kubernetes cluster.
You can use an existing namespace. However, as a best practice, create a new namespace for the exclusive use of each Control Hub Kubernetes environment.
Do not create deployments or pods within the namespace. After you create and activate the Kubernetes environment and then launch the IBM StreamSets Kubernetes agent in the namespace, the agent communicates with Control Hub to provision the required Kubernetes resources in the namespace.
For instructions on creating a namespace in Kubernetes, see the Kubernetes documentation.
Allow Inbound and Outbound Traffic
If the Kubernetes cluster resides behind a firewall, allow the required inbound and outbound traffic to the Kubernetes resources provisioned for the environment. Or if you use Kubernetes network policies, create a network policy that defines the required ingress and egress rules to the resources.
- The IBM StreamSets Kubernetes agent requires outbound connections to StreamSets Control Hub. For the complete list of Control Hub DNS names to allow, see Firewall Configuration.
- The IBM StreamSets engines require all inbound and outbound connections as listed in Firewall Configuration.
Configure kubectl
Configure the Kubernetes command-line tool, kubectl, so that it can
communicate with your Kubernetes cluster.
For details about accessing Kubernetes clusters, see the Kubernetes documentation.
The user who runs the command that launches the IBM StreamSets Kubernetes agent in the cluster must have the following minimum permissions within the namespace that the agent runs in:
| Resource | Permissions |
|---|---|
| Deployments | Get, list, create, patch, delete |
| Pods | Get, list, create, patch, delete |
| Replica sets | Get, list, create, patch, delete |
| Roles | Get, list, create, patch, delete |
| Role bindings | Get, list, create, patch, delete |
| Secrets | Get, list, create, patch, delete |
| Service accounts | Get, list, create, patch, delete |
| Horizontal pod autoscalers | Get, list, create, patch, delete Note: Horizontal pod autoscalers are used only when a Control Hub deployment is
configured to use legacy autoscaling. |
Configuring a Kubernetes Environment
Configure a Kubernetes environment to define where to deploy IBM StreamSets engines in your Kubernetes cluster.
To create a new environment, click in the Navigation panel, and then click the Create
Environment icon: ![]() .
.
To edit an existing environment, click in the Navigation panel, click the environment name, and then click Edit.
Define the Environment
Define the environment essentials, including the environment name and type, and optional tags to identify similar environments.
-
Configure the following properties:
Define Environment Property Description Environment Name Name of the environment. Use a brief name that informs your team of the environment use case.
Environment Type Select Kubernetes. Once saved, you cannot change the environment type.
Environment Tags Optional tags that identify similar environments within Control Hub. Use environment tags to easily search and filter environments. Enter nested tags using the following format:
<tag1>/<tag2>/<tag3>Feature Version Feature version to use for the environment and all deployments created for the environment. Each feature version typically requires different permissions or a restart of engines belonging to the deployments.
When creating a new environment, use the latest feature version. When a new feature version is available, change your existing environments to use the new feature version as soon as possible.
-
Optionally, click Show Advanced Options and configure
the following advanced property:
Define Environment Advanced Property Description Allow Nightly Builds Allows deployments for this environment to use nightly engine builds in addition to released engine versions. Also allows Kubernetes environments to use nightly IBM StreamSets Kubernetes agent builds. Nightly builds are for testing features under development and should not be used in production systems.
The version number of a nightly build includes a -SNAPSHOT suffix and the build number. For example, 5.2.0-SNAPSHOT (Build 1013).
-
If creating the environment, click one of the following buttons:
- Cancel - Cancels creating the environment and exits the wizard.
- Save & Next - Saves the environment and continues.
- Save & Exit - Saves the environment and exits the wizard, displaying the incomplete environment in the Environments view.
Configure the Environment
Specify the version of the IBM StreamSets Kubernetes agent to deploy, enter the name of the Kubernetes namespace created as a prerequisite by your Kubernetes administrator, and optionally define Kubernetes labels to apply to provisioned Kubernetes resources.
-
Configure the following properties:
Configure Environment Property Description Agent Version Version of the Kubernetes agent to deploy. As a best practice, use the latest released version. Kubernetes Namespace Name of the Kubernetes namespace where you plan to deploy IBM StreamSets engines. Enter the name of the namespace created as a prerequisite by your Kubernetes administrator.
You cannot change the namespace name while the environment is active.
Agent Java Options Custom Java options used by the agent. Enter any options supported by the JVM. Kubernetes Labels Kubernetes labels to apply to all Kubernetes resources provisioned for this environment. Enter the labels as key-value pairs. For label naming requirements, see the Kubernetes documentation.Important: IBM StreamSets reservesappas a label key for its own use. As a result, you cannot defineappas a label key.You can define the labels using simple or bulk edit mode. In simple edit mode, click Add Another to define additional labels. In bulk edit mode, configure labels in JSON format.
Note: These labels are applied to Kubernetes resources, not to Control Hub environments. -
If creating the environment, click one of the following buttons:
- Back - Returns to the previous step in the wizard.
- Save & Next - Saves the environment and continues.
- Save & Exit - Saves the environment and exits the wizard, displaying the incomplete environment in the Environments view.
Share the Environment
By default, the environment can only be seen by you. Share the environment with other users and groups to grant them access to it.
- In the Select Users and Groups field, type a user email address or a group name.
-
Select users or groups from the list, and then click
Add.
The added users and groups display in the User / Group table.
-
Modify permissions as needed. By default, each added user
or group is granted the following permissions:
- Read - View the details of the environment. Create and edit a deployment for the environment.
- Write - Edit, activate, deactivate, and delete the environment.
For more information, see Environment Permissions.
-
Click one of the following buttons:
- Back - Returns to the previous step in the wizard.
- Save & Next - Saves the environment and continues.
- Save & Exit - Saves the environment and exits the wizard, displaying the incomplete environment in the Environments view.
Review and Activate the Environment
You've successfully finished creating the environment.
-
Click Activate & Generate Install Script to activate
the environment and generate an installation script and YAML file for the IBM StreamSets Kubernetes agent.
Note: If you click Exit, Control Hub saves the environment and exits the wizard, displaying the deactivated environment in the Environment view. You can activate the environment and retrieve the installation script or YAML file at a later time.
-
To launch the agent from the installation script, click the Copy to
Clipboard icon (
 ) to copy the generated installation
script.
) to copy the generated installation
script.
-
To launch the agent from the YAML file, complete the following steps:
- Click View Kubernetes YAML.
-
Click the Copy to Clipboard icon () to copy the YAML content, and then click
Close.
- Save the YAML to your local file system.
- Optionally, click Check Agent Status after Install to display the Agent Status window, where you can view the agent status after you launch the agent.
- Use the copied installation script or YAML file to launch the Kubernetes agent.
Launching the Agent
After activating a Kubernetes environment, you launch the IBM StreamSets Kubernetes agent so that it runs in the Kubernetes namespace specified in the environment.
- From the installation script.
- From the YAML file.
Launching the Agent from the Installation Script
You can launch the IBM StreamSets
Kubernetes agent using the installation script that Control Hub
generates. The installation script automatically retrieves the agent YAML file from Control Hub, and
then uses the Kubernetes command-line tool, kubectl, to create a deployment
for the agent based on the YAML file.
-
Verify that you have completed the
kubectlprerequisites. - Open a command prompt.
-
To verify that
kubectlcan access your Kubernetes cluster, run the following command:kubectl cluster-info -
Paste and then run the installation script command that you copied from the Control Hub Kubernetes environment.
Note: If needed, you can retrieve the generated installation script.
- If you chose to check the agent status, view the status in the Control Hub UI.
Launching the Agent from the YAML File
You can launch the IBM StreamSets
Kubernetes agent using the YAML file that Control Hub
generates. Use the Kubernetes command-line tool, kubectl, to create a
deployment for the agent based on the YAML file, as you do with other Kubernetes
applications.
-
Verify that you have completed the
kubectlprerequisites. - Open a command prompt.
-
To verify that
kubectlcan access your Kubernetes cluster, run the following command:kubectl cluster-info -
Run the following command to create a deployment for the YAML file that you
copied from the Control Hub Kubernetes environment:
kubectl apply -f ./<file_name>.yamlFor example, if you saved the YAML to a file named streamsets-kubernetes-agent.yaml, run the following command:kubectl apply -f ./streamsets-kubernetes-agent.yamlNote: If needed, you can retrieve the generated YAML file. - If you chose to check the agent status, view the status in the Control Hub UI.
Retrieving the Installation Script
You can retrieve the installation script generated for a Kubernetes environment.
- In the Control Hub Navigation panel, click .
- Locate the Kubernetes environment that you want to launch an agent for.
-
In the Actions column, click the
More icon (
 ) and then click Get Install
Script.
) and then click Get Install
Script.
-
Click the Copy to Clipboard icon (),
and then click Close.
Retrieving the YAML File
You can retrieve the YAML file generated for a Kubernetes environment.
- In the Control Hub Navigation panel, click .
- Locate the Kubernetes environment that you want to launch an agent for.
-
In the Actions column, click the
More icon () and then click View
Generated YAML.
-
Click the Copy to Clipboard icon (),
and then click Close.
Using a Proxy Server for Kubernetes
- IBM StreamSets Kubernetes agent - Configure the Kubernetes agent to use a proxy server when you configure the Kubernetes environment.
- IBM StreamSets engines - Configure the engines to use a proxy server when you configure the Control Hub Kubernetes deployments that belong to the Kubernetes environment.
Configure the Agent to Use a Proxy Server
To configure a Kubernetes agent to use a proxy server for an existing Kubernetes
environment, retrieve the YAML file generated for a Kubernetes environment and edit
the YAML file to define the proxy properties. Then use the Kubernetes command-line
tool, kubectl, to apply the changes to the running IBM StreamSets Kubernetes agent.
- In the Control Hub Navigation panel, click .
-
In the Actions column of the Kubernetes environment,
click the More icon () and
then click View Generated YAML.
-
Click the Copy to Clipboard icon (),
and then click Close.
- Save the YAML to your local file system.
-
Edit the YAML to add the proxy properties as Java options to the
STREAMSETS_KUBERNETES_AGENT_JAVA_OPTSenvironment variable:- name: STREAMSETS_KUBERNETES_AGENT_JAVA_OPTS value: -Dhttps.proxyHost=<proxy host> -Dhttps.proxyPort=<port> -Dhttp.proxyHost=<proxy host> -Dhttp.proxyPort=<port> -Dhttp.nonProxyHosts=<pipe-separated no proxy hosts> -Dhttp.proxyUser=<proxy user> -Dhttp.proxyPassword=<password> -Dhttps.proxyUser=<proxy user> -Dhttps.proxyPassword=<password> -Djdk.http.auth.tunneling.disabledSchemes=For the
-Dhttp.nonProxyHostsoption, include the ClusterIP of the Kubernetes API server and any other hosts that the agent can connect to without going through the proxy server. Separate each entry with the pipe character (|).To retrieve the ClusterIP of the Kubernetes API server, run the following command:kubectl get svc/kubernetes --namespace=defaultNote: Define the user and password properties only when the proxy server requires authentication.The properties are the same proxy properties that you configure for IBM StreamSets engines. For a description of each property, see the Data Collector documentation or the Transformer documentation.
-
Run the following command to apply the changes to the running Kubernetes
agent:
kubectl apply -f ./<file_name>.yaml
Configure Engines to Use a Proxy Server
To configure IBM StreamSets engines to use a proxy server for an existing Control Hub Kubernetes deployment, you must stop the deployment.
After editing the deactivated deployment to modify the proxy properties, you start the deployment. The IBM StreamSets Kubernetes agent communicates with Control Hub to provision the Kubernetes resources again, deploying and launching new engine instances that use the updated proxy properties.
- In the Control Hub Navigation panel, click .
-
Select the active deployment that belongs to the Kubernetes environment, and
then click the Stop icon:
 .
.
- Click OK to confirm, and then click Close.
-
In the Actions column of the deactivated deployment,
click the More icon () and
then click Edit.
- In the Edit Deployment dialog box, expand the Configure Deployment section.
- Click Click here to configure next to the Advanced Configuration property.
-
In the Proxy tab, define the engine proxy properties as
needed.
For a description of each proxy property, see the Data Collector documentation or the Transformer documentation.
- Click Save.
- In the Edit Deployment dialog box, click Save.
-
Start the deployment to launch new engine instances that use the updated proxy
properties.
For detailed instructions, see Starting Deployments.
Monitoring the Agent
To view environment details, click an environment name in the Environments view.
When you need additional monitoring information about the agent, use the Kubernetes
command-line tool, kubectl, to access Kubernetes log
files for the pod where the Kubernetes agent runs.
Agent Status
You can view the status of an IBM StreamSets Kubernetes agent from the list of environments in the Environments view or from the environment details.
The following table describes each agent status:
| Agent Status | Description |
|---|---|
| Agent-Online | Agent is running in the Kubernetes cluster and is communicating regularly with Control Hub. |
| Agent-Error | Agent is running in the Kubernetes cluster, but has encountered an error. View the agent event logs for additional information. |
| Agent-Offline | Agent has been gracefully shut down or has not yet been launched. |
| Agent-Lost | Agent has not communicated with Control Hub for some time. The agent has either lost its connection with Control Hub or has unexpectedly shut down. If the agent reports an Agent-Lost status after you have deactivated the environment, you might need to delete the unresponsive agent. |
Event Logs
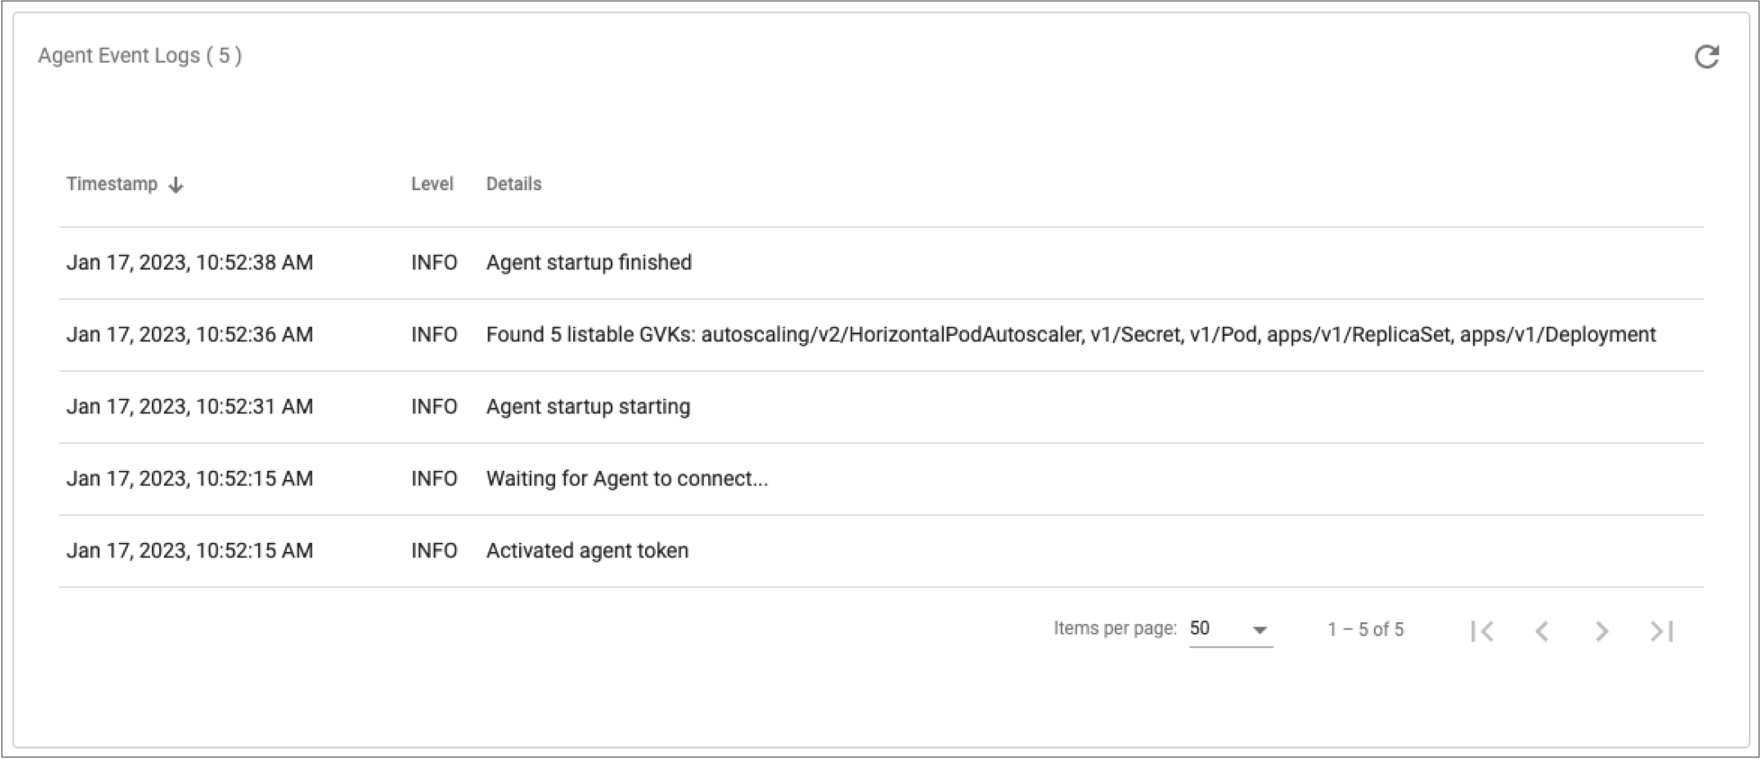
When you view the details of a Kubernetes environment, you can view event logs for the IBM StreamSets Kubernetes agent. The event logs list all events related to the agent launched for the environment, including errors that might occur when launching the agent.
Event logs display messages only about the current activation of the environment. Each time you deactivate and then activate the environment, the previous event logs are removed.
To view agent event logs, click a Kubernetes environment name in the Environments view and then locate the Agent Event Logs section in the environment details.
The following image shows sample event logs for a Kubernetes agent:
Accessing Kubernetes Log Files
You can use the Kubernetes command-line tool, kubectl, to access
Kubernetes log files for the pod where the IBM StreamSets
Kubernetes agent runs.
First, run the following kubectl command to retrieve the name of the
pod, where <namespace_name> is the name of the Kubernetes namespace
created for the environment:
kubectl [-n <namespace_name>] get podsControl Hub uses the following format to name the pod for the agent:
streamsets-agent-dep-<Control_Hub_deployment_ID><pod_UID>
kubectl [-n <namespace_name>] logs pod/<pod_name>Modifying the Agent Log Level
If the agent log file does not provide enough troubleshooting information, you can modify the log level to display messages at another severity level.
- TRACE
- DEBUG
- INFO
- WARN
- ERROR
- FATAL
To modify the log level, retrieve the YAML file generated for a Kubernetes
environment and edit the YAML file to customize the log format. Then use the
Kubernetes command-line tool, kubectl, to apply the changes to the
running IBM StreamSets Kubernetes agent.
- In the Control Hub Navigation panel, click .
-
In the Actions column of the Kubernetes environment,
click the More icon () and
then click View Generated YAML.
-
Click the Copy to Clipboard icon (),
and then click Close.
- Save the YAML to your local file system.
-
Add a ConfigMap section to the end of the YAML file, setting the log level that
you want to use.
For example, to set all messages to the DEBUG log level, add the following ConfigMap:
--- apiVersion: v1 kind: ConfigMap metadata: name: custom-agent-log4j data: custom_log4j_file_name: "custom-agent-log4j.properties" custom-agent-log4j.properties: | name = streamsets-dpm-kubernetes-agent appender.stdout.type = Console appender.stdout.name = stdout appender.stdout.layout.type = PatternLayout appender.stdout.layout.pattern = %d{ISO8601} [thread:%t] %-5p %c{1} - %m%n appender.streamsets.type = RollingFile appender.streamsets.name = streamsets appender.streamsets.fileName = ${sys:streamsets.kubernetes.agent.log.dir}/agent.log appender.streamsets.filePattern = ${sys:streamsets.kubernetes.agent.log.dir}/agent.%i.log appender.streamsets.layout.type = PatternLayout appender.streamsets.layout.pattern = %d{ISO8601} [thread:%t] %-5p %c{1} - %m%n appender.streamsets.append = true appender.streamsets.policies.type = Policies appender.streamsets.policies.size.type = SizeBasedTriggeringPolicy appender.streamsets.policies.size.size = 256MB appender.streamsets.strategy.type = DefaultRolloverStrategy appender.streamsets.strategy.max = 10 rootLogger.level = DEBUG rootLogger.appenderRef.stdout.ref = stdout logger.l1.name = com.streamsets logger.l1.level = DEBUG logger.l1.appenderRef.streamsets.ref = streamsets -
To define a volume for the ConfigMap and mount it from the agent container,
add the following lines in bold to the Deployment section of the YAML
file:
apiVersion: apps/v1 kind: Deployment ... spec: containers: - name: streamsets-agent image: streamsets/kubernetes-agent:1.2.1 ... resources: requests: memory: 1Gi cpu: 0.5 volumeMounts: - name: config mountPath: "/opt/streamsets-kubernetes-agent/etc/" readOnly: true dnsPolicy: Default serviceAccountName: streamsets-agent-sa-f00bb553-59d8-48c5-b681-5bec6eb4f430 volumes: - name: config configMap: name: custom-agent-log4j items: - key: "custom-agent-log4j.properties" path: "custom-agent-log4j.properties" -
Add the path to the log configuration file as a Java option to the
STREAMSETS_KUBERNETES_AGENT_JAVA_OPTSenvironment variable:- name: STREAMSETS_KUBERNETES_AGENT_JAVA_OPTS value: -Dlog4j2.configurationFile=/opt/streamsets-kubernetes-agent/etc/custom-agent-log4j.properties -
Run the following command to apply the changes to the running Kubernetes
agent:
kubectl apply -f ./<file_name>.yaml
Deleting an Unresponsive Agent
When you deactivate a Kubernetes environment, the IBM StreamSets Kubernetes agent is automatically deleted from the namespace for you. However, in rare situations, the agent can become unresponsive and you must retrieve and run an uninstallation script to shut down and delete the agent from the Kubernetes namespace.
For example, if the agent has lost the connection with Control Hub or has unexpectedly shut down, IBM StreamSets cannot gracefully shut down and delete the agent when you deactivate the environment.
- In the Control Hub Navigation panel, click .
-
Locate the Kubernetes environment with the unresponsive agent.
Each environment generates a unique uninstallation script for the agent as defined for that specific environment. Be sure that you retrieve the script for the correct environment.
-
In the Actions column, click the
More icon () and then click Get Uninstall
Script.
-
Click the Copy to Clipboard icon (),
and then click Close.
- Open a command prompt.
-
To verify that
kubectlcan access your Kubernetes cluster, run the following command:kubectl cluster-info - Paste and then run the uninstallation script command that you copied from the Control Hub Kubernetes environment.
Upgrading the Agent
You can upgrade an existing Kubernetes environment to use a later IBM StreamSets Kubernetes agent version. As a best practice, use the latest released version.
- In the Control Hub Navigation panel, click .
-
In the Actions column of the Kubernetes environment,
click the More icon () and
then click Edit.
- In the Edit Environment dialog box, expand the Configure Environment section.
- Select a later Kubernetes agent version.
- Click Save.
- To apply the changes to your Kubernetes cluster, use the agent installation script or YAML file to launch the Kubernetes agent again.