Managing Deployments
When you manage deployments, you can filter the list of deployments and start, stop, or edit deployments. When you edit a deployment, you can add additional stage libraries or edit the engine proxy properties.
After editing an active deployment to update the engine configuration, you must restart all engine instances belonging to the deployment for the changes to take effect.
You can clone a deployment to quickly create another deployment with similar configurations.
When needed, you can delete a deployment. You can also share deployments with other users and groups, as described in Permissions.
To upgrade an engine version, you must create a new deployment.
Filtering Deployments
In the Deployments view, you can filter the list of displayed deployments by type, state, tag, or engine type. You can also search for deployments by name.
- In the Navigation panel, click .
-
If the Filter column does not display, click the Toggle Filter
Column icon:
 .
.
The following image displays the Filter column in the Deployments view:
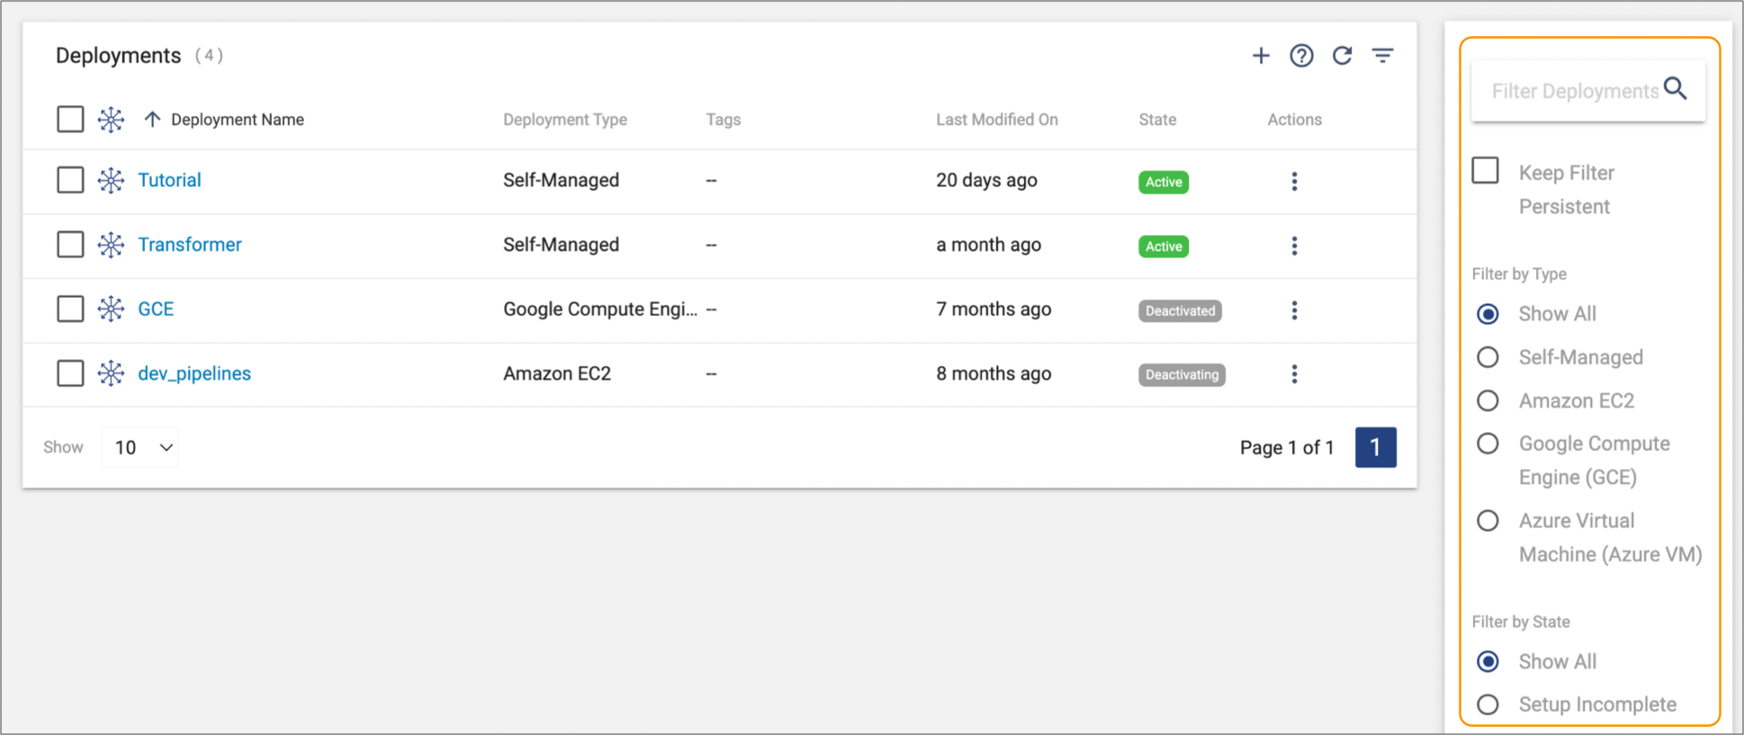
- To search for deployments by name, enter text in the search field, and then press Return.
- Select a type, state, tag, or engine type to additionally filter the list of deployments.
-
Select the Keep Filter Persistent checkbox to retain the
filter when you return to the view.
Tip: To share the applied filter, copy the URL and send it to another user in your organization.
Starting Deployments
Start a deployment when you want to launch engine instances for the deployment.
You can start a deployment when you create it, or you can start it at a later time.
When you start a new self-managed deployment, Control Hub generates the installation script that you run to install and launch engine instances. When you restart an existing self-managed deployment, you must manually restart each existing engine instance from the command line.
When you start a Control Hub-managed deployment, Control Hub connects to the external system represented by the parent environment and automatically provisions the resources needed to run the engine type, ensuring that the resources meet engine requirements. Engine instances are then automatically deployed and launched on those resources.
You can start a deployment that is in the Deactivated or Deactivation Error state.
- In the Control Hub Navigation panel, click .
-
Select the deactivated deployments, and then click the
Start icon:
 .
.
- Click OK to confirm.
- For an existing self-managed deployment, restart each existing engine instance from the command line.
Stopping Deployments
Stop a deployment when you want to temporarily prevent engine instances that belong to that deployment from running.
When you stop a self-managed deployment, running engine instances belonging to that deployment are shut down so that they no longer use computing resources. After you restart the deployment, you must manually start each engine instance from the command line.
- The deployment is in the Active or Activation Error state.
If a Kubernetes deployment remains in an Activating or Deactivating state indefinitely, you can force the deployment to stop.
- No engine instances belonging to the deployment are currently running pipelines.
- In the Control Hub Navigation panel, click .
-
Select the active deployments, and then click the Stop
icon:
 .
.
-
Click OK to confirm.
It can take a few minutes for a deployment to stop.
Self-managed deployments wait to stop until all running engine instances are successfully shut down. Control Hub-managed deployments wait to stop until all running engine instances are successfully shut down and all provisioned resources in the external system are deleted.
Forcing a Kubernetes Deployment to Stop
If a Kubernetes deployment remains in an Activating or Deactivating state indefinitely, you can force the deployment to stop.
In most cases, you can wait for the activating or deactivating process to finish, and then stop the deployment. However, if more than 5 minutes have passed or if you know the process will not resolve on its own, you can force the deployment to stop.
- The Kubernetes cluster has insufficient resources.
- The deployment is configured with advanced mode, but the deployment YAML file has been incorrectly edited.
- The IBM StreamSets Kubernetes agent has been manually deleted from the cluster.
In these situations, Control Hub might start activating or deactivating the deployment but not be able to finish.
When you force a Kubernetes deployment to stop, Control Hub might not be able to delete all provisioned resources in the Kubernetes cluster. Abandoned resources can continue to run in the cluster. Ensure that you locate those resources and manually delete them.
- In the Control Hub Navigation panel, click .
-
Select the activating or deactivating deployment, and then click the
Stop icon: .
The Stop Deployments dialog box informs you that the deployment cannot be stopped, but that you can force stop it.
- Click Force Stop.
- In the Force Stop Deployment dialog box, copy the list of potentially abandoned resources.
- Click Force Stop.
- After the deployment stops, manually delete any abandoned resources in the Kubernetes cluster.
Editing Deployments
You can edit deployments when they are in any state except for the transient Activating and Deactivating states.
When you edit an active self-managed deployment that updates most engine configuration properties, Control Hub prompts you to restart the engine instances for the changes to take effect.
You cannot change all properties when you edit a deployment. You must create a new deployment to change the following properties:
- Deployment type
- Environment that the deployment belongs to
- Engine version
To edit a deployment, locate the deployment in the Deployments view. In the
Actions column, click the More
icon (![]() )
and then click Edit.
)
and then click Edit.
Updating Stage Libraries
Add stage libraries to a deployment when you want to use functionality provided by the stage library, such as a stage or credential store.
Remove stage libraries from a deployment when you no longer needed the stage library functionality.
- In the Control Hub Navigation panel, click .
-
In the Actions column of the deployment, click the More
icon (
 ) and then click Edit.
- In the Edit Deployment dialog box, expand the Configure Deployment section.
- Click <number> stage libraries selected next to the Stage Libraries property.
-
In the Select Stage Libraries window, select the stage
libraries to add or remove in one of the following ways:
- Select from stages - Click the Select from Stages tab and then filter or search for the stages or credential stores to add or remove. After selecting a stage that is included in multiple stage libraries, select the specific stage library version to add.
- Select from stage libraries - Click the Select from Stage Libraries tab and then select the stage libraries to add. Clear the stage libraries to remove.
- In the Select Stage Libraries window, click the Summary tab to review the selected stage libraries by file name.
- To save your selections, click Ok.
- In the Edit Deployment dialog box, click Save.
-
If associated engines are running, click Restart Engines
to restart all engine instances for the changes to take effect.
If associated engines are not running, they inherit the changes when the engines restart.
Editing Engine Proxy Properties
When you edit a deactivated deployment, you can define proxy properties that configure engine instances to use a proxy server for outbound network requests.
Editing for Self-Managed Deployments
To define proxy properties for an existing self-managed deployment, you must stop the deployment. After editing the deployment, you start the deployment again and then run the updated engine installation script that includes proxy properties defined as environment variables.
- In the Control Hub Navigation panel, click .
-
Select the active self-managed deployment, and then click the
Stop icon: .
- Click OK to confirm, and then click Close.
-
In the Actions column of the deployment, click the
More icon () and then click
Edit.
- In the Edit Deployment dialog box, expand the Configure Deployment section.
- Click Click here to configure next to the Advanced Configuration property.
-
In the Proxy tab, edit the engine proxy properties as
needed.
For a description of each property, see the Data Collector documentation or the Transformer documentation.
- To save your changes, click Save, and then click OK.
- In the Edit Deployment dialog box, click Save.
- Select the deployment and click Start to start the deployment and generate the updated engine installation script that includes the proxy environment variables.
-
In the Actions column, click the More icon () and
then click Get Install Script.
- Select whether the installation script runs an engine instance as a foreground or background process.
-
Click the Copy to Clipboard icon (
 ) to
copy the generated command.
) to
copy the generated command.
- Open a command prompt on the engine machine.
-
Paste and then run the updated installation script command.
When prompted by the script, you can enter the same download and installation directory as the original engine installation, and then choose to replace the existing folder.
The script starts the engine instance using the required proxy environment variables.
Editing for Cloud Service Provider Deployments
To define proxy properties for an existing cloud service provider deployment, such as an Amazon EC2 or GCE deployment, you must stop the deployment. When you stop a cloud service provider deployment, the provisioned resources in your cloud account are deleted.
After editing the deployment to modify the proxy properties, you start the deployment again. Control Hub provisions resources in the external system again, deploying and launching new engine instances that use the updated proxy properties.
- In the Control Hub Navigation panel, click .
-
Select the active deployment, and then click the Stop
icon: .
- Click OK to confirm, and then click Close.
-
In the Actions column of the deployment, click the
More icon () and then click
Edit.
- In the Edit Deployment dialog box, expand the Configure Deployment section.
- Click Click here to configure next to the Advanced Configuration property.
-
In the Proxy tab, edit the engine proxy properties as
needed.
For a description of each property, see the Data Collector documentation or the Transformer documentation.
- To save your changes, click Save, and then click OK.
- In the Edit Deployment dialog box, click Save.
- Select the deployment and click Start to start the deployment, provision resources in the external system, and launch new engine instances that use the updated proxy properties.
Cloning Deployments
Clone a deployment to quickly create another deployment with similar configurations. You can select the same engine version or a later engine version than used in the original deployment. You might clone a deployment as the first step in the engine upgrade process.
When you clone a deployment, you define the deployment name, tags, engine labels, and engine version to use for the new deployment. The cloned deployment uses the same parent environment, deployment type, and engine type of the original deployment.
For example, when you clone a GCE deployment that belongs to the GCP environment named WestDataCenter and that uses Data Collector 5.6.0, the new cloned deployment is also a GCE deployment belonging to the WestDataCenter environment and can use Data Collector 5.6.0 or later.
The cloned deployment retains all other property values from the original deployment, with a few exceptions, based on whether the cloned deployment uses the same engine version or a later engine version.
After creating the cloned deployment, you can edit deployment properties as needed.
Same Engine Version
Select the same engine version when you want to create another deployment with similar configurations.
When you clone a deployment and select the same engine version as the original deployment, the cloned deployment retains all configured property values from the original deployment, unless you clone a Kubernetes deployment that uses a YAML file directly edited in advanced mode. Control Hub retains the configured values corresponding to basic mode properties, but removes all other customizations added to the YAML file.
After cloning the deployment, review and modify the YAML in advanced mode as needed.
Later Engine Version
Select a later engine version when you want to upgrade an engine. Cloning the deployment is the first step in the engine upgrade process.
- Data Collector Release Notes
- Transformer Release Notes
- Transformer for Snowflake Release Notes - Applicable when your organization uses a deployed Transformer for Snowflake engine.
When you clone a deployment and select a later engine version than used in the original deployment, the cloned deployment retains all configured property values from the original deployment, except when the later engine version includes the following changes:
- Removed stage library
- When a stage library has been removed from the later engine version, Control Hub also removes that stage library from the cloned deployment. After cloning the deployment, you add replacement stage libraries when you check the deployment. Review the engine release notes for information about changes to stage libraries.
- Updated engine advanced configuration properties
- A later engine version can add or remove engine advanced configuration properties. The cloned deployment uses the updated engine advanced configuration properties, so can also include new or removed properties.
- Changed configuration formats or functionality for major engine versions
- Major engine versions can result in larger changes, including changed configuration formats or functionality.
After cloning the deployment, you can add replacement stage libraries and review and modify the engine configuration properties as needed. You can also view the differences between the engine versions.
In addition, if you clone a Kubernetes deployment that uses a YAML file edited in advanced mode, Control Hub retains the configured values corresponding to basic mode properties, but removes all other customizations added to the YAML file. After cloning the deployment, review and modify the Kubernetes YAML in advanced mode as needed.
Cloning a Deployment
You can clone a deployment that is in any state except for the Setup Incomplete state.
To clone a deployment, click in the Navigation panel. In the Actions column for the deployment, click
the More icon (![]() ) and then click Clone. Or, click the
deployment name to view the deployment details, and then click
Clone.
) and then click Clone. Or, click the
deployment name to view the deployment details, and then click
Clone.
Configure the Deployment
Configure the name of the cloned deployment, the tags and engine labels to assign to the cloned deployment, and the engine version to deploy. The cloned deployment retains all other property values from the original deployment, with a few exceptions, based on whether the cloned deployment uses the same engine version or a later engine version.
Once saved, you cannot change the engine version.
-
Configure the following properties:
Property Description Deployment Name Name of the cloned deployment. Use a brief name that informs your team of the deployment use case.
Default is Clone of <original deployment name>.
Deployment Tags Optional tags that identify similar deployments within Control Hub. Use deployment tags to easily search and filter deployments. Enter nested tags using the following format:
<tag1>/<tag2>/<tag3>Default is all existing tags assigned to the original deployment and a new cloned-from:<original deployment name> tag.
Engine Labels Labels to assign to all engine instances launched for this deployment. Labels determine the group of engine instances that run a job. Default is all existing labels assigned to the original deployment and the name of the cloned deployment.
Engine Version Engine version to deploy. You can select the same engine version or a later engine version than used in the original deployment.Important: Before you select a later engine version, be sure to review the appropriate engine release notes to understand the changes in the versions:- Data Collector Release Notes
- Transformer Release Notes
- Transformer for Snowflake Release Notes - Applicable when your organization uses a deployed Transformer for Snowflake engine.
-
Click Save.
It can take some time for Control Hub to clone the deployment.
Review and Launch the Deployment
You've successfully cloned the deployment. When the cloned deployment uses a later engine version, check the cloned deployment configuration before launching the deployment.
- Exit - Saves the deployment and exits the wizard, displaying the Deactivated deployment in the Deployments view. You can check the deployment and start it at a later time.
- Check Deployment - Saves the deployment and displays
the deployment wizard so that you can check
the configuration of the cloned deployment and add replacement
stage libraries, if needed.
After checking the deployment configuration, you can start the deployment at a later time.
- Start & Generate Install Script - Starts the deployment and generates the command to run the engine installation script.
- Exit - Saves the deployment and exits the wizard, displaying the Deactivated deployment in the Deployments view. You can check the deployment and start it at a later time.
- Check Deployment without Launching - Saves the
deployment and displays the deployment wizard so that you can check the configuration of the cloned
deployment and add replacement stage libraries, if needed.
After checking the deployment configuration, you can start the deployment at a later time.
- Launch and Check Deployment - Starts the deployment, launching engines on provisioned resources. Then, displays the deployment wizard so that you can check the configuration of the cloned deployment and add replacement stage libraries, if needed.
Checking a Cloned Deployment
Check a cloned deployment so that you can add replacement stage libraries for libraries that are no longer supported and so that you can review and modify engine configuration properties. For cloned Kubernetes deployments, you can also review and modify the Kubernetes YAML in advanced mode, as needed.
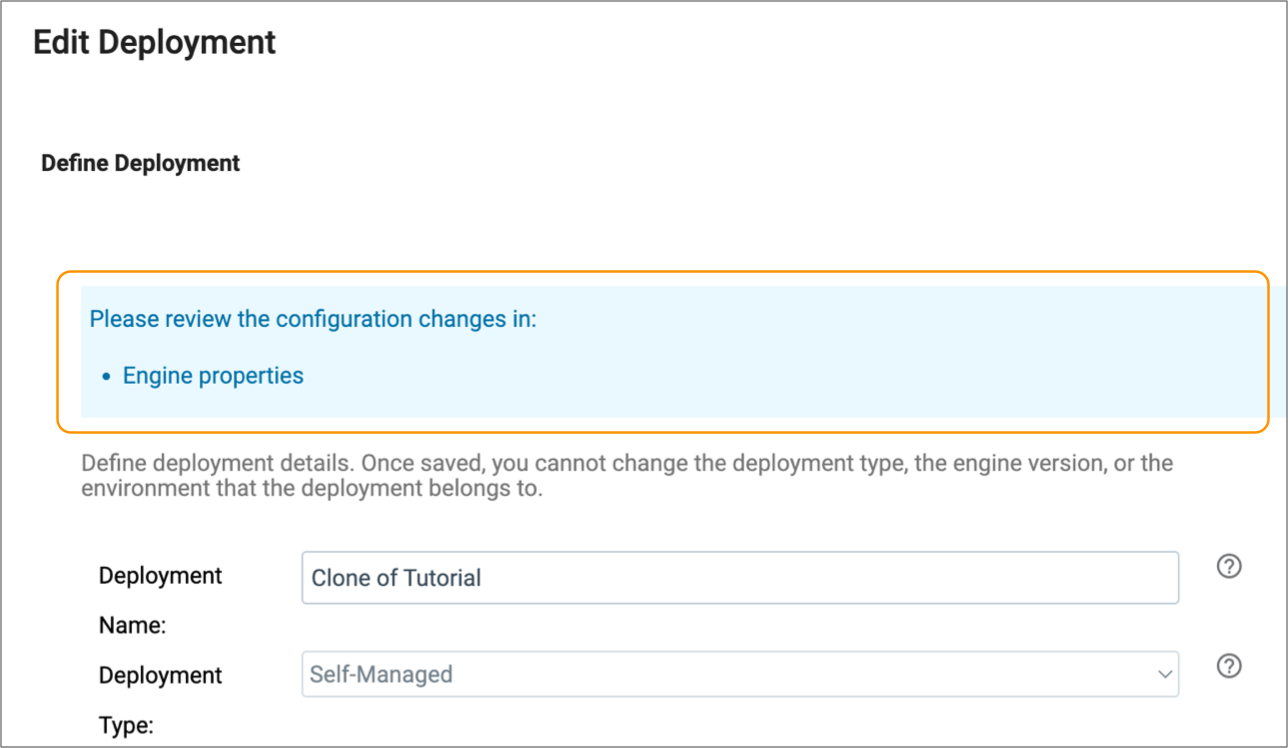
When you check a cloned deployment immediately after creating the clone, the edit deployment wizard informs you of the configuration properties needing review. Navigate to those properties in the wizard, and then click Show Diff to display the differences between the original deployment and the cloned deployment.
For example, after cloning a deployment that uses a later engine version, the edit deployment wizard informs you that you can view the differences between the versions in the engine properties:
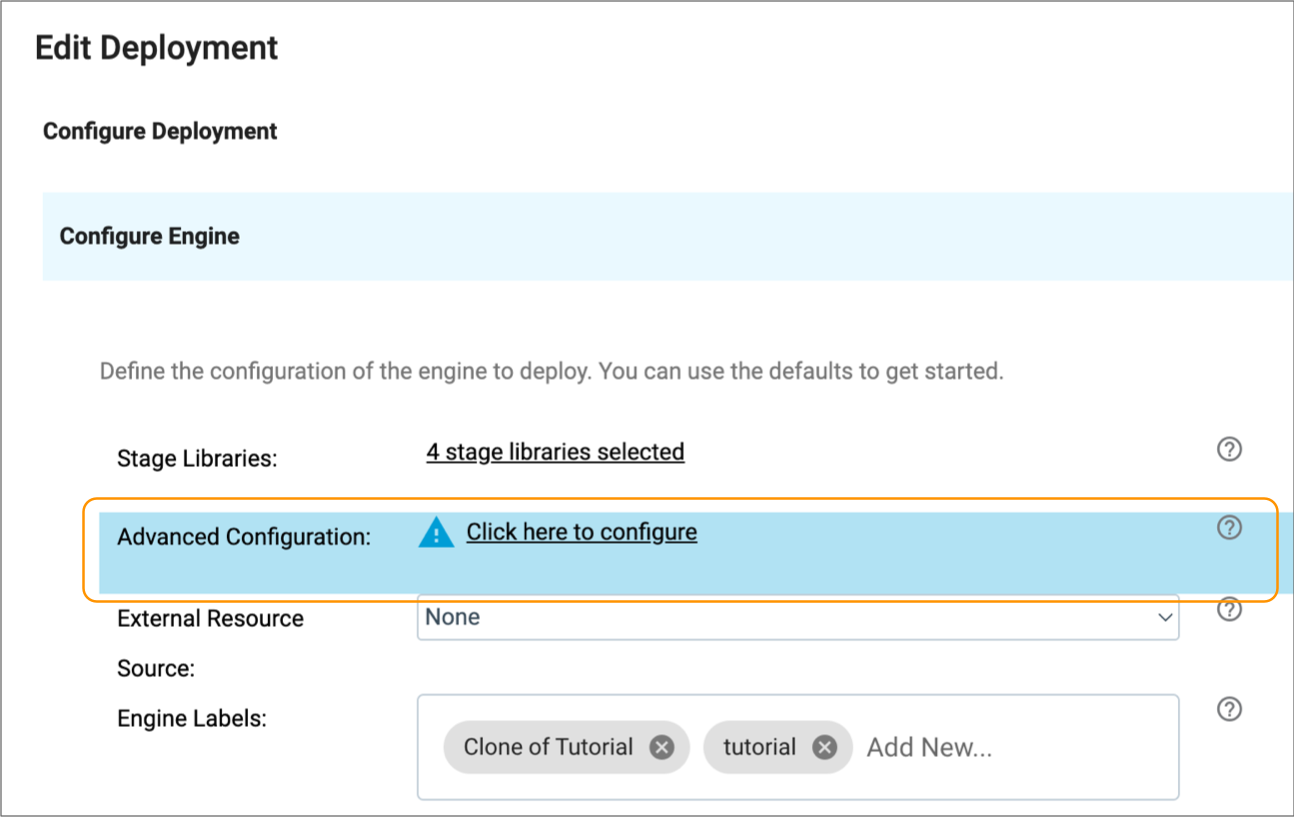
When you navigate to the engine properties, the wizard displays a warning icon next to the Advanced Configuration property, prompting you to review those properties:
In the engine advanced configuration, the wizard displays a warning icon on the Data Collector Configuration tab.
When you click the tab, the Show Diff property is enabled by default, displaying the Data Collector configuration properties from the different versions side by side. The comparison highlights the differences between the files so that you can quickly review and make modifications to the current version if needed:
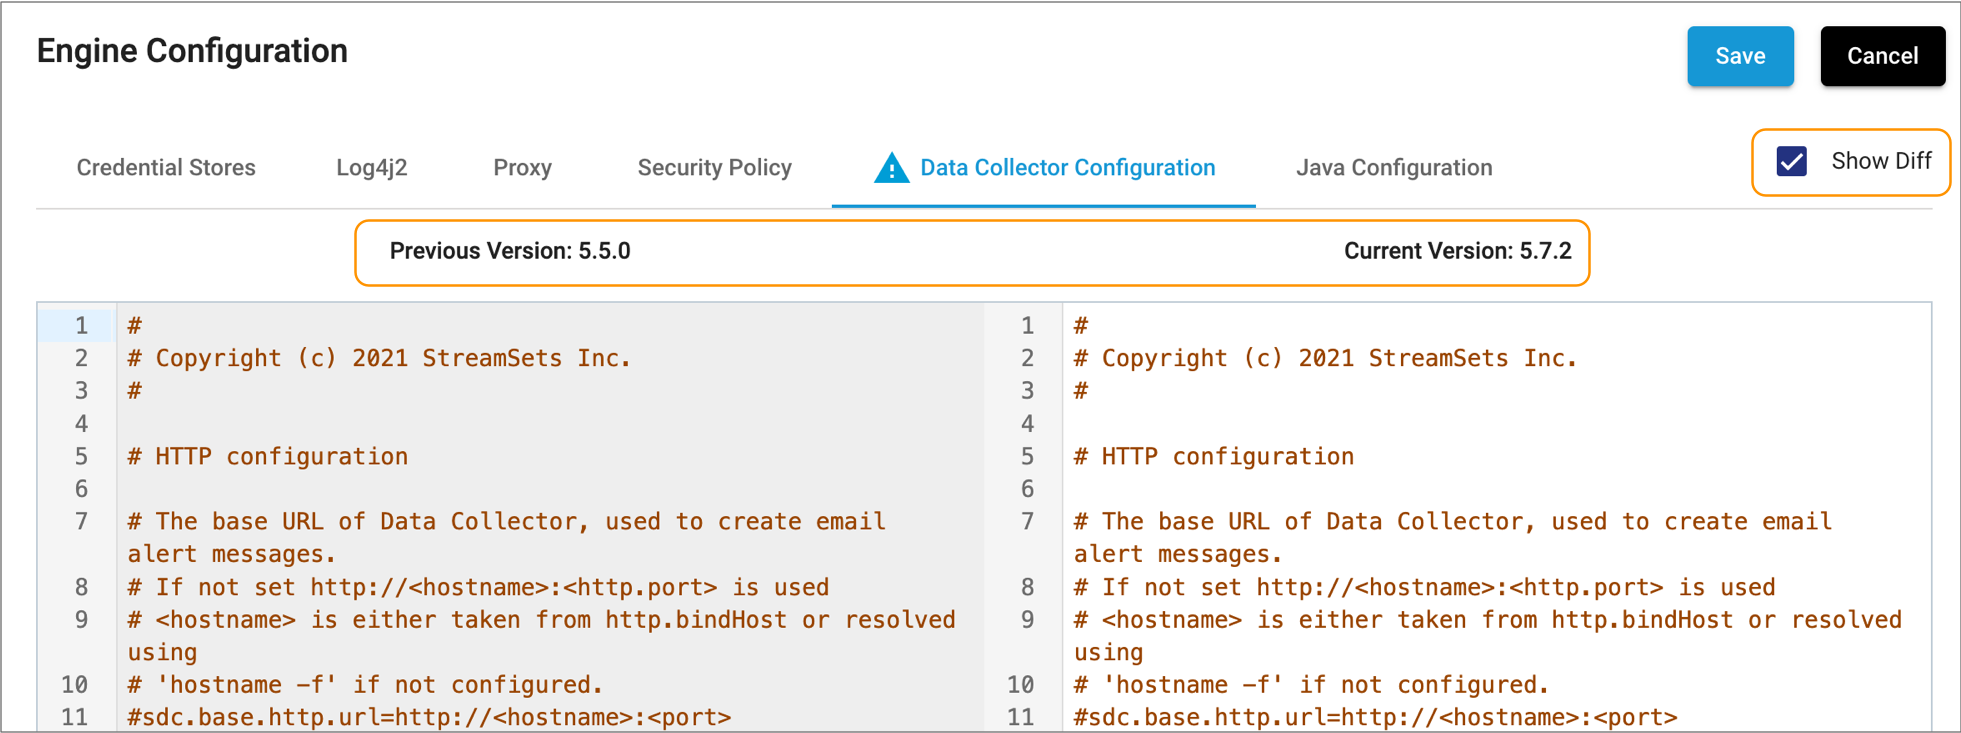
The comparison highlights all changes between the files, not necessarily changes that you must act on. For example, the comparison highlights when a new property is added to a later version. The default value of a newly added property is sufficient for most use cases and does not need to be modified before you start the cloned deployment.
Restarting Engines
When you edit an active deployment to update the engine configuration, Control Hub prompts you to restart all engine instances. If you choose not to restart the engine instances while editing the deployment, you can restart the engine instances at a later time from the Deployments view.
During the restart process, the engine instances shut down and then automatically restart.
- In the Navigation panel, click .
- Select an active deployment.
-
In the Actions column, click the More icon () and
then click Restart Engines.
-
Click Ok to confirm.
It can take a few minutes for engine instances to shut down and then restart.
- Click Close.
Deleting Deployments
Delete a deployment when you no longer want the deployed engine instances to run pipelines.
When you delete a self-managed deployment, all engine instances belonging to that deployment are shut down, but the engine installation files are not deleted. You must manually remove the files from the host machines.
When you delete a Control Hub-managed deployment, all resources provisioned for that deployment are deleted. For example, when you delete an Amazon EC2 deployment, all provisioned EC2 instances are deleted in addition to the AWS CloudFormation stack created for that deployment.
You can delete a deployment when no engine instances belonging to the deployment are currently running pipelines.
- In the Control Hub Navigation panel, click .
-
Select the deployments, and then click the Delete icon:
 .
.
- Confirm the deletion.
-
For self-managed deployments, locate and then delete the installation directory
on each machine where you launched an engine instance.
The installation directory is named streamsets-<engine type>-<version>.
For example, streamsets-datacollector-4.4.0.