My Account
You can resize, hide, and reorder table columns in any of the Control Hub list pages.
When you access the My Account menu, you can configure your account and browser settings, invite users to join your organization, or sign out of IBM StreamSets. If you have a free trial, you can also upgrade to a paid subscription.
You can also configure Snowflake credentials and Snowflake pipeline defaults through the My Account menu.
This documentation discusses the general Control Hub settings. For information about the Snowflake settings, see the Transformer for Snowflake documentation.
Customizing Table Columns
You can resize, hide, and reorder table columns.
- To resize table columns, select and drag the column headers.
-
To hide and reorder table columns, click the More icon
(
 )
above the table and then click Show/Hide Columns.
)
above the table and then click Show/Hide Columns.

-
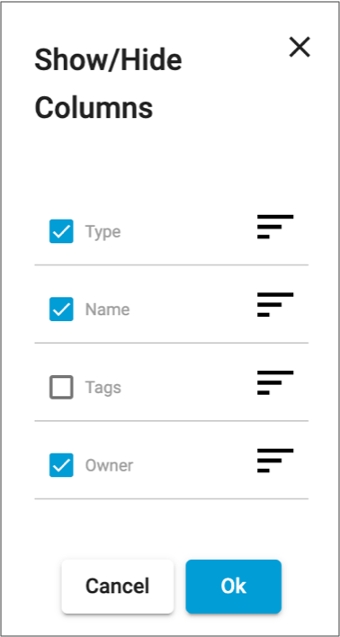
In the Show/Hide Columns dialog box, complete the
following tasks:
- Clear a column name to hide the column.
- Select and drag column names to reorder the columns.
For example, the following image shows that the Tags column is hidden and that the columns are reordered to list the Type column first:
-
Click Ok.
Tip: To reset columns to the defaults, click the More icon () above the table and then click
Reset Columns.
Configuring Account Settings
You can configure account settings that apply to your personal user account across organizations.
To configure
your account settings, click the My Account icon (![]() ) in
the top right toolbar, click your user name, and then click the Account
Settings tab.
) in
the top right toolbar, click your user name, and then click the Account
Settings tab.
- View your Control Hub user ID and the organization that you belong to.
If you are not the organization administrator who created the organization, you can choose to leave the organization.
- Modify your display name.
- Review your user roles.
User roles determine the tasks you can perform. Contact your organization administrator if you need to change your user roles.
- Manage your usage statistics collection.
- View the groups that you belong to.
Contact your organization administrator if you need to change your groups.
Managing Usage Statistics Collection
Applies to: IBM StreamSets as a Service
You can help to improve IBM StreamSets by allowing IBM StreamSets to collect usage statistics about system performance and the features that you use. This data helps IBM StreamSets to improve product performance and to make feature development decisions.
-
In the top right toolbar, click the My Account icon
(
 ) and then click your user name.
- Click the Account Settings tab.
-
In the My Account section, select Share Usage
Data with StreamSets to enable usage statistics
collection.
Clear the checkbox if you prefer not to share usage statistics.
- Click Save.
Configuring Browser Settings
You can configure browser settings that are saved in your current browser. These settings are not applied if you sign in using another browser.
-
In the top right toolbar, click the My Account icon
() and then click your user name.
- Click the Browser Settings tab.
-
Configure the following settings:
Browser Setting Description Browser to Engine Communication Method used for browser to engine communication: - Using WebSocket Tunneling
- Using Direct Engine REST APIs
Important: Before using direct engine REST APIs, you must configure all engines to use the HTTPS protocol. For more information, see Engine Communication.Override Organization's Authoring Engine Timeout Overrides the authoring engine timeout value defined for the organization. Authoring Engine Timeout Number of milliseconds that Control Hub waits for a response from an authoring engine before considering the engine as not accessible. When the engine is not accessible, you cannot select that engine as the authoring engine when designing pipelines or creating connections.
In most cases, the organization value should be appropriate. Try increasing the value when the authoring engines are running, but the authoring engine selection pages indicate that engines are not accessible.
Enter a value after choosing to override the organization's authoring engine timeout.
Hide Uninstalled Stages Hide stages that are not installed on the authoring engine in the pipeline creation help bar and in the stage library panel in the pipeline canvas. When cleared, stages that are not installed appear disabled, or greyed out.
Show Advanced Options in New Pipelines Show advanced options by default when creating a new pipeline or when adding a new stage to an existing pipeline. When cleared, new pipelines and stages hide the advanced options by default.
- Click Save.
Inviting Users
Invite other users to join your organization so that you can collaboratively manage pipelines as a team.
-
In the toolbar, click the My Account icon () and then click Invite Users.
-
In the Add Users window, type or paste one or more email
addresses.
Note: Users enter their own display name when they join the organization.
-
Optionally, select one or more existing groups to add the users to.
Control Hub provides a default all group that includes every user in the organization. To create additional groups, see Creating Groups.
-
Optionally, modify the roles assigned to the users.
Default role assignments for new users permit most tasks to encourage development and testing. Change the role assignments as needed to secure the integrity of your organization and data.
For a description of each role, see Role Descriptions.
-
Click Invite.
- For IBM StreamSets as a Service - Control Hub sends an email inviting the users to join your organization.
- For IBM StreamSets as client-managed software - Inform the users that they can access IBM StreamSets on the IBM Software Hub platform.
Note: Users must join the organization within seven days. Otherwise, the invite expires and you must renew the invites.
Upgrading to a Paid Subscription
Applies to: IBM StreamSets as a Service
To upgrade from a free trial to a paid subscription, click the My
Account icon (![]() ) in the top right toolbar, and then click
Subscribe.
) in the top right toolbar, and then click
Subscribe.
Signing Out
To sign out of IBM StreamSets,
click the My Account icon (![]() ) in
the top right toolbar, and then click Sign Out.
) in
the top right toolbar, and then click Sign Out.