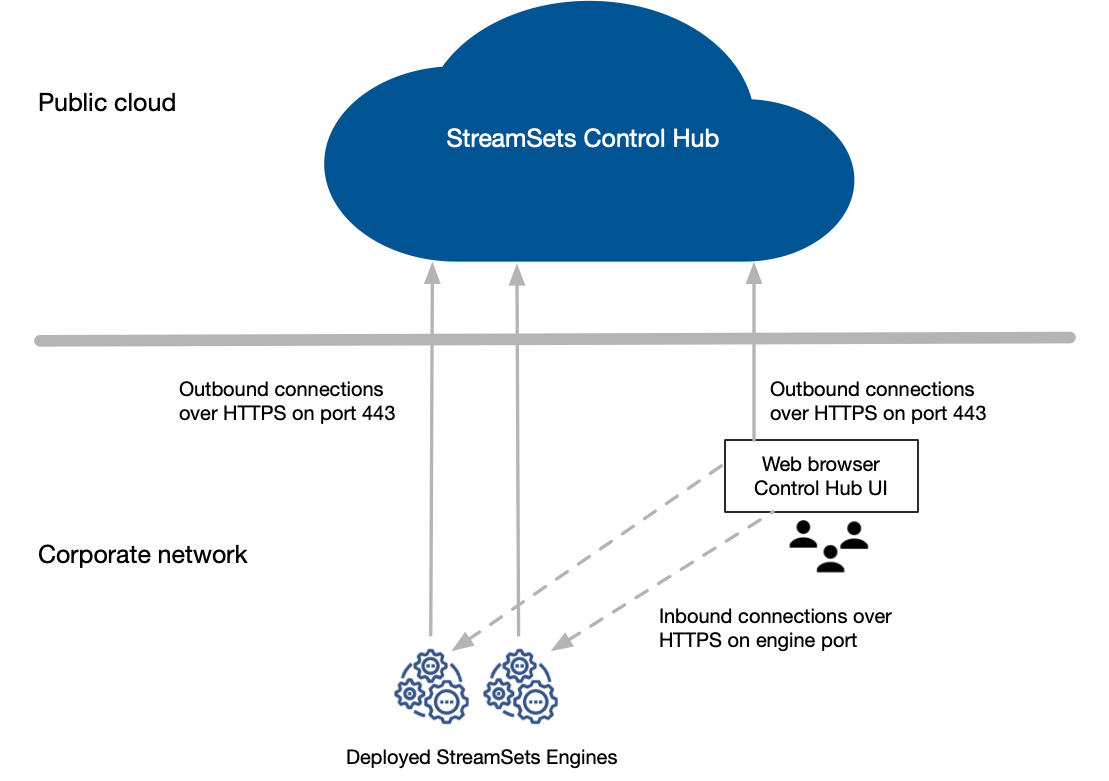
Engine Communication
You access Control Hub using a web browser. You use Control Hub to deploy engines to your corporate network, which can be on-premises or on a protected cloud computing platform.
Control Hub works with the deployed engines when you design pipelines and when you run pipelines from jobs.
- Control Hub
- Deployed engines use encrypted REST APIs to communicate with Control Hub. Engines initiate outbound connections to Control Hub over HTTPS on port number 443.
- Web browser
- The web browser also uses encrypted REST APIs to communicate with Control Hub, initiating outbound connections to Control Hub over HTTPS on port number 443.
WebSocket Tunneling
By default, the web browser uses WebSocket tunneling to communicate with deployed engines.
When an engine starts up, the engine uses the WebSocket Secure (wss) protocol to establish a WebSocket tunnel with Control Hub over an encrypted SSL/TLS connection. Control Hub serves as the WebSocket server, and acts as an intermediary between the browser and the engine.
When you design pipelines or monitor jobs with WebSocket tunneling enabled, the web browser initiates outbound connections to Control Hub over HTTPS on port number 443. Control Hub then uses the encrypted WebSocket tunnel to communicate with the engine. The engine securely passes the requested data back through the WebSocket tunnel to Control Hub, and then the browser receives the data from Control Hub over HTTPS. Control Hub decrypts and then re-encrypts the data as it passes through. Control Hub does not use or inspect the data.
Each engine uses a single WebSocket tunnel connection that remains active until the engine restarts. Multiple users can use the same connection to securely request data from the engine. WebSocket tunneling ensures that your data is secure and does not require additional setup.
However, when you preview a pipeline or capture a snapshot of an active job, your source data does pass through encrypted connections beyond your corporate network into Control Hub, and then back to your web browser. If your data must remain behind a firewall due to corporate regulations, you can configure the browser to use direct engine REST APIs to directly communicate with the engines behind the firewall.
The following image shows how the web browser uses a WebSocket tunnel to communicate with engines:

Direct Engine REST APIs
When your source data must remain behind a firewall due to corporate regulations, you can configure the web browser to use direct engine REST APIs to communicate with engines deployed behind the firewall.
To use direct engine REST APIs, complete the following tasks:
- Enable engines to use the HTTPS protocol.
- Ensure browser access to the engines.
- Choose the direct engine REST APIs communication method in your browser settings.
- Optionally, require all users to use direct engine REST APIs.
The following image shows how the web browser can use direct engine REST APIs to communicate with engines:
Enabling HTTPS for Engines
To use direct engine REST APIs, you must enable engines to use the HTTPS protocol.
Prerequisites
Before you enable HTTPS for an engine, complete the following requirements:
- Obtain access to OpenSSL and Java keytool
- If you do not have a keystore file that includes an SSL/TLS certificate signed
by a certificate authority (CA), you can request a certificate and create the
keystore file using the following tools:
- OpenSSL - Use OpenSSL to create a Certificate Signing Request (CSR) that you send to the CA of your choice, as well as to create the keystore and truststore files. For more information, see the OpenSSL documentation.
- Java keytool - You can also use Java keytool to create a CSR and to create the keystore and truststore files. Java keytool is part of the Java Development Kit (JDK). For more information, see the keytool documentation.
- Generate SSL/TLS certificate and private key pairs signed by a certificate authority (CA)
- To enable HTTPS for an engine, generate a single private key and public certificate pair for the engine. IBM StreamSets provides a self-signed certificate that you can use. However, web browsers generally issue a warning for self-signed certificates. As a best practice, generate a key and certificate pair signed by a trusted CA.
Create a Keystore File
Create a keystore file that includes each private key and public certificate pair signed by the CA. A keystore is used to verify the identity of the client upon a request from an SSL/TLS server.
Create keystores in the PKCS #12 (p12 file) format. In most cases, a CA issues certificates in PEM format. Use OpenSSL to directly import the certificate into a PKCS #12 keystore.
-
Use the following command to import the certificate and private key issued in
PEM format to a PKCS #12 keystore:
openssl pkcs12 -export -in <PEM certificate> -inkey <private key> -out <keystore filename> -name <keystore name>You will be prompted to create a password for the keystore file.
For example:openssl pkcs12 -export -in my_certificate.pem -inkey my_private_key.key -out my_keystore.p12 -name my_keystore -
Store the keystore password in a text file.
For example, store the password in a file named
my_keystore_password.txt.Tip: To ensure that a newline character is not added after the password, run the following command:echo -n "<password>" > my_keystore_password.txt -
Store the keystore and password text files in the engine resources directory,
<installation_dir>/externalResources/resources, on
each engine machine.
For example, if creating the keystore for Data Collector, store the files in the streamsets-datacollector-5.10.0/externalResources/resources directory.
Create a Truststore File (Transformer Only)
Transformer uses the default Java truststore file located in $JAVA_HOME/jre/lib/security/cacerts. When Transformer is enabled for HTTPS and you run a cluster pipeline that launches a Spark application, the default Java truststore file is included with the application. When the Spark application sends status and metrics about running pipelines to Transformer, the HTTPS certificates must be trusted by the default Java truststore.
When Transformer runs pipelines on a Spark cluster and the Transformer HTTPS certificates are signed by a private CA or not trusted by the default Java truststore, you must create a custom truststore file or modify a copy of the default Java truststore file. For example, if your organization generates its own certificates, you must add the root and intermediate certificates for your organization to the truststore file.
- Transformer runs only local pipelines.
- Transformer runs pipelines on a Spark cluster and your certificates are signed by a trusted CA included in the default Java truststore file.
These steps show how to modify a copy of the default truststore file to add an additional CA to the list of trusted CAs. If you prefer to create a custom truststore file, see the keytool documentation.
- Java keystore file (JKS)
- PKCS #12 (p12 file)
-
On the Transformer machine, use the following command to set the JAVA_HOME environment
variable:
export JAVA_HOME=<Java home directory> -
Use the following command to set the TRANSFORMER_RESOURCES environment
variable:
export TRANSFORMER_RESOURCES=<engine resources directory>For example:export TRANSFORMER_RESOURCES=streamsets-transformer-5.0.0/externalResources/resources -
Use the following command to copy the default Java truststore file to the Transformer resources directory:
cp "${JAVA_HOME}/jre/lib/security/cacerts" "${TRANSFORMER_RESOURCES}/truststore.jks" -
Use the following keytool command to import the CA certificate into the
truststore file:
keytool -import -file <CA certificate> -trustcacerts -noprompt -alias <CA alias> -storepass <password> -keystore "${TRANSFORMER_RESOURCES}/truststore.jks"For example:keytool -import -file my_certificate.pem -trustcacerts -noprompt -alias MyCorporateCA -storepass changeit -keystore "${TRANSFORMER_RESOURCES}/truststore.jks" -
Store the truststore password in a text file.
For example, store the password in a file named
my_truststore_password.txtTip: To ensure that a newline character is not added after the password, run the following command:echo -n "<password>" > my_truststore_password.txt -
Store the truststore file and password text file in the Transformer resources directory,
<installation_dir>/externalResources/resources, on each Transformer machine.
Configure Engines to Use HTTPS
Modify engine configuration properties to configure the engine to use a secure port, your keystore file, and optionally your truststore file.
-
When using one of the cloud service provider deployments, such as an Amazon EC2
or a Google Compute Engine (GCE) deployment, locate the public IP address of the
provisioned instance.
- Launch the deployment to provision the instance.
- Use the console for your cloud service provider to locate the provisioned instance.
- Copy the public IP address of the instance.
- In Control Hub, edit the deployment. In the Configure Engine section, click Advanced Configuration. Then, click <engine type> Configuration.
-
Define the following engine configuration properties:
Engine HTTPS Property Description https.port Secure port number for the engine. For example, for Data Collector, you might enter 18636. Any number besides -1 enables the secure port number.
Note: When both the HTTP and HTTPS port properties are defined, the HTTP port bounces to the HTTPS port.sdc.base.http.url, transformer.base.http.url,
or
streamflake.base.http.url
Engine URL using the HTTPS protocol and the secure port number configured in the
https.portproperty.For a cloud service provider deployment, use the public IP address that you copied from the cloud service provider console. For example, for Data Collector:
sdc.base.http.url=https://<IP
                                                address>:18636
For a self-managed deployment where the engine runs on a local on-premises machine, you might use the name of the host machine. For example, for Data Collector:
sdc.base.http.url=https://myhost:18636Important: For a self-managed deployment where the engine runs on a cloud computing machine, use the public IP address of that instance.Be sure to uncomment the property.
https.keystore.path Path and name of the keystore file. Enter an absolute path or a path relative to the engine resources directory.
For example, to use a keystore file named
my_keystore.p12stored in the resources directory, configure the property as follows:https.keystore.path=my_keystore.p12Note: Default iskeystore.jkswhich provides a self-signed certificate that you can use. However, as a best practice, generate a certificate signed by a trusted CA, as described in Prerequisites.https.keystore.password Password to open the keystore file. For example, if you added the password to a text file named my_keystore_password.txt and stored the file in the engine resources directory, configure the property as follows:https.keystore.password=${file("my_keystore_password.txt")}https.require.hsts Requires the engine to include the HTTP Strict Transport Security (HSTS) response header. Set to
trueto enable HSTS.Default is
false.Available for Data Collector and Transformer.
https.truststore.path Path and name of the truststore file. If you created a custom truststore file or modified a copy of the default Java truststore file, uncomment this property and enter an absolute path or a path relative to the engine resources directory.
For example, to use a truststore file named
truststore.jksstored in the resources directory, configure the property as follows:https.truststore.path=truststore.jksIf you do not uncomment and configure the property, the engine uses the default Java truststore file located in $JAVA_HOME/jre/lib/security/cacerts.
Applicable for Transformer only.
https.truststore.password Password to open the truststore file. Uncomment this property to specify the location of the password.
For example, if you added the password to a text file named my_truststore_password.txt and stored the file in the engine resources directory, configure the property as follows:
https.truststore.password=${file("my_truststore_password.txt")}Applicable for Transformer only.
- Save the changes to the deployment and restart all engine instances.
-
For a self-managed deployment using Docker, you must shut down and then
manually start the engine instances from the command line to publish the
configured HTTPS port number.
-
In the Deployments view, select the deployment, and then click the
Stop icon:
 .
.
Wait for the deployment to stop and for all running engine instances to shut down.
-
Select the deactivated deployment, and then click the
Start icon:
 .
.
-
In the Deployments view, select the deployment, and then click the
Stop icon:
Ensuring Browser Access to Engines
To use direct engine REST APIs, you must ensure that the browser can reach the URLs of the engines.
Configure network routes and firewalls so that Control Hub web browsers can reach all engines on the configured HTTPS port number. For more information about inbound traffic to engines, see Firewall Configuration.
To verify that the browser can access the engines, view the engines from the Engines view or from the deployment details on the Deployments view. When the engine is accessible, the Last Reported Time value is listed in green. When the engine cannot be reached, the Last Reported Time value is red.
Choosing the Communication Method
After you enable HTTPS for the engines and ensure that the browser can access the engines, you choose the communication method that the browser uses.
By default, the browser uses WebSocket tunneling. You might choose direct engine REST APIs because the REST APIs can offer faster communication with the engines.
-
In the top Control Hub toolbar, click the My Account icon (
 ), and then click your user name.
- Click the Browser Settings tab.
-
For the Browser to Engine Communication property, select
one of the following options:
- Using WebSocket Tunneling
- Using Direct Engine REST APIs
Note: The property is saved in the configured web browser only. It does not apply if you log in from another browser. - Click Save.
Requiring Direct Engine REST APIs
An organization administrator can optionally require that all web browsers use direct engine REST APIs to communicate with the engines.
- In the Navigation panel, click .
- In the organization details, click Advanced.
- Clear Enable WebSocket Tunneling for UI Communication.
-
Click Save.
The web browser used by all users in your organization always uses direct engine REST APIs to communicate with engines, regardless of the user-defined communication method set from the My Account menu.