Enabling SAML using Entra ID
Applies to: IBM StreamSets as a Service
When using Microsoft Entra ID (previously known as Azure AD) as an identity provider, complete the following steps to enable SAML authentication for your organization:
- Retrieve IdP information generated for your organization.
- Create an Entra ID enterprise application for IBM StreamSets.
- Set up a draft SAML configuration for your organization.
- Publish and enable the SAML configuration.
- Optionally configure SCIM provisioning of user accounts.
Step 1. Retrieve IdP Information
In Control Hub, choose Entra ID as your identity provider and then retrieve the IdP information generated for your organization.
- As a user with the Organization Administrator role, log in to IBM StreamSets using local or public identity provider authentication.
- In the Control Hub Navigation panel, click .
- Click Configure SAML.
- Click the Draft tab.
-
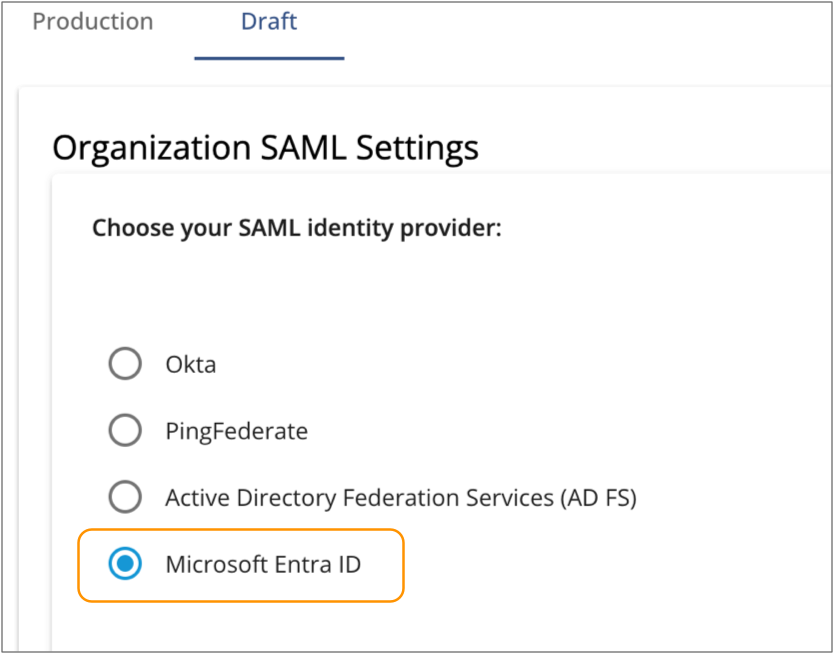
Choose Entra ID as your SAML identity provider.
-
In the IdP SAML Configuration section on the right, verify
that the Require Encryption on Assertion property is
enabled and then click Download StreamSets SAML
Metadata.
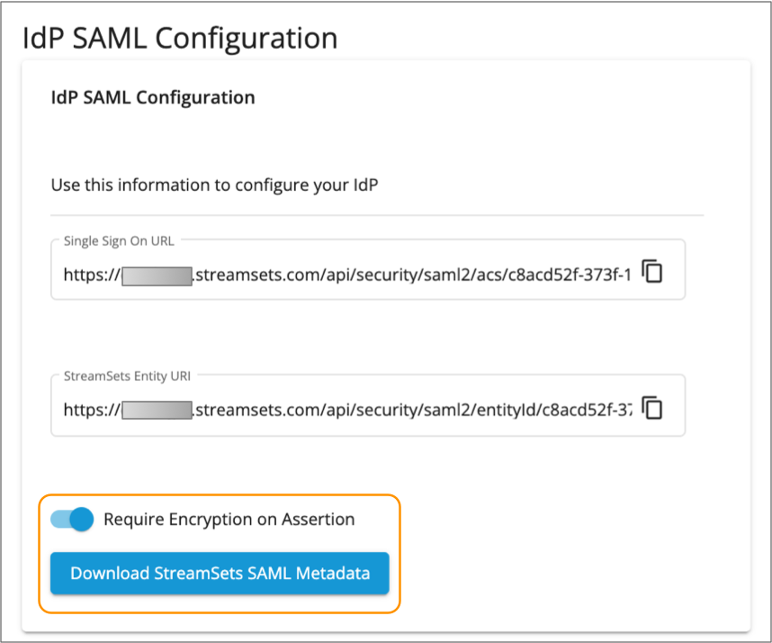
The metadata XML file is saved to your default downloads directory.
-
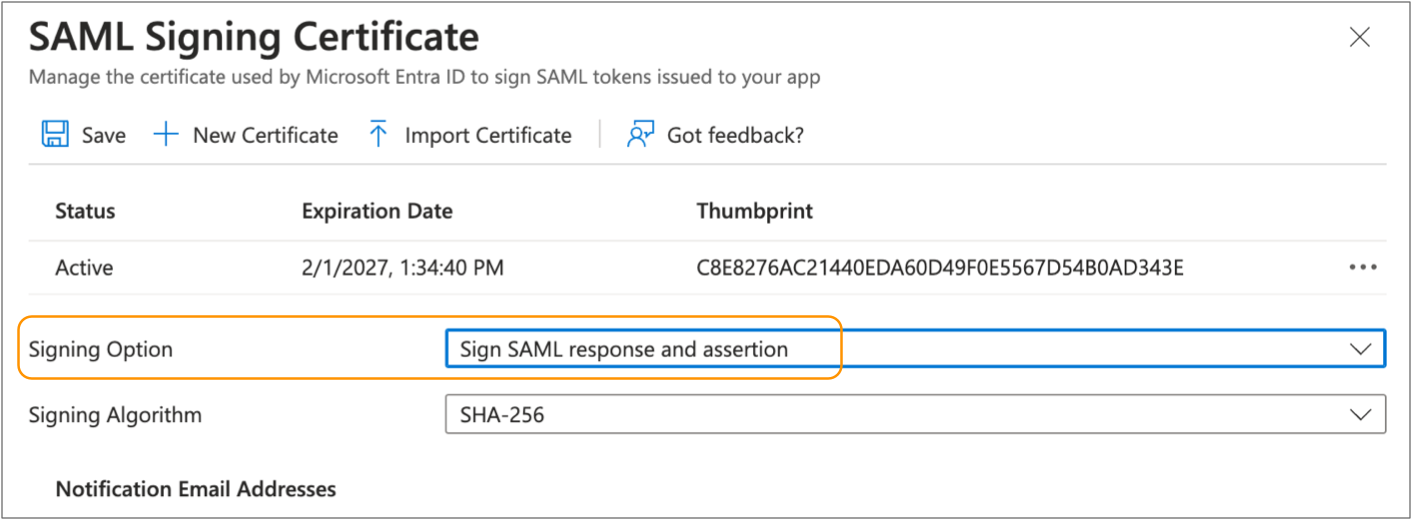
To configure IBM StreamSets to sign SAML requests and to configure Entra ID to encrypt SAML response
assertions, download the IBM StreamSets SAML certificate by clicking the Download icon (
 ) in
the List of SAML Certificates section on the right.
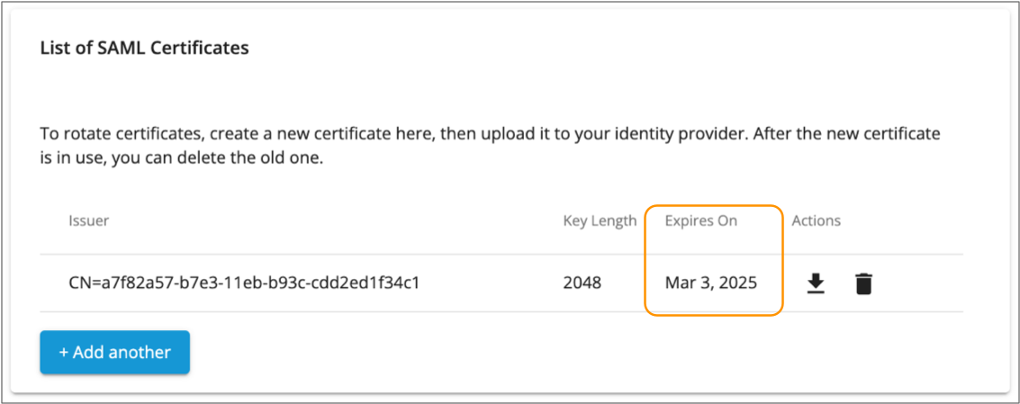
The certificate is saved to your default downloads directory. For more information, see Service Provider Certificates.
- Click Save to save the changes made to the draft SAML configuration.
Step 2. Create an Entra ID Application
To register IBM StreamSets as a service provider in Entra ID, use the IdP information that you retrieved from Control Hub to create an enterprise application in Entra ID. Then, assign the enterprise application to all Entra ID users and groups that need to log in to IBM StreamSets.
- In the Azure portal, select Microsoft Entra ID.
- In the left navigation, click .
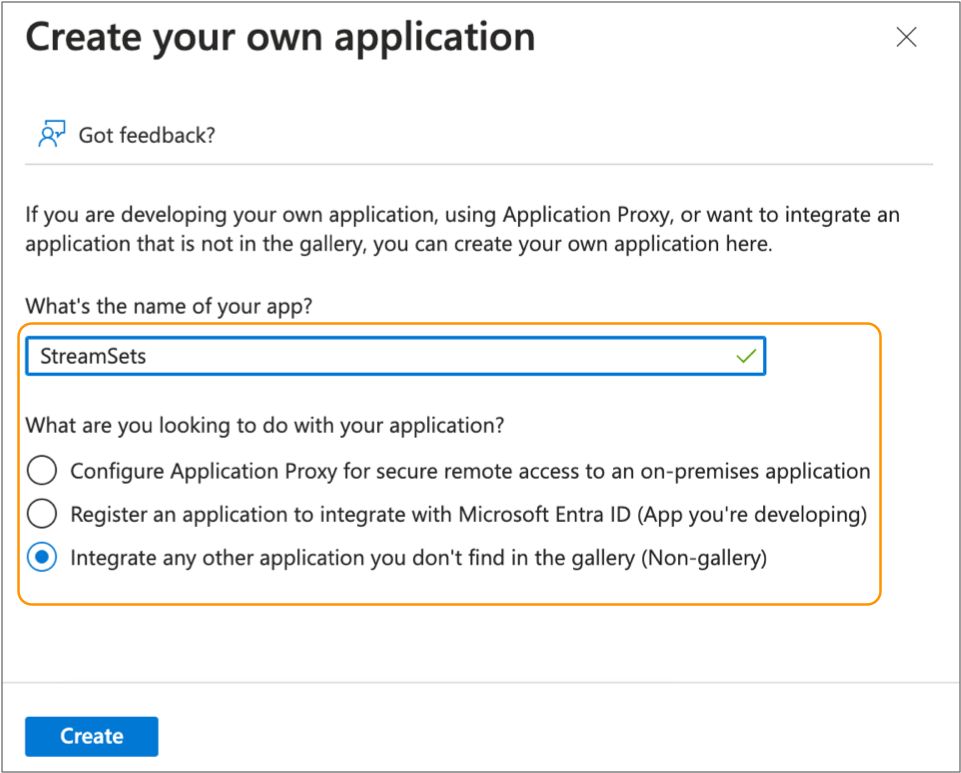
- Click New application, and then click Create your own application.
-
Enter the name of the application.
For example, you might enter StreamSets.
-
Select Integrate any other application you don't find in the gallery
(Non-gallery).
- Click Create.
- In the left navigation, click .
-
Click Add user/group, and then select all Entra ID users
and groups that need to log in to IBM StreamSets.
Important: Each Control Hub organization provides a default group named all that includes every user in the organization. As a result, you cannot assign an Entra ID group named all to the IBM StreamSets enterprise application.
-
Click Assign to assign the selected Entra ID users and
groups to the IBM StreamSets enterprise application.
For detailed steps about assigning users and groups to enterprise applications, see the Entra ID documentation.
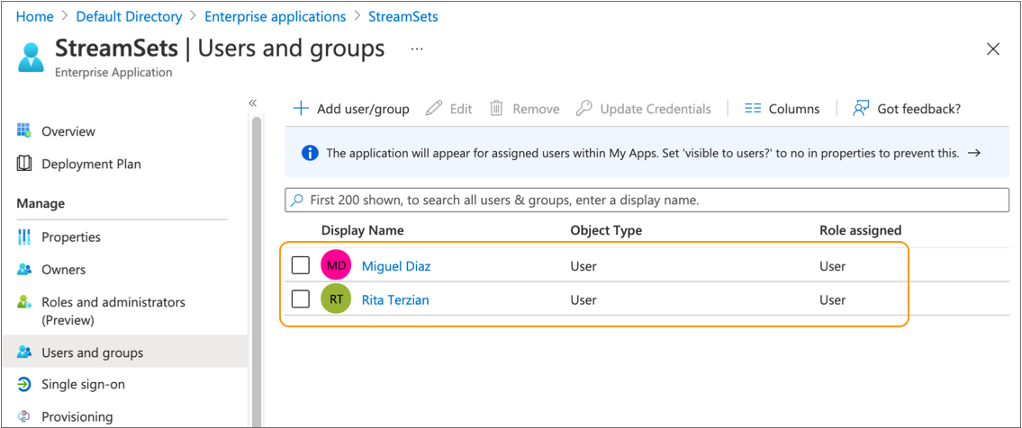
For example, the following image shows that two users have been assigned to the enterprise application:
- In the left navigation, click .
- Select SAML as the single sign-on method.
-
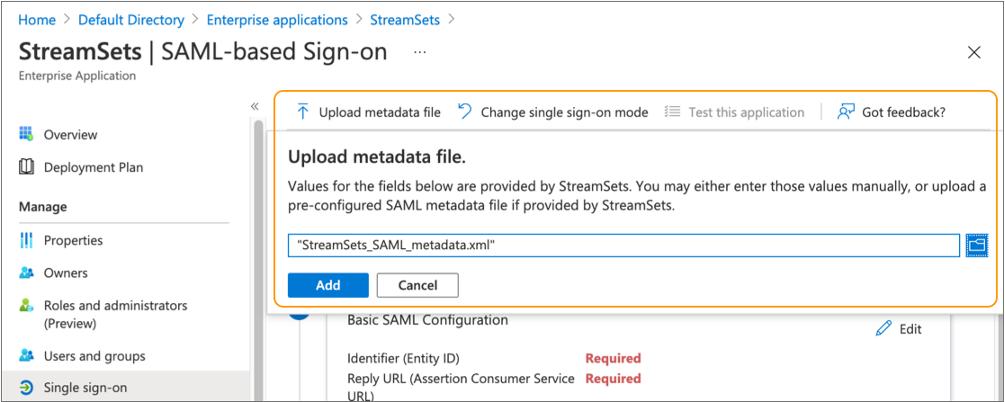
Click Upload metadata file, select the metadata XML file
that you downloaded from Control Hub, and then click Add.
- Click Save, and then close the Basic SAML Configuration pane.
- In the Attributes & Claims section, click Edit to configure the attributes that Entra ID passes to IBM StreamSets.
-
In the Required claim section, map the Entra ID attribute
that contains the user email address to the Unique User Identifier (Name ID)
claim.
By default,
user.userprincipalnameis mapped to the Unique User Identifier claim. Ifuser.userprincipalnamecontains the user email address, you do not need to make any changes.If
user.userprincipalnamedoes not contain the user email address, select the Unique User Identifier claim to edit the source attribute value. Change the Source attribute value to the Entra ID attribute containing the user email address. For example, if theuser.mailattribute contains the email address, edit the attribute as follows: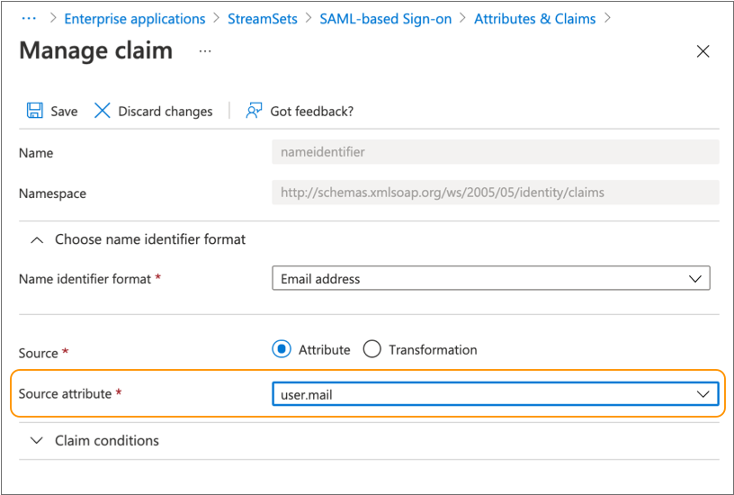
- Click Save.
- In the Additional claims section, delete the emailaddress claim, and then click OK to confirm the deletion.
-
Optionally, edit the additional claims so that Entra ID can pass user names to
IBM StreamSets.
For more information, see IdP Attribute Mappings.
Edit the additional claims as follows:
Name Namespace Source Attribute displayName none user.displayname firstName none user.givennamelastName none user.surname -
Close the Attributes & Claims pane.
The complete list of edited attributes and claims displays as follows:

-
Configure the enterprise application to encrypt the SAML assertion.
- In the left navigation, click .
-
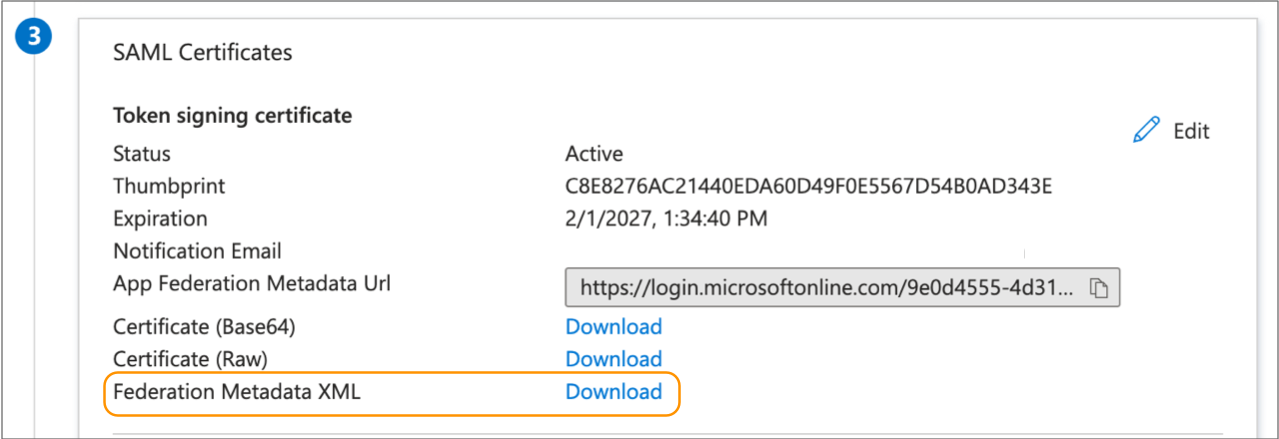
In the SAML Certificate section, download the Federation
Metadata XML.
Step 3. Set up a Draft SAML Configuration
In Control Hub, set up the draft SAML configuration for your organization by uploading the metadata XML file downloaded from Entra ID, and then optionally configuring advanced properties. You can also enable or disable SP-initiated logins.
- In the Control Hub Navigation panel, click .
- Click Configure SAML.
- Click the Draft tab.
-
In the Organization SAML Settings section, click
Upload Metadata File from IdP and upload the metadata
file that you downloaded from Entra ID.
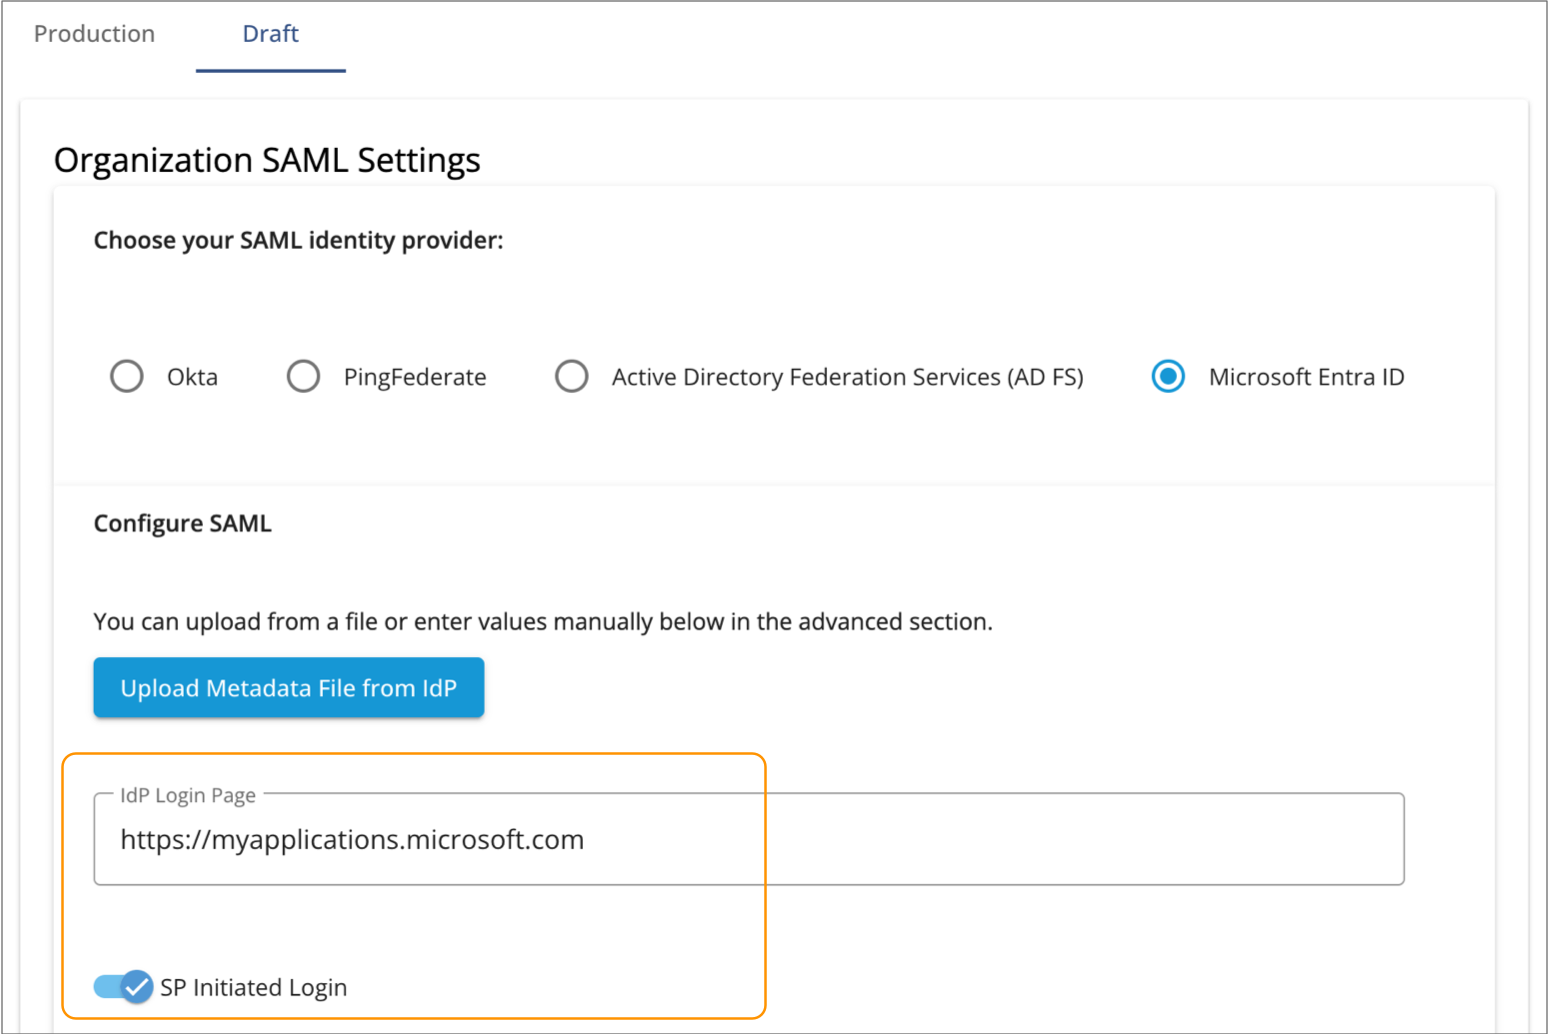
By default, the IdP Login Page property is automatically populated from the uploaded metadata, and SP-initiated logins from IBM StreamSets are enabled, as follows:
-
To disable SP-initiated logins and require IdP-initiated logins, disable the
SP Initiated Login property.
For more information, see IdP and SP-initiated Logins.
-
If you created custom attributes and claims in Entra ID that do not match the
default values displayed for the IdP user properties, modify the property values
as needed.
If you created the attributes and claims as instructed in Step 2. Create an Entra ID Application, you can use the default values. For more information, see IdP Attribute Mappings.
-
To enable the automatic provisioning of user accounts from Entra ID to IBM StreamSets, enable the SCIM Provisioning property.
Important: In addition to enabling this property, you must complete additional steps to configure SCIM provisioning, as described in Step 5. Configure SCIM Provisioning. Configure SCIM provisioning only after you finish enabling SAML authentication.
-
Optionally, click Show Advanced and modify the advanced
properties.
Control Hub automatically populates the advanced property values from the uploaded metadata file. In most cases, you do not need to modify the advanced properties.
- Click Save.
-
If you enabled SP-initiated logins, click Test to test
the configuration.
The SAML debug console displays, indicating whether IBM StreamSets is able to successfully send a request to Entra ID and receive a response. In case of a failure, use the listed errors to help you troubleshoot issues.
Step 4. Publish and Enable the SAML Configuration
After testing and validating that the draft SAML configuration is set up correctly with Entra ID, publish the configuration to production and then enable the configuration to activate it.
- In the Draft tab, click Publish in the Organization SAML Settings section.
-
Click Confirm.
The Production tab displays a read-only version of the SAML configuration.
- In the Production tab, click Enable to enable SAML authentication for your organization.
-
Click Confirm.
When enabled, all organization users must log in using SAML authentication. For more information, see IdP and SP-initiated Logins.
To enable the automatic provisioning of user accounts from Entra ID to IBM StreamSets, continue with Step 5. Configure SCIM Provisioning.
If you choose not to enable automatic provisioning, then you must manually manage user accounts as follows:- To invite new users to the organization, first use Entra ID to assign the users to the IBM StreamSets enterprise application. Then in Control Hub, use the email addresses from Entra ID to invite the users. For more information, see Adding Users.
-
If existing organization users are assigned to the IBM StreamSets enterprise application in Entra ID and originally joined with their email address from Entra ID, they can use SAML authentication for the next login session. If existing organization users joined with a different email address, you must add them to the Control Hub organization again using the email address from Entra ID.
Step 5. Configure SCIM Provisioning
You can optionally configure the automatic provisioning of users and groups from Entra ID to IBM StreamSets. To do so, complete additional steps in both Control Hub and in Entra ID.
- Verify that when you created an Entra ID enterprise application, you assigned the Entra ID users and groups that need to log in to IBM StreamSets to the enterprise application.
- Verify that when you set up the draft SAML configuration for your organization, you also enabled the SCIM Provisioning property. If not enabled, edit the SAML draft configuration and then publish it to production.
- Consider defining default roles for newly provisioned users.
- With the exception of the primary user account assigned the Organization Administrator role and the default all group, consider deleting existing Control Hub users and groups that did not originally join with their email address from Entra ID and that are not assigned to the Entra ID enterprise application. After SCIM provisioning is enabled, you cannot use Control Hub to delete users and groups.
-
Create a Control Hub API credential that Entra ID requires to connect to IBM StreamSets and synchronize user data:
- In the Azure portal, select Microsoft Entra ID.
- In the left navigation, click .
- Click the name of the enterprise application that you created when you enabled SAML authentication for IBM StreamSets.
- In the left navigation, click .
- Click Get Started.
- Set Provisioning Mode to Automatic.
-
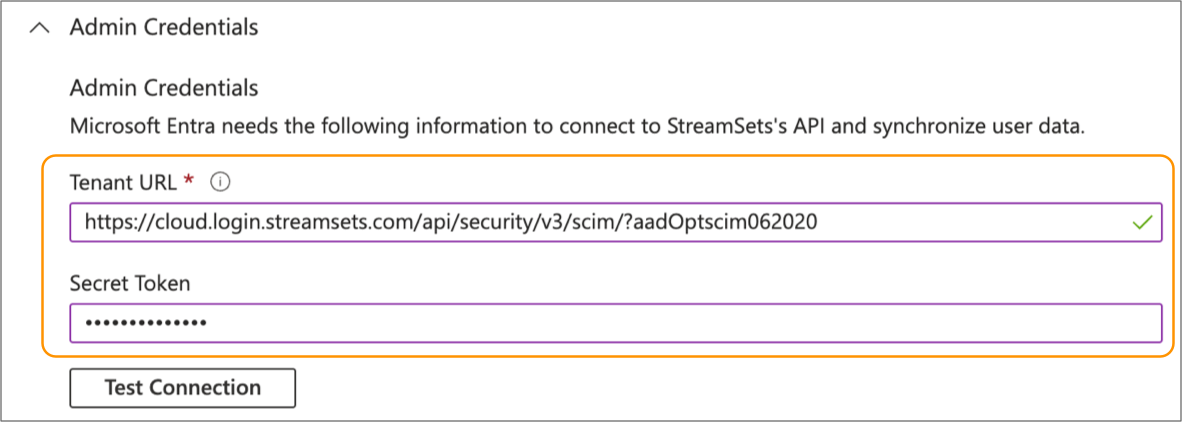
In the Admin Credentials section, enter the following URL
for the Tenant URL property:
https://cloud.login.streamsets.com/api/security/v3/scim/?aadOptscim062020 -
In the Secret Token property, paste the authentication
token value that you copied from the Control Hub API credential created in step 1.
- Click Test Connection to verify that the Entra ID enterprise application can connect to the IBM StreamSets SCIM endpoints.
- Click Save.
-
Expand the Mappings section to define how to map user
attributes between Entra ID and IBM StreamSets.
You can use the default group mappings, but must modify the default user mappings.
- Click Provision Entra ID Users.
- Use the default values for the general properties, and verify that Target Object Actions is set to Create, Update, and Delete.
-
In the Attribute Mappings section, map the appropriate
Entra ID attributes to the following target attributes required by IBM StreamSets:
userName- Must be mapped to the Entra ID attribute that contains the user email address.active- Indicates whether the user account is active.displayName- User display namename.givenName- User first name.name.familyName- User last name.externalId- Unique identifier for the user account.
Delete the remaining target attributes not required by IBM StreamSets.
For example, the following image displays the target attributes required by IBM StreamSets. In this example, the Entra IDuserPrincipalNameattribute contains the user email address and thus is mapped to theuserNametarget attribute. Your list of Entra ID attributes might differ.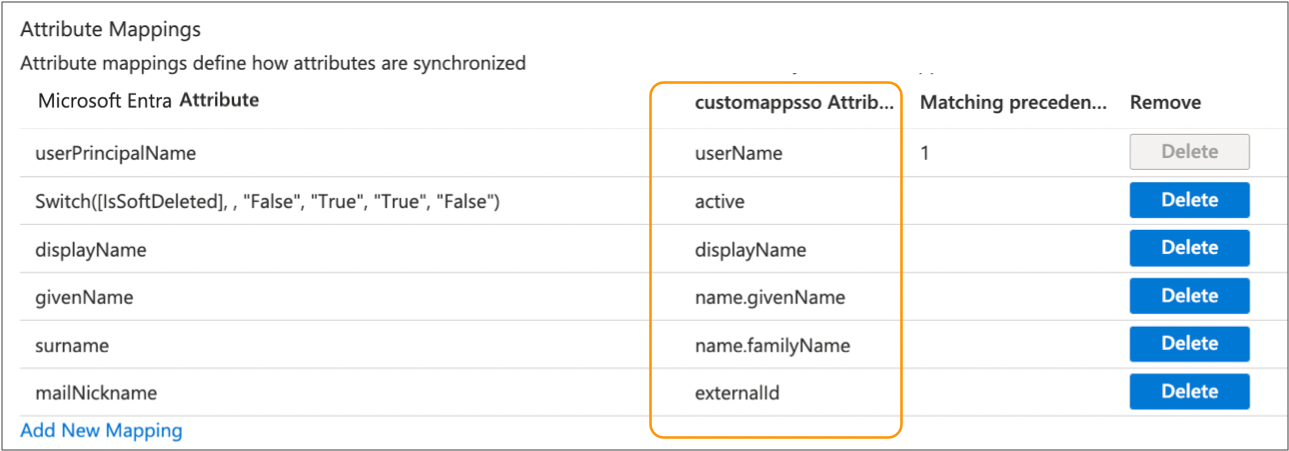
- Click Save, and then close the Attribute Mapping pane.
- Close the Provisioning pane.
-
Click Start provisioning.
Entra ID starts the initial provisioning immediately, and then periodically performs incremental provisioning to synchronize updates to IBM StreamSets. For more information about how Entra ID provisions users and groups, see the Entra ID documentation.
