Managing Jobs
After publishing pipelines, create a job for each pipeline that you want to run. You can create a job in the following ways:
- From a pipeline
- When you create a job from a pipeline, you configure all of the job details. You can create a single job instance at a time.
- From a job template
- When you create a job from a job template, the job definition is already determined, and you configure pipeline parameter values only. You can create multiple job instances at the same time. The job instances have the same job definition, but different runtime parameter values.
When you start a job, Control Hub sends an instance of the pipeline to an execution engine assigned all labels assigned to the job.
When a job is active, you can synchronize or stop the job.
When a job is inactive, you can reset the origin for the job, edit the job, or delete the job.
When a job is active or inactive, you can edit the latest pipeline version, upgrade the job to use the latest pipeline version, or schedule the job to start, stop, or upgrade on a regular basis.
Creating a Job from a Pipeline
When you create a job from a pipeline, you configure all of the job details.
- In the Navigation panel, click , and then click the Create a Job Instance
icon:
 .
. - In the Navigation panel, click , select a published pipeline, and then click the
Create Job icon:
 .
.
Define the Job
Define the job essentials, including the job name, and optionally a description and tags to identify similar jobs.
-
Configure the following information to define the job:
Property Description Name Name of the job. Use a brief name that informs your team of the job use case.
Description Optional description. Use the description to add additional details about the job use case.
Job Tags Tags that identify similar jobs. Use job tags to easily search and filter jobs. Enter nested tags using the following format:
<tag1>/<tag2>/<tag3>Start with Select Create from pipeline. Note: If you launched the job wizard after selecting a published pipeline in the Pipelines view, this property does not display. -
Click one of the following buttons:
- Cancel - Cancels creating the job and exits the wizard.
- Next - Saves the job definition and continues.
Select the Pipeline
Select the published pipeline that you want to add to the job and then run.
-
To select a published pipeline, click Click here to
select next to the Pipeline
property.
In the Select a Pipeline window, select the pipeline to use, and then click Save to return to the job wizard.
By default, the latest published version is selected.
-
To select an earlier published version, click Click here to
select next to the Pipeline Version
property.
In the Select a Pipeline Version window, select an earlier version, and then click Save to return to the job wizard.
-
Click one of the following buttons:
- Back - Returns to the previous step in the wizard.
- Next - Saves the job definition and continues.
Configure the Job
Configure the job to determine how engines run the pipeline.
-
Configure the following job properties:
Property Description Deployment Deployment associated with the group of engines that run the pipeline. Engine Labels Label or labels that determine the group of engines that run the pipeline. Labels are case sensitive. By default, the labels assigned to the deployment are automatically selected as the engine labels. In most cases, you can use the default labels so that the pipeline runs on a deployment of identical engine instances.
Enable Failover Enables Control Hub to restart a pipeline on another available engine when the original engine shuts down unexpectedly.
Default is enabled.
Control Hub manages pipeline failover differently based on the engine type, as described in the following topics: -
Optionally, click Show Advanced Options and configure
the following advanced properties.
The defaults should work in most cases.
Advanced Job Property Description Number of Instances Number of pipeline instances to run for the job. Increase the value only when the pipeline is designed for scaling out. Default is 1, which runs one pipeline instance on an available Data Collector running the fewest number of pipelines. An available Data Collector is an engine assigned all labels specified for the job.
Available for Data Collector jobs only.
Failover Retries per Data Collector Maximum number of pipeline failover retries to attempt on each available Data Collector. When a Data Collector reaches the maximum number of failover retries, Control Hub does not attempt to restart additional failed pipelines for the job on that Data Collector.
Use -1 to retry indefinitely.
Available for Data Collector jobs when failover is enabled.
Global Failover Retries Maximum number of pipeline failover retries to attempt across all available engines. When the maximum number of global failover retries is reached, Control Hub stops the job. Use -1 to retry indefinitely.
Control Hub manages failover retries differently based on the engine type, as described in the following topics:Available when failover is enabled.
Statistics Refresh Interval (ms) Milliseconds to wait before automatically refreshing statistics when you monitor the job. The minimum and default value is 60,000 milliseconds.
Pipeline Force Stop Timeout (ms) Number of milliseconds to wait before forcing remote pipeline instances to stop. In some situations when you stop a job, a remote pipeline instance can remain in a Stopping state. For example, if a scripting processor in the pipeline includes code with a timed wait or an infinite loop, the pipeline remains in a Stopping state until it is force stopped.
Default is 120,000 milliseconds, or 2 minutes.
Require Job Error Acknowledgement Requires that users acknowledge an inactive error status due to connectivity issues before the job can be restarted. Clear the property for a scheduled job so the job can automatically be restarted without requiring user intervention.Important: Clear the property with caution, as doing so might hide errors that the job has encountered. -
Click one of the following buttons:
- Back - Returns to the previous step in the wizard.
- Save & Next - Saves the job and continues.
- Save & Exit - Saves the job and exits the wizard, displaying the new job in the Job Instances view. If the selected pipeline uses runtime parameters, the job uses the default parameter values defined in the pipeline.
Define the Runtime Parameters
If the selected pipeline uses runtime parameters, define the parameter values to use when the job starts.
-
Override the default value of each parameter as needed.
The wizard displays the parameter names and default values as defined in the pipeline.
If the pipeline uses a parameter for a connection property, the default value displays the connection ID. To view the name of the default connection or to select another connection of the same type, click the Select Connection icon:
 .
.You can override the default values using simple or bulk edit mode. In bulk edit mode, configure parameter values in JSON format. You can also use functions to define parameter values.
-
Click one of the following buttons:
- Back - Returns to the previous step in the wizard.
- Save & Next - Saves the parameter values and continues.
- Save & Exit - Saves the parameter values and exits the wizard, displaying the new job in the Job Instances view.
Review and Start the Job
You've successfully finished creating the job.
- Exit - Saves the job and exits the wizard, displaying the new job in the Job Instances view.
- Start & Monitor Job - Starts the job and displays the job in the canvas so that you can monitor the progress.
Creating a Job from a Job Template
When you create a job from a job template, the job definition is already determined, and you configure pipeline parameter values only. You can create and start multiple job instances at the same time. The job instances have the same job definition, but different runtime parameter values.
- In the Navigation panel, click , and then click the Create a Job Instance
icon: .
- In the Navigation panel, click , select a job template, click the More
icon (
 ), and then click Create Instances.
Define the Job
Define the job essentials, including the job name, and optionally a description and tags to identify similar jobs.
-
Enter the following information to define the job:
Property Description Name Name of the job. Use a brief name that informs your team of the job use case.
Description Optional description. Use the description to add additional details about the job use case.
Job Tags Tags that identify similar jobs. Use job tags to easily search and filter jobs. Job instances also inherit all tags added to the job template.
Enter nested tags using the following format:
<tag1>/<tag2>/<tag3>Start with Select Create from job template. Note: If you launched the job wizard after selecting a job template in the Job Templates view, this property does not display. -
Click one of the following buttons:
- Cancel - Cancels creating the job and exits the wizard.
- Next - Saves the job definition and continues.
Select the Job Template
Select the job template that you want to use to create the job instances, and then optionally configure advanced options.
-
To select a job template, click Click here to
select.
In the Select a Job Template window, select the template to use, and then click Save to return to the job wizard.
Note: If you launched the job wizard after selecting a job template in the Job Templates view, the template is selected for you. You can select a different template if needed. -
Optionally, click Show Advanced Options and configure
the following advanced properties:
Property Description Delete from Job Instances when Completed Automatically deletes job instances from the Job Instances view when they finish and transition to an inactive status. Select when you want to avoid listing a large number of completed instances in the Job Instances view.
Attach Instances to Template Attaches the job instances to the parent job template. Attached job instances are updated when the parent job template is edited. Clear to detach the job instances from the job template. Detached job instances are not updated when the parent job template is edited.
Inherit Permissions Job instances inherit the permissions assigned to the parent job template. You can configure both attached and unattached job instances to inherit permissions.
-
Click one of the following buttons:
- Back - Returns to the previous step in the wizard.
- Next - Saves the job definition and continues.
Define the Runtime Parameters
If the pipeline included in the job template uses runtime parameters, define the parameter values to use when the job instances start.
-
Configure the following properties:
Job Instances Property Description Instance Name Suffix Suffix used to uniquely name each job instance: - Counter
- Timestamp
- Parameter Value
The suffix is added to the job name after a hyphen, as follows:<job name> - <suffix>Runtime Parameters for Each Instance Runtime parameter values for each job instance. The wizard displays the names and default values of all dynamic and static parameters as defined in the job template. You can override dynamic parameter values, but not static parameter values.
If the pipeline uses a parameter for a connection property, the default value displays the connection ID. To view the name of the default connection or to select another connection of the same type, click the Select Connection icon:
.Override the dynamic parameter values in simple edit mode or in bulk edit mode in JSON format. Or, define them in a file in JSON format and upload the file.
Add Another Instance When using simple or bulk edit mode, click Add Another Instance to create another job instance. Control Hub adds another group of runtime parameters and values to the list of runtime parameters. You can define unique dynamic parameter values for each instance.
-
Click one of the following buttons:
- Back - Returns to the previous step in the wizard.
- Create & Start - Creates and starts all job instances and continues with the next step in the wizard.
Review and Start the Job
You've successfully finished creating and starting the job instances.
Click Exit, and then monitor the instances from the Job Instances view or from the parent job template details.
Starting Jobs
When you start a job in the Job Instances view, you start a single job instance. Control Hub sends an instance of the pipeline to an engine assigned all labels added to the job.
Before sending an instance of a pipeline to an engine, Control Hub verifies that the engine does not exceed its resource thresholds.
- In the Navigation panel, click .
-
Hover over the inactive job, and then click the Start
Job icon:
 .
.
Filtering Jobs
- In the Navigation panel, click .
-
If the Filter column does not display, click the Toggle Filter
Column icon:
 .
.
The following image displays the Filter column in the Job Instances view:
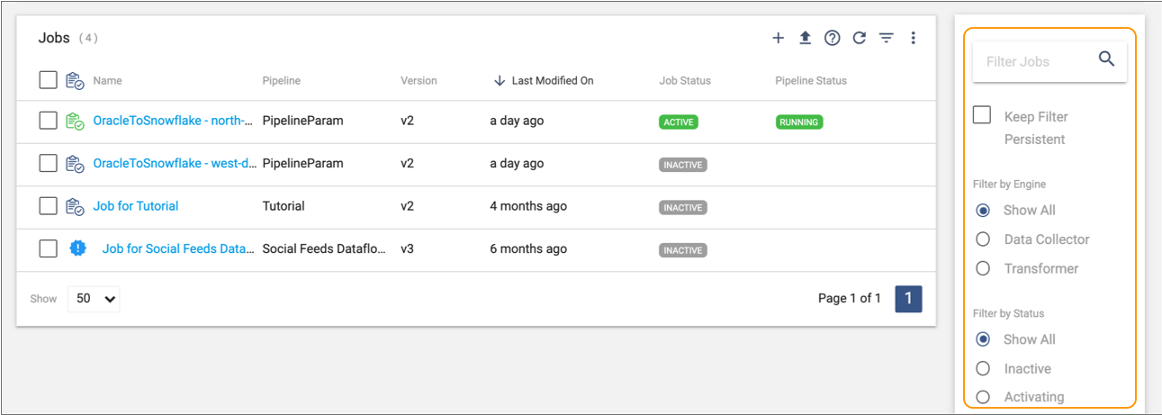
- To search for jobs by name, enter text in the search field, and then press Return.
- Select an engine type, job status, job status color, execution engine label, job tag, or whether the job was created from a template to additionally filter the list of jobs.
-
Select the Keep Filter Persistent checkbox to retain the
filter when you return to the view.
Tip: To share the applied filter, copy the URL and send it to another user in your organization.
Synchronizing Jobs
Synchronize a job when you've changed the labels assigned to Data Collectors and the job is actively running on those engines. Or, synchronize a job to trigger a restart of a non running pipeline that has encountered an error.
- Stops the job so that all running pipeline instances are stopped, and then waits until each Data Collector sends the last-saved offset back to Control Hub. Control Hub maintains the last-saved offsets for all pipeline instances in the job.
- Reassigns the pipeline instances to Data Collectors as follows, sending the
last-saved offset for each pipeline instance to a Data Collector:
- Assigns pipeline instances to additional Data Collectors that match the same labels as the job and that have not exceeded any resource thresholds.
- Does not assign pipeline instances to Data Collectors that no longer match the same labels as the job.
- Reassigns pipeline instances on the same Data Collector that matches the same labels as the job and that has not exceeded any resource thresholds. For example, a pipeline might have stopped running after encountering an error or after being deleted from that Data Collector.
- Starts the job, which restarts the pipeline instances from the last-saved offsets so that processing can continue from where the pipelines last stopped.
For example, let’s say a job is active on three Data Collectors with label Test. If you remove label Test from one of the Data Collectors, synchronize the active job so that the pipeline stops running on that Data Collector. Or, let's say that one of the three pipelines running for the job has encountered an error and has stopped running. If you synchronize the active job, Control Hub triggers a restart of the pipeline on that same Data Collector.
Job Offsets
Just as Data Collector and Transformer engines maintain the last-saved offset for some origins when you stop a pipeline, Control Hub maintains the last-saved offset for the same origins when you stop a job.
Let's look at how Control Hub maintains the offset for Data Collector pipelines. Control Hub maintains the offset for Transformer pipelines the same way:
- When you start a job, Control Hub can run a remote pipeline instance on each Data Collector assigned all labels assigned to the job. As a Data Collector runs a pipeline instance, it periodically sends the latest offset to Control Hub. If a Data Collector becomes disconnected from Control Hub, the Data Collector maintains the offset. It updates Control Hub with the latest offset as soon as it reconnects to Control Hub.
- When you stop a job, Control Hub instructs all Data Collectors running pipelines for the job to stop the pipelines. The Data Collectors send the last-saved offsets back to Control Hub. Control Hub maintains the last-saved offsets for all pipeline instances in that job.
- When you restart the job, Control Hub sends the last-saved offset for each pipeline instance to a Data Collector so that processing can continue from where the pipeline last stopped. Control Hub determines the Data Collector to use on restart based on whether failover is enabled for the job:
- Failover is disabled - Control Hub sends the offset to the same Data Collector that originally ran the pipeline instance. In other words, Control Hub associates each pipeline instance with the same Data Collector.
- Failover is enabled - Control Hub sends the offset to a different Data Collector with matching labels.
You can view the last-saved offset sent by each execution engine in the job History view.
If you want the execution engines to process all available data instead of processing data from the last-saved offset, simply reset the origin for the job before restarting the job. When you reset the origin for a job, you also reset the job metrics.
Origins that Maintain Offsets
Control Hub maintains the last-saved offset for the same origins as execution engines. Execution engines maintain offsets for some origins only.
Data Collector Origins
Data Collector maintains offsets for the following origins:
- Amazon S3
- Azure Blob Storage
- Azure Data Lake Storage Gen2
- Azure Data Lake Storage Gen2 (Legacy)
- CONNX
- CONNX CDC
- CoAP Server
- Couchbase
- Directory
- Elasticsearch
- File Tail
- Google BigQuery
- Google Cloud Storage
- Groovy Scripting
- Hadoop FS Standalone
- HTTP Client
- HTTP Server
- JavaScript Scripting
- JDBC Multitable Consumer
- JDBC Query Consumer
- JMS Consumer
- Jython Scripting
- MapR FS Standalone
- MongoDB
- MongoDB Atlas
- MongoDB Atlas CDC
- MongoDB Oplog
- MySQL Binary Log
- OPC UA Client
- Oracle CDC
- Oracle CDC Client
- Oracle Multitable Consumer
- RabbitMQ Consumer
- Redis Consumer
- Salesforce
- Salesforce Bulk API 2.0
- SAP HANA Query Consumer
- SFTP/FTP/FTPS Client
- SQL Server CDC Client
- SQL Server Change Tracking
- TCP Server
- UDP Multithreaded Source
- UDP Source
- Websocket Client
- Websocket Server
Transformer Origins
Transformer maintains offsets for all origins that can be included in both batch and streaming pipelines as long as the origin has the Skip Offset Tracking property cleared.
- Delta Lake
- Kudu
- Whole Directory
Resetting the Origin for Jobs
Reset the origin when you want the execution engines running the pipeline to process all available data instead of processing data from the last-saved offset.
You can reset the origin for all inactive jobs. When you reset an origin that maintains the offset, you reset both the origin and the metrics for the job. When you reset an origin that does not maintain the offset, you reset only the metrics for the job.
To reset origins from the Job
Instances view, select jobs in the list, click the
More icon (![]() ) and then click Reset
Origin.
) and then click Reset
Origin.
Uploading an Initial Offset File
In most situations, you do not need to upload an initial offset file for a job. Control Hub maintains the last-saved offset when you stop a job and handles the offset when engines become unresponsive.
However, in some situations, you might want to upload an offset file to ensure that data duplication does not occur.
For example, a Data Collector engine running a pipeline loses its connection to Control Hub. The engine continues running the pipeline, storing the last-saved offset in data files on the engine machine. However, before the engine reconnects to Control Hub to report the last-saved offset, the engine unexpectedly shuts down. To restart the processing from the last-saved offset maintained by the engine, you can upload the offset file stored on the Data Collector machine.
- The job is inactive.
- The job runs a single pipeline instance.
-
Locate the pipeline offset file on the Data Collector or Transformer machine.
Each pipeline offset file is named offset.json. Offset files are located in the following directory:
/streamsets-<engine_type>-<version>/data/runInfo/<pipelineID>/0 - In the Control Hub Navigation panel, click .
-
Select a job and then click the Upload Offset icon:
 .
.
- In the Upload Offset window, select the pipeline offset file to upload.
-
Click Upload Offset.
When you monitor the job, the History tab displays the initial offset that you uploaded. When you start the job, the job uses the offset saved in the file as the initial offset.
Editing the Latest Pipeline Version
While viewing an inactive job or monitoring an active job, you can access the latest version of the pipeline to edit the pipeline.
When you view or monitor a job, Control Hub displays a read-only view of the pipeline in the pipeline canvas. To edit the latest version of the pipeline, click the Edit Job icon next to the job name, and then click Edit Latest Version of Pipeline, as follows:

Control Hub creates a new draft of the latest version of the pipeline, and opens the draft in edit mode in the pipeline canvas.
When you edit a pipeline from a job, the job is not automatically updated to use the newly edited version. You must upgrade the job to use the latest published pipeline version. When working with job templates, you upgrade the job template to use the latest version.
Upgrading to the Latest Pipeline Version
You can upgrade a job created from a pipeline or a detached job instance created from a job template to use the latest published pipeline version. To upgrade an attached job instance created from a job template, you must upgrade the job template.
When a job includes a pipeline that has a later
published version, Control Hub
notifies you by displaying the New Pipeline Version icon (![]() ) next to the job.
) next to the job.
You can simply click the icon to upgrade the job to
use the latest pipeline version. Or, you can select jobs in the Job
Instances view, click the More icon (![]() ) and then click
Use Latest Pipeline Version.
) and then click
Use Latest Pipeline Version.
When you upgrade to the latest pipeline version, the tasks that Control Hub completes depend on the following job types:
- Inactive job
- When you upgrade an inactive job, Control Hub updates the job to use the latest pipeline version.
- Active job
- When you upgrade an active job, Control Hub stops the job, updates the job to use the latest pipeline version, and then restarts the job. During the process, Control Hub displays a temporary Upgrading status for the job.
Stopping Jobs
Stop a job when you want to stop processing data for the pipeline included in the job.
When stopping a job, Control Hub waits for the pipeline to gracefully complete all tasks for the in-progress batch. In some situations, this can take several minutes.
For example, if a scripting processor includes code with a timed wait, Control Hub waits for the scripting processor to complete its task. Then, Control Hub waits for the rest of the pipeline to complete all tasks before stopping the pipeline.
When you stop a job that includes an origin that can be reset, Control Hub maintains the last-saved offset for the job. For more information, see Job Offsets.
- In the Navigation panel, click .
-
Select active jobs in the list, and then click the Stop Jobs icon:
 . Or when monitoring an active job,
click the Stop icon.
Tip: You can also stop a job from a topology.
. Or when monitoring an active job,
click the Stop icon.
Tip: You can also stop a job from a topology. -
In the confirmation dialog box that appears, click OK.
Depending on the pipeline complexity, the job might take some time to stop.
When a job remains in a Deactivating state for an unexpectedly long period of time, you can force Control Hub to stop the job immediately.
- After the job successfully stops, click Close.
Forcing a Job to Stop
When a job remains in a Deactivating state, you can force Control Hub to stop the job immediately.
- In the Navigation panel, click .
-
Select the job in the list, click the More icon (), and
then click Force Stop.
A confirmation dialog box appears.
- To force stop the job, click OK.
- After the job successfully stops, click Close.
Scheduling Jobs
You can use the Control Hub scheduler to schedule a job to start, stop, or upgrade to the latest pipeline version on a regular basis.
Alternatively, you can create a sequence to schedule a collection of jobs to run in sequenced order. A sequence can include jobs that run on different types of IBM StreamSets engines.
Editing Jobs
You can edit inactive jobs to change the job definition. You can edit jobs created from a pipeline or detached job instances created from a job template. You cannot edit attached job instances created from a job template.
Edit inactive jobs from the Job Instances view. Hover over the inactive job, and click the Edit icon: ![]() .
.
- Description
- Pipeline
version - You can select a different pipeline version to run.
For example, after you start a job, you realize that the developer forgot to enable a metric rule for the pipeline, so you stop the job. You inform your developer, who edits the pipeline rules in the pipeline canvas and republishes the pipeline as another version. You edit the inactive job to select that latest published version of the pipeline, and then start the job again.
Important: If you edit the job so that it contains a new pipeline version with a different origin, you must reset the origin before restarting the job. - Execution Engine Labels - You can assign and remove labels from the job to change the group of execution engines that run the pipeline.
- Job Tags - You can assign and remove tags from the job to identify the job in a different way.
- Statistics Refresh Interval - You can change the milliseconds to wait before Control Hub refreshes the statistics when you monitor the job.
- Number of Instances - You can change the number of pipeline instances run for Data Collector jobs.
- Pipeline Force Stop Timeout - You can change the number of milliseconds to wait before Control Hub forces remote pipeline instances to stop.
- Runtime Parameters - You can change the values used for the runtime parameters defined in the pipeline.
- Enable or disable failover - You can enable or disable pipeline failover for
jobs. Control Hub manages pipeline failover differently based on the engine type, as described in the following topics:
Duplicating Jobs
Duplicate a job to create one or more exact copies of an existing job. You can then change the configuration and runtime parameters of the copies.
You duplicate jobs from the Job Instances view in Control Hub.
- In the Navigation panel, click .
-
Select a job in the list and then click
the Duplicate icon:
 .
.
-
Enter a name for the duplicate and the number of copies to make.
When you create multiple copies, Control Hub appends an integer to the job name. For example, if you enter the name
MyJoband create two copies of a job, Control Hub names the duplicate jobsMyJob1andMyJob2. -
Click Duplicate.
Control Hub adds the duplicated jobs to the list of jobs. You can edit them as necessary.
Deleting Jobs
You can delete inactive jobs. Control Hub automatically deletes inactive job instances older than 365 days that have never been run. You cannot delete an inactive job that is included in a sequence.
- In the Navigation panel, click .
-
Select jobs in the list, and then click the
Delete icon:
 .
.