Sequences
Sequences Overview
A sequence is a list of steps that run jobs in order based on conditions.
By default, a step includes a single job, such that each job runs sequentially, one after the other. You can optionally add multiple jobs to a single step to run those jobs in parallel. Each job can be included in only one sequence.
A sequence can include jobs that run on different types of IBM StreamSets engines. For example, you can create a sequence that first runs a Data Collector job to load data to a data warehouse, and then runs a Transformer job to transform that data.
You can add a start condition to a sequence to schedule the time when the sequence starts. You can configure a step start condition that determines if the step automatically starts when a job in the previous step encounters an error. Additionally, you can add a finish condition to a step to define when the job stops running.
Although sequences run on a schedule, you can manually run a sequence so that the sequence starts immediately. For troubleshooting purposes, you can also manually run a step in a sequence.
When a sequence is active, you can monitor the overall sequence status and the status of each step within the sequence. You can also view the sequence history and the list of errors encountered by sequence steps.
Example
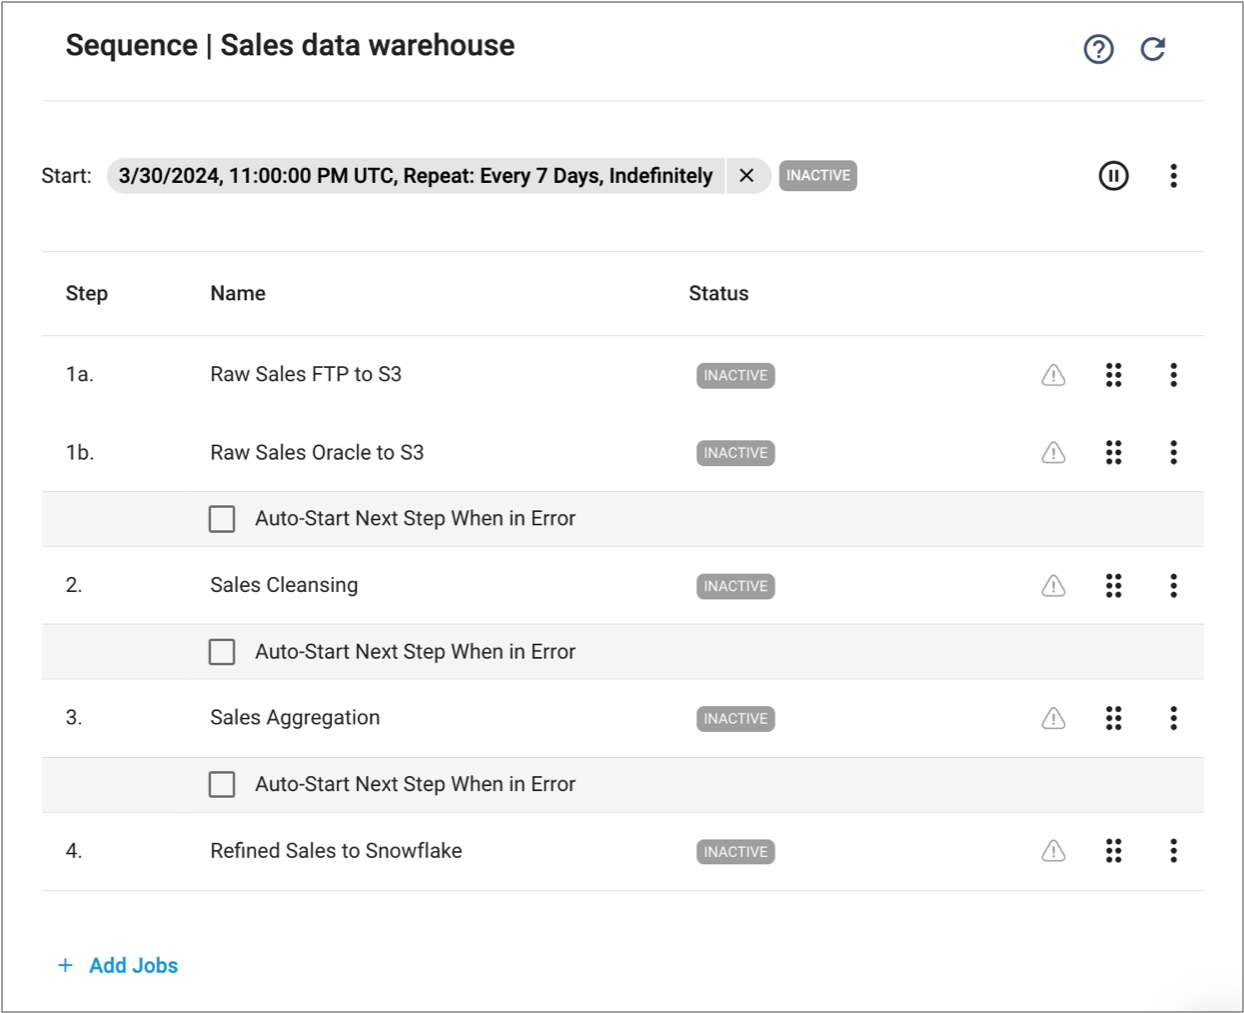
- Data Collector pipeline that reads raw sales data from an Oracle database and writes the data to a temporary Amazon S3 bucket.
- Data Collector pipeline that reads raw sales data from CSV files located on an FTP server and writes the data to another temporary Amazon S3 bucket.
- Transformer pipeline that uses two origins to read from the temporary Amazon S3 buckets, a Join processor to join the data from both inputs, a Deduplicate processor to remove duplicate records, and a Field Renamer processor to rename several fields. This pipeline writes the cleansed data to a third temporary Amazon S3 bucket.
- Transformer pipeline that reads from the third temporary Amazon S3 bucket and uses an Aggregate processor to aggregate the cleansed data to calculate the total sales data by store and region. The pipeline writes the aggregated data to a final temporary Amazon S3 bucket.
- Data Collector pipeline that loads the final aggregated data to your Snowflake data warehouse.
You've finished testing the pipelines, have published them, and added them to jobs. You can run the first two Data Collector jobs that read raw sales data in parallel because they do not depend on each other. But the remaining jobs must run sequentially, only after the previous job has successfully completed. You don't want to manually monitor the status of each job, and then manually start the next one. You also want to run the jobs during off-business hours, and repeat the process every 7 days.
- Data Collector jobs - Raw Sales Oracle to S3 and Raw Sales
FTP to S3
You add these jobs to the same sequence step so that they run in parallel. The sequence lists the jobs as steps 1a and 1b.
- Transformer job - Sales Cleansing
- Transformer job - Sales Aggregation
- Data Collector job - Refined Sales to Snowflake
You create a start condition for the sequence to start the sequence at 11 PM every 7 days. You also configure the sequence to start each step only when the jobs in the previous step have run successfully. You've designed the pipelines in each job to run as batch pipelines, where they process all available data and then stop. As a result, you do not add any step finish conditions.
When you finish configuring the sequence, you enable it. Note that the sequence remains inactive until the start condition is met.
Your finished sequence looks as follows:
Parallel Jobs
By default when you add a job to a sequence, the job is added as an additional step in the sequence, such that each job runs sequentially, one after the other. You can optionally add multiple jobs to a single step to run those jobs in parallel.
When a step includes multiple jobs, the sequence starts the next step only when all jobs in the previous step have completed.
- When adding jobs to a sequence, select multiple jobs in the Select Jobs dialog box and then select Add jobs to the same step.
- When viewing the details of a sequence, select the drag icon (
 )
for a step and then drag the step into another step.
)
for a step and then drag the step into another step.
When you add multiple jobs to a single step, the sequence creates a substep for each job, using alphabetic characters to number the substeps. For example, if you add two jobs to step 2, the sequence numbers the steps as 2a and 2b.
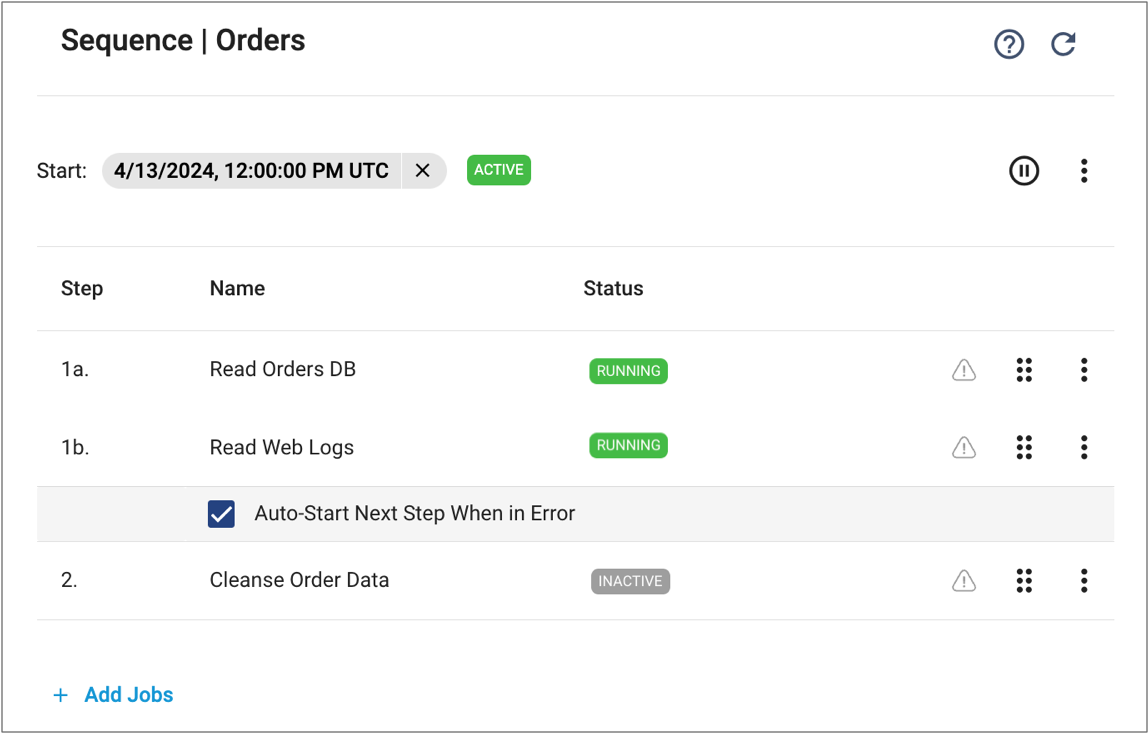
The following image displays a sequence with parallel jobs in step 1, numbered as 1a and 1b. The sequence starts the job in step 2 only after both the Read Orders DB and Read Web Logs jobs in step 1 have completed.
Batch and Streaming Jobs
- Batch job
- A batch job includes a pipeline that processes all available data, and then stops. When you add a batch job to a sequence, the sequence starts the next job step after the batch job completes.
- Streaming job
-
A streaming job includes a pipeline that maintains a connection to the origin system and processes data as it becomes available. The pipeline runs continuously because you expect data to arrive continuously.
When you add a streaming job to a sequence, the sequence runs the streaming job indefinitely unless you add a finish condition to the job step to define when the job stops running. After the streaming job stops, the sequence can start the next job step.
Alternatively, you can manually stop the job in the Job Instances view. Or, you can redesign the pipeline so that the pipeline stops after processing all available data. For example, for Data Collector pipelines, you can use the Pipeline Finisher executor to stop the pipeline when all data is processed.
Conditions
- Sequence start condition - Schedules the time when the sequence starts.
- Step start condition - Determines if the step automatically starts when a job in the previous step encounters an error.
- Step finish condition - Finishes the step at a defined time.
Sequence Start Condition
You can add a start condition to a sequence to schedule the time when the sequence starts. After you enable a sequence, the sequence remains inactive until the start condition is met or until you manually run the sequence.
When you add a start condition, you specify the start date and select the time zone.
You can optionally configure the start condition to repeat on a regular basis, such as daily, weekly, or monthly. When you configure a repeat start condition, you can also configure an end date for the condition.
When a repeat start condition is met while the sequence is inactive, the sequence starts as expected. This occurs when the sequence is in an Inactive or Error status.
When a repeat start condition is met while the sequence is running, the sequence logs an error message and does not start again. It simply completes the current sequence run, then stops. This occurs when the sequence is in an Active status. For example, you configure a sequence to start at 9 AM and to repeat every hour. The initial run of the sequence takes 90 minutes to complete, so the sequence does not start again at 10 AM because the sequence is already active.
Step Start Condition
When a sequence contains multiple steps, you can configure the Auto-start When Previous Step in Error condition. The step start condition determines if the step automatically starts when a job in the previous step encounters an error:
- Auto-start is enabled
- When the Auto-start When Previous Step in Error condition is enabled, the sequence remains active and automatically starts the step when a job in the previous step encounters an error.
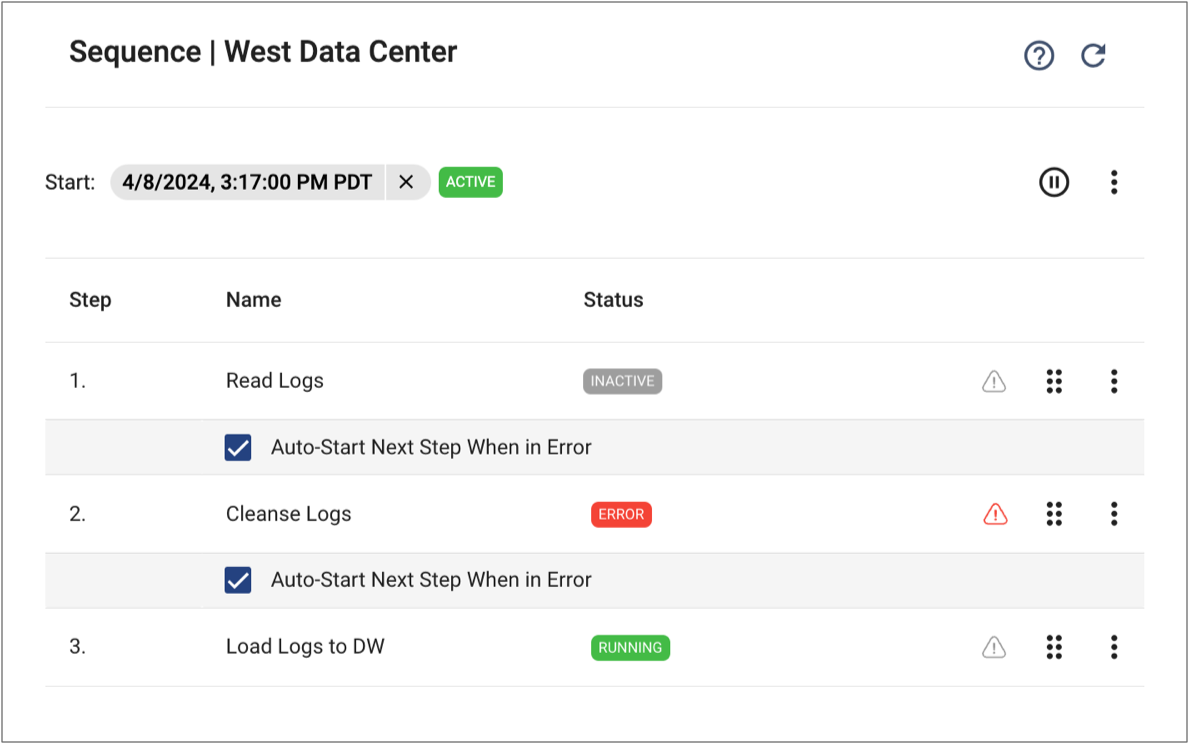
- For example, in the following sequence, the auto-start step condition is enabled
for step 3. When the Cleanse Logs job in step 2
encounters an error, the sequence remains active and automatically starts
running the job in step 3.
- Auto-start is disabled
- When the Auto-start When Previous Step in Error condition is disabled, the sequence transitions to an Error status and stops running the remaining steps when a job in the previous step encounters an error.
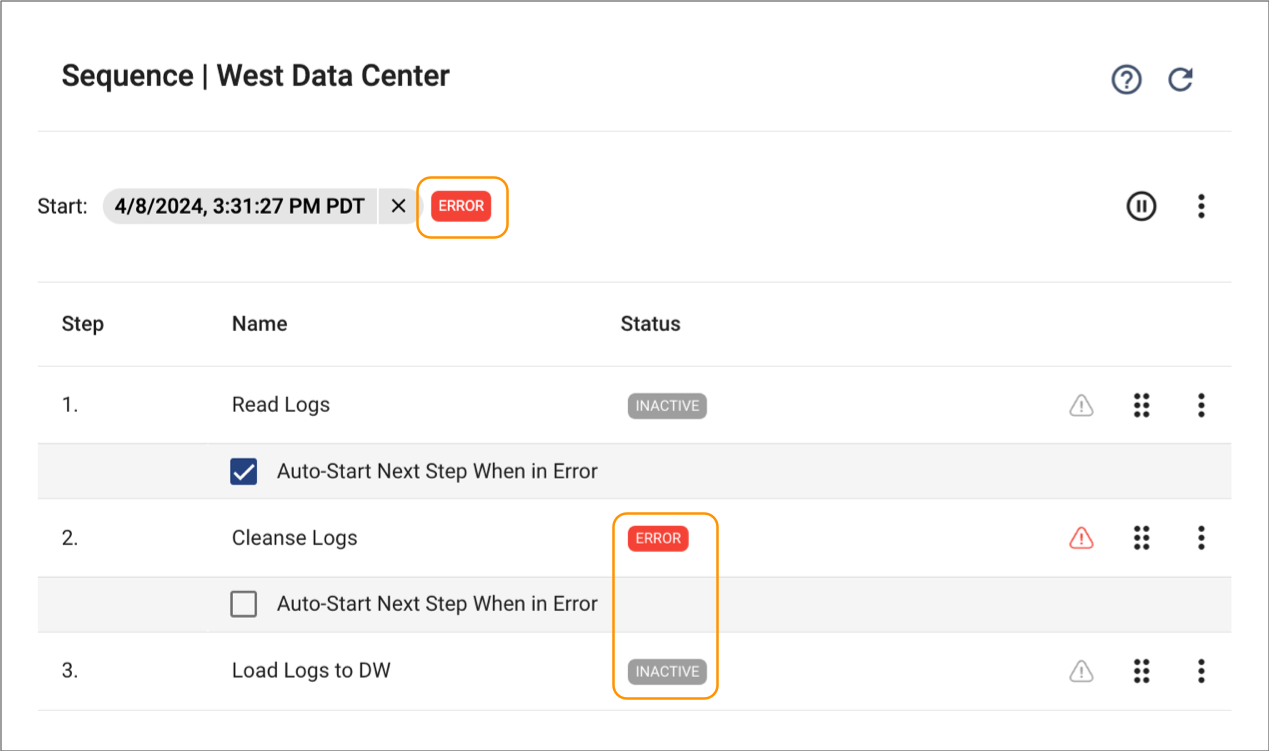
- For example, in the following sequence, the auto-start step condition is
disabled for step 3. When the Cleanse Logs job in step 2
encounters an error, the sequence transitions to an Error status and does not
run the job in step 3.
Step Finish Condition
You can add a finish condition to a step to define when the job stops running.
When the finish condition is met, the step stops the job and transitions the job to a grey Inactive status. The sequence can then start the next step. If the job completes before the finish condition is met, the sequence starts the next step before triggering the finish condition.
For example, you add a streaming job to a sequence that maintains a connection to the origin system and processes data continuously as it becomes available. However, the sequence includes additional steps that must run after the streaming job completes. You expect the streaming job to process all data within six hours. You schedule the sequence to start at 6 AM, and then schedule the streaming job step to finish at 12 PM. The sequence runs the streaming job step until 12 PM, then stops the job and finishes the step so that the next step can start.
Without a finish condition, the job continues running until it processes all available data, and stops on its own.
When needed, you can configure a finish condition to move the running job to error, which transitions the job to a red Inactive status and transitions the step to an Error status. You might move a job to error when you want the sequence to stop processing the remaining steps or when you want to alert team members that the job has not stopped on its own.
For example, you add a Read Orders DB job to a sequence. You expect the job to run for one hour, then stop so that the sequence can start the next step. If the job takes longer than one hour, that likely indicates a network issue and you want to stop the sequence from running the remaining steps. You add a finish condition to the job step to stop running the job two hours after the sequence starts and then move the job to error. You disable the Auto-start When Previous Step in Error condition for the next step. As the sequence runs, the Read Orders DB job does not complete and continues running for two hours, triggering the finish condition. The sequence transitions the job to a red Inactive status and the step to an Error status. Because the auto-start step condition is disabled, the sequence also transitions to an Error status and stops running the remaining steps.
When you add a finish condition, you schedule the time that the step finishes. Or, you define a cron expression that defines the frequency at which the step finishes.
Scheduled Time
To schedule the time that the step finishes, select Schedule Finish for the finish condition type.
You then specify the finish date and time and select the time zone.
Cron Expression
To define the frequency at which the step finishes, select Cron Expression for the finish condition type.
You then specify the frequency, such as two days or three months.
When you use the UI to configure a simple cron expression, the finish condition triggers regularly at the beginning of each time period. For example, you configure a step finish condition for one hour. The sequence starts at 6:10 PM, and the step containing the job with the finish condition starts running at 6:15 PM. The finish condition triggers at 7:00 PM, stopping the currently running job in the step.
You can optionally configure your own advanced expression using the cron expression syntax. With an advanced expression, you can configure the finish condition to occur at any moment in the time period, such as on the third day of each month or hourly at 15 minutes past the hour, such as 7:15 or 11:15.
0 9 1 1/1 ? *| Field Name | Mandatory | Allowed Values |
|---|---|---|
| Minutes | yes | 0-59 |
| Hours | yes | 0-23 |
| Day of month | yes | 1-31 |
| Month | yes | 1-12 or JAN-DEC |
| Day of week | yes | 1-7 or SUN-SAT |
| Year | no | empty, 1970-2099 |
The fields can also contain various combinations of the allowed special characters for that field. For example, the asterisk (*) special character can be used in all fields to represent all values within the field.
For a list of the allowed special characters in each field and for example expressions, see the Quartz Scheduler documentation. Note that Control Hub sequences do not support the seconds field.
Time Zone
You select a time zone for the sequence start condition and for a step finish condition.
You can select any time zone, regardless of your current time zone or the time zone of your browser. For example, suppose you are currently located in the US/Pacific time zone but want to schedule a sequence to start in the US/Eastern time zone. You specify the US/Eastern time zone for the start condition and configure the sequence to start daily at 6 AM. The sequence starts daily at 6 AM in the US/Eastern time zone and at 3 AM in the US/Pacific time zone.
Time zones automatically adjust for daylight saving time when appropriate.
When viewing a sequence, Control Hub shows all scheduled and historical times in the time zone of the browser.
Managing Sequences
Create a sequence to run a list of jobs in specified order.
When you finish configuring a sequence, you must enable it. After you enable a sequence, the sequence remains inactive until the start condition is met.
When needed, you can manually run a sequence so that the sequence starts immediately. For troubleshooting purposes, you can also manually run a step in a sequence.
You can edit an existing sequence to reorder the steps or to add or remove jobs from the sequence. You can also edit or delete the start condition.
To temporarily stop a sequence from running jobs, you can disable the sequence. When needed, you can delete a sequence.
You can also share a sequence with other users and groups, as described in Permissions.
Creating a Sequence
Create a sequence to run a list of jobs in specified order. Each job can be included in only one sequence.
-
In the Navigation panel, click , and then click the Add Job Sequence icon:
 .
.
- Enter a name for the sequence and an optional description.
-
Click Save.
An empty sequence in a Disabled status displays.
-
Click Add Start Condition to schedule the time when the
sequence starts.
Define the start condition and then click Save.
-
Click Add Jobs.
The sequence lists the added jobs as ordered steps.
-
To configure a step to finish at a defined time, click Add Finish
Condition for the step.
Define the step finish condition and then click Save.
-
To reorder a step, select the More icon (
 ) for the step and then click Move to
Previous Step or Move to Next Step.
) for the step and then click Move to
Previous Step or Move to Next Step.
Alternatively, select the drag icon (
 ) for the step and then drag the step
to a new location.
) for the step and then drag the step
to a new location. -
When you finish configuring the sequence, click the More
icon (
 ) to the right of the start condition, and then click Enable
Sequence.
) to the right of the start condition, and then click Enable
Sequence.
The sequence transitions to an Inactive status until the start condition is met or until you manually run the sequence.
Renaming a Step
By default, each sequence step is named Step <number>, such as Step 1 or Step 2. You can rename a step to inform your team of the step use case. Each step name within a sequence must be unique.
- In the Navigation panel, click .
- Click the name of a sequence to display the sequence details.
-
Select the More icon () for the
step and then click Rename Step.
- Enter a step name and click Save.
Reordering Steps
You can reorder the steps in a sequence when the sequence is not actively running jobs.
- In the Navigation panel, click .
- Click the name of a sequence to display the sequence details.
-
Select the More icon () for the step and then click Move to
Previous Step or Move to Next Step.
Alternatively, select the drag icon (
) for the step and then drag the step
to a new location.
Modifying the Jobs in a Sequence
You can add jobs to or remove jobs from a sequence when the sequence is not actively running jobs.
- In the Navigation panel, click .
- Click the name of a sequence to display the sequence details.
-
To add jobs to the sequence, click Add Jobs.
-
To remove a job from the sequence, select the More icon
()
for a step and then click Remove from Sequence.
Editing a Start or Finish Condition
You can edit or delete a sequence start condition or a step finish condition when the sequence is not actively running jobs.
- In the Navigation panel, click .
- Click the name of a sequence to display the sequence details.
-
To edit a start or finish condition:
- Click the defined condition.
- In the Edit Condition dialog box, edit the condition as needed.
- Click Save.
-
To delete a start or finish condition:
-
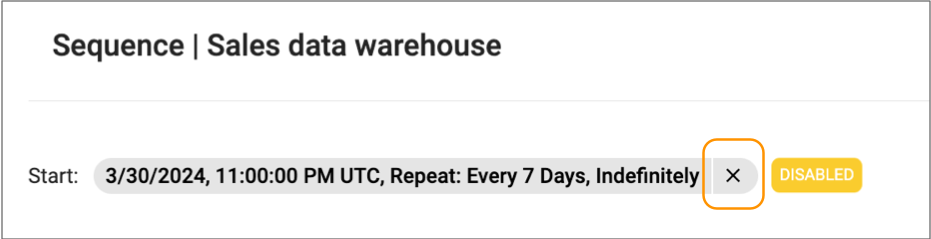
Click the X icon next to the defined condition.
-
Click the X icon next to the defined condition.
Manually Running a Sequence
When needed, you can manually run a sequence so that the sequence starts immediately.
- In the Navigation panel, click .
- Click the name of an inactive sequence to display the sequence details.
-
Click the More icon () to the
right of the start condition, and then click Run
Now.
Manually Running a Step
For troubleshooting purposes, you can manually run a step in a sequence. You can run the selected step only, or you can run the selected step and all remaining steps.
For example, if the first step in a sequence encounters an error that stops the sequence, you can correct the errors in the first step and then manually run the remaining sequence steps.
You can manually run a step when the sequence has an Inactive or Error status.
- In the Navigation panel, click .
- Click the name of a sequence to display the sequence details.
-
Click the More icon () for a
step, and then click Run Step.
- In the Run Step dialog box, optionally configure the sequence to continue running the remaining steps after the selected step completes.
- Click Run.
Disabling a Sequence
You can disable a sequence in an Inactive or Error status to temporarily stop the sequence from running jobs. A disabled sequence does not start at the next scheduled time.
- In the Navigation panel, click .
- Click the name of a sequence to display the sequence details.
- Click Disable Sequence.
Enabling a Sequence
You can enable a disabled sequence. After you enable a sequence, the sequence remains inactive until the start condition is met or until you manually run the sequence.
- In the Navigation panel, click .
- Click the name of a disabled sequence to display the sequence details.
- Click Enable Sequence.
Deleting Sequences
You can delete sequences that are not actively running jobs.
- In the Navigation panel, click .
-
Select sequences in the list, and then click the Delete
icon:
 .
.
- Click Delete to confirm.
Monitoring Sequences
You can monitor the overall sequence status and the status of each step within the sequence.
You can also view the sequence history and the list of errors encountered by sequence steps. When needed, you can delete historical log messages or errors.
Sequence Status
The Sequences view lists the status of each sequence. The sequence details also list the sequence status, in addition to the status of each step.
| Sequence Status | Description |
|---|---|
| Active | Sequence has started and is actively running jobs. |
| Disabled | Sequence is disabled and cannot run jobs. You must enable the sequence before it can start again. |
| Error | Sequence has encountered an error and has stopped running jobs.
When a step encounters an error and the auto-start next step condition is disabled, the sequence also transitions to an Error status. When a sequence with an Error status is configured with a repeat start condition, the sequence starts again at the next scheduled time. |
| Inactive | Sequence is waiting for the start condition to be met. If a sequence does not have a defined start condition, the sequence remains inactive indefinitely unless you manually run the sequence. |
Step Status
When you view the details of a sequence, you can monitor the status of each step within the sequence. The step status is simply a summary of the running job included in the step. The step status is not the same as the job status.
To monitor the details of a running job and view the job status, click the job name from the sequence details.
| Step Status | Description |
|---|---|
| Inactive | Step is waiting to be started. |
| Error | Job included in the step has encountered an error. |
| Running | Step is running a job. |
Viewing Sequence History
You can view the global history for all steps in the sequence, or you can view the history for a single step.
- In the Navigation panel, click .
- Click the name of a sequence to display the sequence details.
-
To view the global history for all steps in the sequence, click the
More icon () to the right of the start condition,
and then click View Global History.
-
To view the history for a single step, click the More
icon () for a step and then click View History.
Both the global and single step history display in the right side panel, listing log messages for the last run of the sequence, as follows:
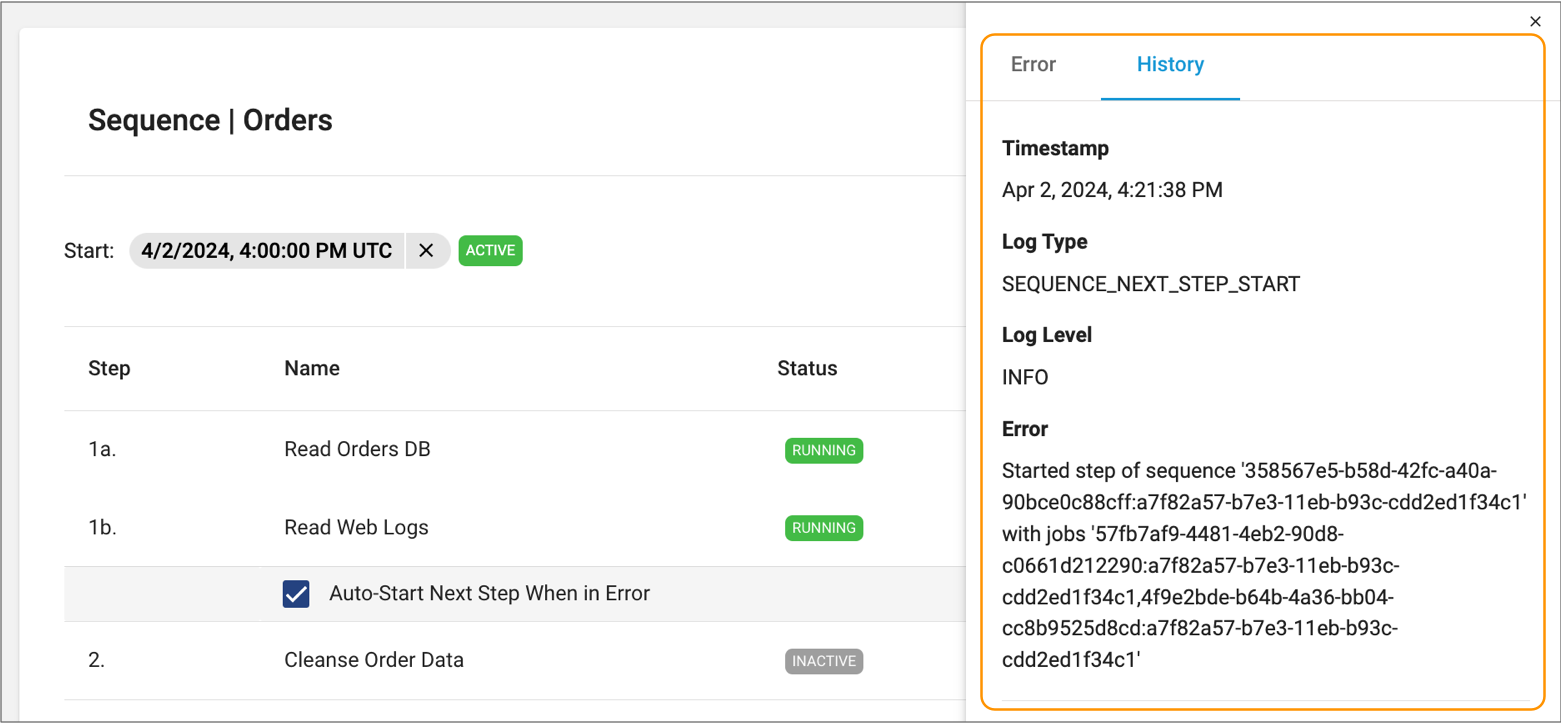
-
To view the history for all runs of the sequence, click See All
History.
Control Hub displays the log messages in a table format. You can optionally search for log messages by date.
-
Click the Close icon (
 ) to
close the history and return to the sequence details.
) to
close the history and return to the sequence details.
Viewing Sequence Errors
You can view the global errors encountered by all steps in the sequence, or you can view the errors encountered by a single step.
To view more detailed errors for a job run, monitor the job from the Job Instances view.
- In the Navigation panel, click .
- Click the name of a sequence to display the sequence details.
-
To view the global errors encountered by all steps in the sequence, click the
More icon () to the right of the start condition,
and then click View Global Errors.
-
To view the errors encountered by a single step, click the
More icon () for a step and then click
View Errors.
Both the global and single step errors display in the right side panel, listing errors for the last run of the sequence, as follows:
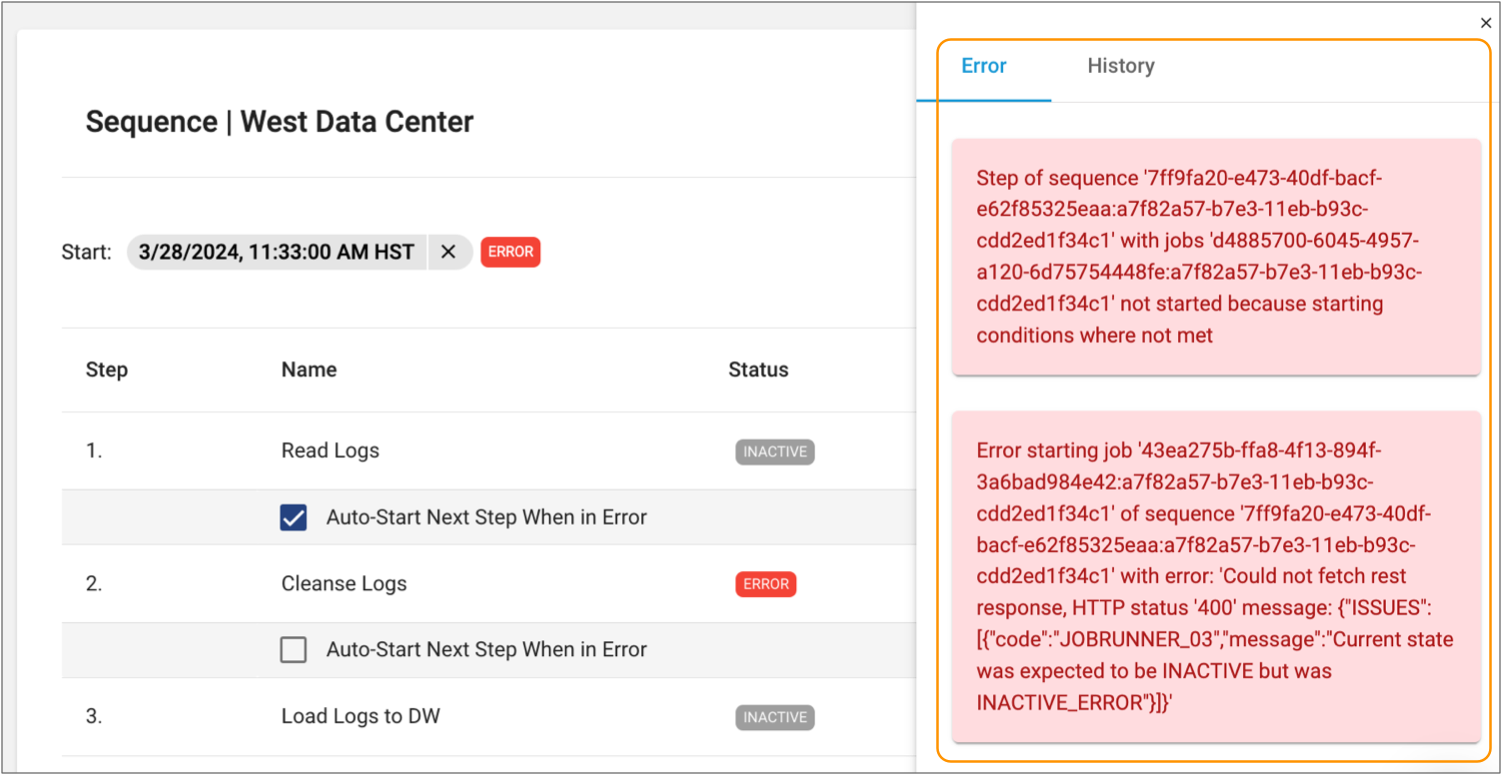
-
To view errors for all runs of the sequence, click See All
Errors.
Control Hub displays the errors in a table format. You can optionally search for errors by date.
-
Click the Close icon () to
close the errors and return to the sequence details.
Deleting Sequence History or Errors
When needed, you can delete historical log messages or errors for a sequence. For example, you might want to delete all log messages with a timestamp older than 4 months ago.
- In the Navigation panel, click .
- Click the name of a sequence to display the sequence details.
-
Click the More icon () to the
right of the start condition, and then click View Global
History or View Global Errors.
- Click See All History or See All Errors.
-
Select log messages or errors, and then click the Delete
icon:
 .
.
You can also search for log messages or errors by date, and then select all items within the date range for deletion.
Troubleshooting
Use the following tips for help with sequence management:
- I’ve enabled my sequence, but it remains in an Inactive status indefinitely.
-
After you enable a sequence, the sequence remains in an Inactive status until the start condition is met. If the sequence does not have a start condition, then the sequence remains inactive indefinitely.
You can manually run the sequence. Alternatively, edit the sequence to add a start condition.
- My sequence runs one job continuously and does not start the job in the next step.
- The job is likely a streaming job which includes a pipeline that maintains a connection to the origin system and processes data as it becomes available.