Manually Administered Data Collectors
Manually administering authoring and execution Data Collectors involves installing Data Collectors on-premises or on a protected cloud computing platform and then registering them to work with Control Hub.
For instructions on installing Data Collectors, see Installation in the Data Collector documentation.
When you register a Data Collector, you generate an authentication token for that Data Collector. Each Data Collector also has a universally unique ID (UUID), generated upon initial start and stored in the sdc.id file in the $SDC_Data directory.
To authenticate a registered Data Collector, Control Hub verifies that both the authentication token and UUID exist and are unchanged. Data Collector includes its authentication token and UUID in requests to Control Hub. Because all communication between Control Hub and any registered Data Collector uses HTTPS, the authentication token and UUID are kept confidential.
- Register Data Collectors with Control Hub.
- For Data Collectors installed on a cloud computing platform, configure the Data Collector to use a publicly accessible URL.
- Delete unregistered authentication tokens if you generated tokens but did not record the tokens.
- Regenerate an authentication token for a registered Data Collector.
- Unregister Data Collectors from Control Hub.
Register Data Collectors
To register a Data Collector with Control Hub, you generate an authentication token and modify the Data Collector configuration files.
- Tarball installation
- You can register the Data Collector from the command line interface or from Control Hub.
- RPM installation
- You must register the Data Collector from Control Hub.
- Cloudera Manager installation
- You must register the Data Collector from Cloudera Manager.
A registered Data Collector communicates with Control Hub at regular intervals. If a Data Collector cannot connect to Control Hub, due to a network or system outage, then the Data Collector uses the Control Hub disconnected mode.
Registering from Control Hub
When you register from Control Hub, you generate an authentication token. Then, you edit Data Collector configuration files to register the token with the Data Collector and to enable communication with Control Hub.
When you register from Control Hub, you can generate multiple authentication tokens at one time.
- Log in to Control Hub using your Control Hub user account.
-
In the Navigation panel, click .
Control Hub displays the Data Collectors that have already been registered.
-
Click the Generate Authentication Tokens icon
 .
.
- Enter the number of tokens to generate.
-
Click Generate.
The Authentication Tokens window displays each generated token.
-
Record the generated tokens.
You can copy the tokens from the window. Or, you can click Download to download all generated tokens to a JSON file named
authTokens.json.Note: If you close the window before recording the tokens, you cannot retrieve the tokens. You can delete unregistered authentication tokens, as described in Deleting Unregistered Tokens. - Click Close in the Authentication Tokens window.
-
Complete the following steps for each Data Collector
that you want to register:
Registering from the Command Line Interface
When you register from the Data Collector command line interface, Data Collector generates the authentication token and modifies the configuration files for you. The Data Collector must be running before you can use the command line interface.
For a Data Collector RPM installation, you must use Control Hub to register the Data Collector. For a Data Collector installation with Cloudera Manager, you must use Cloudera Manager to register the Data Collector.
streamsets sch register command. The
command must be run on the local machine where Data Collector is
installed. The Data Collector
does not need to be running. See the command line help for the list of available
options. If you choose to skip updating the dpm.properties
configuration file, you must configure the automation tool to update the file.Start Data Collector, and then use the system enableDPM command to register the Data Collector.
Use the command from the $SDC_DIST directory as follows:
bin/streamsets cli \
(-U <sdcURL> | --url <sdcURL>) \
[(-D <dpmURL> | --dpmURL <dpmURL>)] \
[(-a <sdcAuthType> | --auth-type <sdcAuthType>)] \
[(-u <sdcUser> | --user <sdcUser>)] \
[(-p <sdcPassword> | --password <sdcPassword>)] \
system enableDPM \
(--dpmUrl <dpmBaseURL>) \
(--dpmUser <dpmUserID>) \
(--dpmPassword <dpmUserPassword>) \
[(--labels <labels>)]
When using the system enableDPM command, the following basic options are required:
| Basic Option | Description |
|---|---|
| -U <sdcURL> or --url <sdcURL> |
Required. URL of the Data Collector. The default URL is
|
| -D <dpmURL> or --dpmURL <dpmURL> |
Required. URL to access Control Hub. Set to
|
The following table describes the enableDPM options:
| Enable DPM Option | Description |
|---|---|
| --dpmUrl <dpmBaseURL> | URL to access Control Hub.
Set to
|
| --dpmUser <dpmUserID> | Required. Enter your Control Hub user ID using the following format: |
| --dpmPassword <dpmUserPassword> | Required. Enter the password for your Control Hub user account. |
| --labels <labels> | Optional. Assign a label to this Data Collector. You can enter multiple labels separated by commas. Labels that
you assign here are defined in the Control Hub configuration file, $SDC_CONF/dpm.properties. To
remove these labels after you register the Data Collector, you must modify the configuration file.Default is
For more information about labels, see Labels Overview. |
bin/streamsets cli -U http://localhost:18630 -D https://cloud.streamsets.com system enableDPM --dpmUrl https://cloud.streamsets.com --dpmUser alison@MyOrg --dpmPassword MyPassword --labels Finance,Accounting,Development$SDC_CONF/sdc.properties, and verify that the
http.authentication.login.module property is set to
file. Control Hub
requires that each registered Data Collector
be configured for file-based authentication. After a Data Collector
is registered with Control Hub, the Data Collector
uses the authentication method enabled for Control Hub.Restart the Data Collector to apply the changes.
Registering from Cloudera Manager
If you installed Data Collector through Cloudera Manager, you must use Cloudera Manager to register the Data Collector with Control Hub.
- In Cloudera Manager, select the StreamSets service, then click Configuration.
- Enter "Control Hub" in the search field to display the Control Hub configuration properties.
-
Configure the following properties:
Property Description Enable Control Hub Select to enable Control Hub. Control Hub URL URL to access Control Hub. Set to
https://cloud.streamsets.com.Control Hub User ID Enter your Control Hub user ID using the following format: <ID>@<organization ID>Control Hub Password Enter the password for your Control Hub user account. Control Hub Labels Assign a label to this Data Collector. Labels that you assign here are defined in the Control Hub configuration file, $SDC_CONF/dpm.properties. To remove these labels after you register the Data Collector, you must modify the labels through Cloudera Manager.Default is
all, which you can use to run a job on all registered Data Collectors.For more information about labels, see Labels Overview.
-
Set the HTTP Authentication Login Module property to
file.
Control Hub requires that each registered Data Collector be configured for file-based authentication. After a Data Collector is registered with Control Hub, the Data Collector uses the authentication method enabled for Control Hub.
- Click Save Changes.
- Click to restart the Data Collector.
Using a Publicly Accessible URL
If you register a Data Collector that is installed on a cloud computing platform such as Amazon Elastic Compute Cloud (EC2), configure the Data Collector to use a publicly accessible URL.
When you register a Data Collector with Control Hub,
the Data Collector sends
its URL to Control Hub in
the format http://<hostname>:<http.port>, where
<hostname> is the value defined in the
http.bindHost property in the Data Collector
configuration file, $SDC_CONF/sdc.properties. If the host name is not
defined in http.bindHost, Data Collector runs the
following command to determine the host name: hostname -f
For most cloud computing platforms, the hostname -f command returns the
private IP address of the machine on the cloud platform. Control Hub
includes the private IP address in the Data Collector URL
displayed in Control Hub.
However, when you click the Data Collector
URL, you cannot access the Data Collector
because you must use a public IP address to access a cloud machine.
To access a Data Collector
installed on a cloud computing platform from Control Hub,
uncomment the sdc.base.http.url property in the Data Collector
configuration file, $SDC_CONF/sdc.properties, and then configure it to
use the publicly accessible URL to that Data Collector.
After modifying the configuration file, restart Data Collector for the changes to take effect.
Deleting Unregistered Tokens
Delete unregistered authentication tokens when you used Control Hub to generate the tokens, but did not copy or download the tokens from the Generate Authentication Token window.
Control Hub lists the number of unregistered authentication tokens in the Data Collector Administration view as follows:
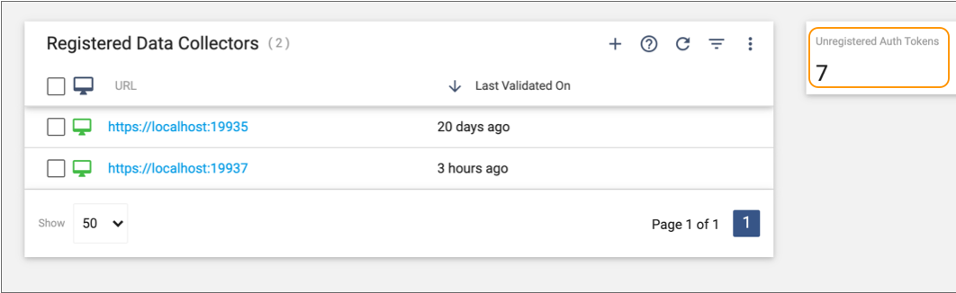
- In the Navigation panel, click .
-
Click the Toggle Filter Column icon (
 ) to view the number of unregistered authentication
tokens.
) to view the number of unregistered authentication
tokens.
-
Click the More icon
 , and then
click Delete Unregistered Authentication Tokens.
, and then
click Delete Unregistered Authentication Tokens.
Regenerate a Token
You can regenerate an authentication token for a Data Collector. You might need to regenerate a token to replace a token that has been compromised or to follow your organization's security policy.
For a Cloudera Manager installation, you must regenerate authentication tokens from Cloudera Manager. For all other installations, you regenerate authentication tokens from Control Hub.
Regenerating from Control Hub
When you regenerate an authentication token for a Data Collector, you replace
the previous authentication token with a new one. You must copy the new token into the
$SDC_CONF/application_token.txt file for the Data Collector.
- In the Navigation panel, click .
- Select a registered Data Collector to display its details.
-
Click Regenerate Authentication Token.
The Authentication Tokens window displays the regenerated token.
-
Record the regenerated token.
You can copy the token from the window. Or, you can click Download to download the token to a JSON file named
authTokens.json.Note: If you close the window before recording the token, you cannot retrieve the token. You can delete unregistered authentication tokens, as described in Deleting Unregistered Tokens. -
To register the Data Collector
with the newly generated token, copy the token to the
$SDC_CONF/application-token.txtfile and restart the Data Collector.
Regenerating from Cloudera Manager
If you installed Data Collector through Cloudera Manager, you must regenerate an authentication token from Cloudera Manager.
When you regenerate an authentication token, you replace the previous authentication token with a new one. You can regenerate a token for a single Data Collector instance or for all Data Collector instances included in the StreamSets service.
- In Cloudera Manager, select the StreamSets service, and then click .
-
Complete one of the following actions, based on whether you are regenerating
tokens for all Data Collector
instances or for a single instance:
- All instances - Click .
- Single instance - Click Instances, select a Data Collector instance, and then click .
- Click to restart the Data Collector.
Unregister Data Collectors
You can unregister a Data Collector from Control Hub when you no longer want to use that Data Collector installation with Control Hub.
- Tarball installation
- You can unregister the Data Collector from the command line interface or from Control Hub.
- RPM installation
- You must unregister the Data Collector from Control Hub.
- Cloudera Manager installation
- You must unregister the Data Collector from both Control Hub and Cloudera Manager.
Unregistering from Control Hub
When you unregister a Data Collector from Control Hub, Control Hub deactivates the authentication token. Then, you modify Data Collector configuration files to remove the token from the Data Collector and to disable communication with Control Hub.
- In Control Hub, stop all jobs running on the Data Collector.
- Shut down the Data Collector.
- In Control Hub, click in the Navigation panel.
- Hover over the Data Collector that you shut down, and then click the Delete icon.
- In the confirmation dialog box, click Delete and Unregister.
-
On the machine where the Data Collector is installed, open the
$SDC_CONF/application-token.txtfile, and remove the authentication token from the file. -
Open the
$SDC_CONF/dpm.propertiesfile for the Data Collector, and set thedpm.enabledproperty to false.
Unregistering from the Command Line Interface
You can unregister a Data Collector from Control Hub using the Data Collector command line interface. When you unregister from the Data Collector command line interface, Data Collector deactivates the authentication token and modifies the configuration files for you.
For a Data Collector RPM installation, you must use Control Hub to unregister the Data Collector. For a Data Collector installation with Cloudera Manager, you must use both Control Hub and Cloudera Manager to unregister the Data Collector.
streamsets sch unregister command. The
command must be run on the local machine where Data Collector is
installed. The Data Collector
does not need to be running. See the command line help for the list of available
options. If you choose to skip updating the dpm.properties
configuration file, you must configure the automation tool to update the file.Start the Data Collector, and then use the system disableDPM command to unregister the Data Collector.
$SDC_DIST directory as
follows:bin/streamsets cli \
(-U <sdcURL> | --url <sdcURL>) \
[(-a <sdcAuthType> | --auth-type <sdcAuthType>)] \
[(-D <dpmURL> | --dpmURL <dpmURL>)] \
[(-u <sdcUser> | --user <sdcUser>)] \
[(-p <sdcPassword> | --password <sdcPassword>)] \
system disableDPMWhen using the system disableDPM command, the following basic options are required:
| Basic Option | Description |
|---|---|
| -U <sdcURL> or --url <sdcURL> |
Required. URL of the Data Collector. The default URL is http://localhost:18630. |
| -a <sdcAuthType> or --auth-type <sdcAuthType> |
Required. Authentication type used by the Data Collector. Set to dpm.If you omit this option, Data Collector uses the Form authentication type, which causes the disableDPM command to fail. |
| -D <dpmURL> or --dpmURL <dpmURL> |
Required. URL to access Control Hub. Set to
|
| -u <sdcUser> or --user <sdcUser> |
Required. Enter your Control Hub user ID using the following format:If you omit this option, Data Collector uses the |
| -p <sdcPassword> or --password <sdcPassword> |
Required. Enter the password for your Control Hub user account. |
bin/streamsets cli -U http://localhost:18630 -a dpm -D https://cloud.streamsets.com -u alison@MyOrg -p MyPassword system disableDPMRestart the Data Collector to apply the changes.
Unregistering from Control Hub and Cloudera Manager
If you installed a Data Collector through Cloudera Manager, you must use both Control Hub and Cloudera Manager to unregister the Data Collector.
You use Control Hub to deactivate the authentication token. Then, you use Cloudera Manager to modify Data Collector configuration properties and files.
- In Control Hub, stop all jobs running on the Data Collector.
- In Cloudera Manager, shut down the Data Collector.
- In Control Hub, click in the Navigation panel.
- Hover over the Data Collector that you shut down, and then click the Delete icon.
- In the confirmation dialog box, click Delete and Unregister.
- In Cloudera Manager, select the StreamSets service, then click Configuration.
- Enter "Control Hub" in the search field to display the Control Hub configuration properties.
- Clear the Enable Control Hub property.
- Find the location to the authentication token file in the Control Hub Token Location property, and then delete the file.