Pipeline Canvas
When you create or edit a pipeline or pipeline fragment, Control Hub displays the pipeline canvas. Use the pipeline canvas to build the pipeline or fragment.
You configure pipelines and fragments on the same canvas.
Control Hub
provides both a new pipeline
canvas UI and a classic pipeline canvas UI. To switch the UI while viewing a pipeline or
fragment in the canvas, click the More icon (![]() ) and then click
Switch to Classic UI or Switch to New
UI.
) and then click
Switch to Classic UI or Switch to New
UI.
New Pipeline Canvas UI
The following image shows the new pipeline canvas UI when you configure a pipeline:
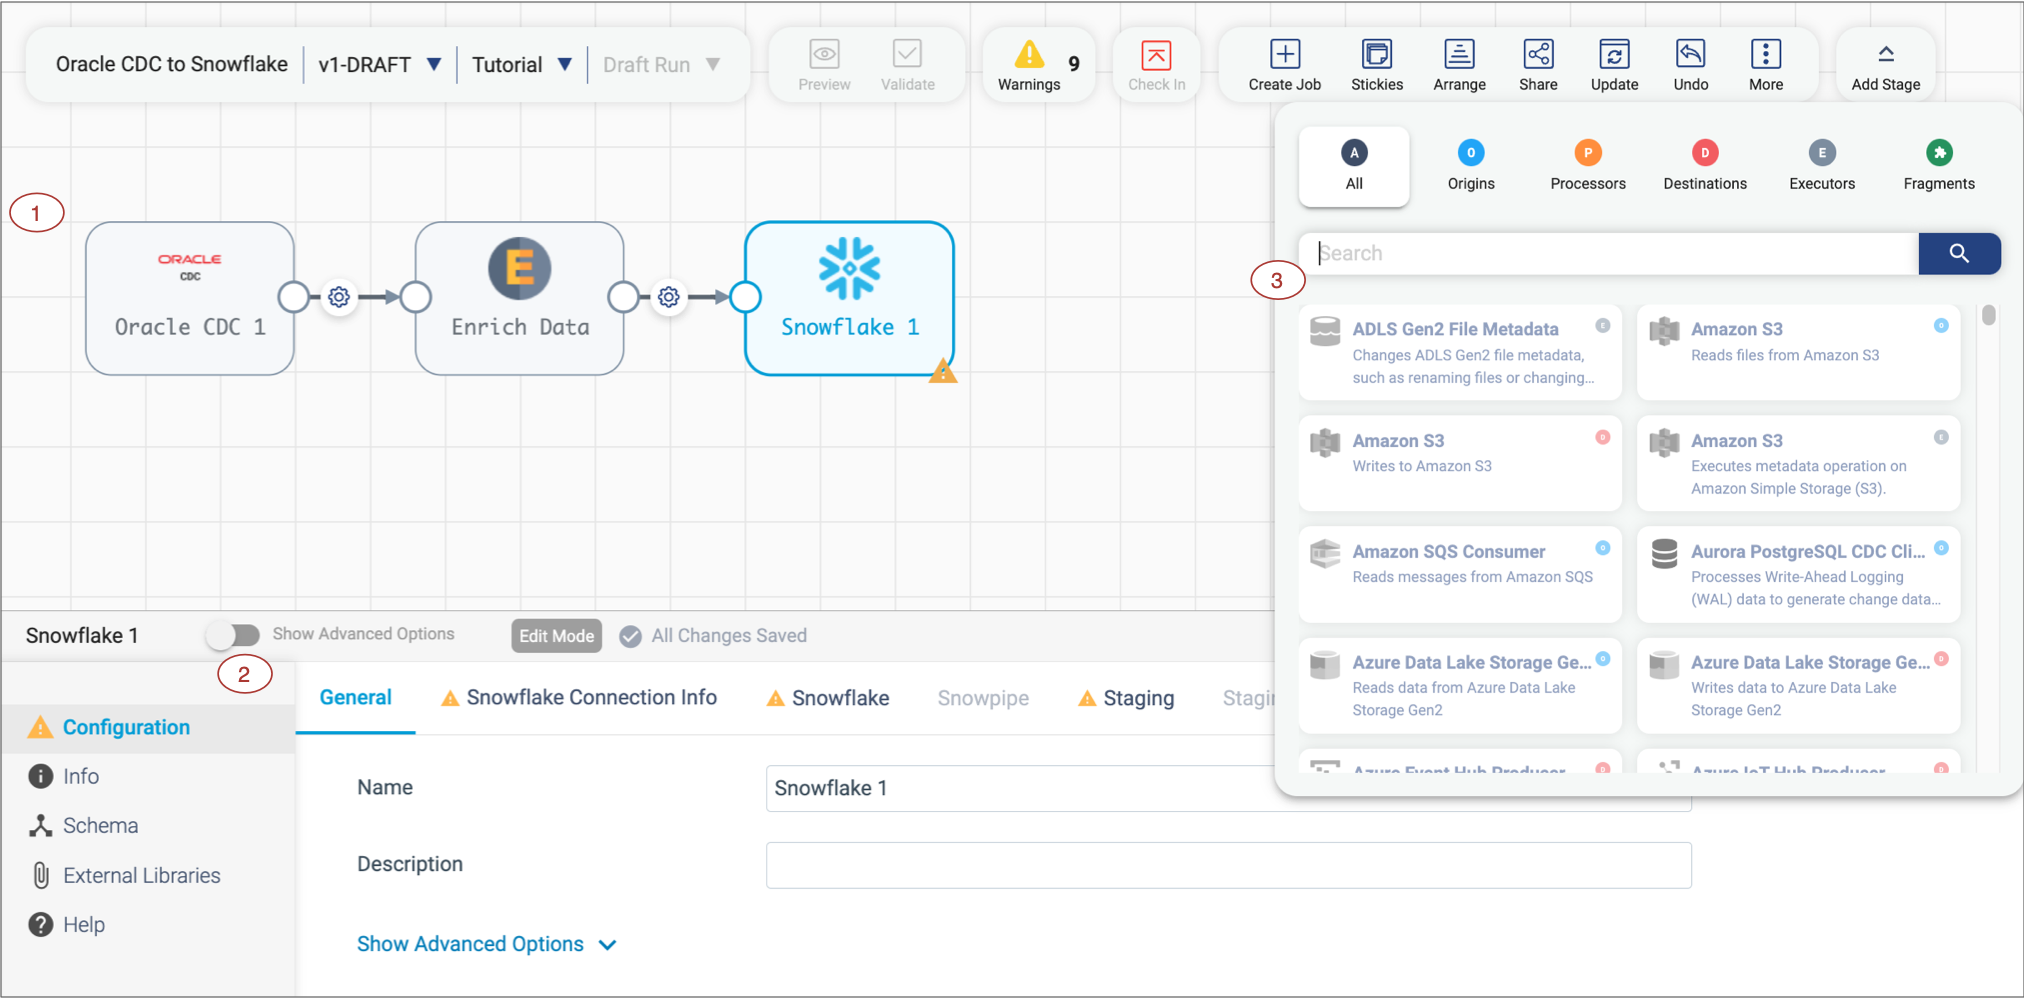
| Area/Icon | Name | Description |
|---|---|---|
| 1 | Pipeline canvas | Displays the pipeline. Use to configure the pipeline data flow. |
| 2 | Properties panel | Displays the properties of the pipeline or selected stage when you configure a pipeline. |
| 3 | Stage selector | List of available stages. Click a stage to add it to the pipeline. You can view all stages or stages by type. You can also search for a stage by name. Stages that are not installed appear disabled, or greyed out. Click on a disabled stage to install the stage library that includes the stage. |
| Pipeline name display | Displays the name of the pipeline in the canvas. | |
| Pipeline version display and selection | Version of the pipeline in the canvas. To select a different version, click the down arrow. | |
| Authoring engine selection | Authoring engine associated with the pipeline. Displays the name of the parent deployment. To select a different authoring engine to use, click the down arrow. | |
| Draft Run selection |
Starts a draft run of the draft pipeline in the pipeline canvas. You can click the down arrow and then choose to start a draft run, reset the origin and then start a draft run, or specify parameter values and then start a draft run. |
|
 |
Preview icon | Starts data preview. Available for valid pipelines and fragments. |
 |
Validate icon | Validates the pipeline. Performs explicit validation. Displays when the pipeline is in edit mode and passes implicit validation. |
 |
Validation Errors icon | Lists the number of validation errors for implicit validation. Click to view the error messages. |
 |
Check In icon | Publishes the pipeline or fragment in the canvas. Displays in red when the pipeline or fragment has not passed implicit validation and cannot be checked in. Displays in green when the pipeline or fragment has passed implicit validation and is ready to be checked in. When the pipeline has already been published, the Edit icon displays in the same location. Publish a pipeline to enable creating a job for the pipeline. Publish a fragment to enable using the fragment in a pipeline. |
 |
Edit icon | Enables editing the pipeline or fragment. Displays when the pipeline or
fragment has already been published and is being viewed in read only
mode. When the pipeline or fragment is already in edit mode, the Check In icon displays in the same location. |
 |
Create Job icon | Creates a job based on the pipeline. Creates a job for a published pipeline. |
 |
Stickies icon | Adds a sticky note to the pipeline canvas that you can use to communicate with other users. |
 |
Arrange icon | Automatically arranges the stages on the canvas. |
 |
Share icon | Shares the pipeline or fragment with users and groups. Use to configure permissions for the pipeline or fragment. |
 |
Update icon | Updates stage libraries for multiple stages in the pipeline or fragment. Use to update all necessary stage libraries at one time when you change the authoring engine for the pipeline or fragment. |
 |
Undo icon |
Reverts recent changes. On Mac, you can also use Command+Z. On Windows, you can use Ctrl+Z. |
 |
Redo icon |
Restores changes that were reverted. On Mac, you can also use Command+Shift+Z. On Windows, you can use Ctrl+Y. |
 |
History icon | Displays the history of the pipeline or fragment in the canvas. |
 |
Delete Draft or Delete Pipeline icon | Deletes the draft version or published version of a pipeline. |
 |
More icon | Provides additional pipeline actions to take. |
| Add Stage icon | Indicates that you need to add a stage to complete the pipeline. Select the icon to open the stage selector. |
|
 |
Duplicate Stage icon | Duplicates the selected stage. |
 |
Create Pipeline Fragment icon | Creates a pipeline fragment from the selected stages. |
 |
Delete icon | Deletes the selected item in the canvas. |
 |
Expand Fragments icon | Expands either all or the selected fragment stages in the pipeline, displaying all the stages in the fragments. |
 |
Collapse Fragments icon | Collapses expanded pipeline fragments, displaying a single fragment stage for each fragment. |
 |
Stream link icon | Indicates the flow of data through the pipeline or fragment. Select the link to insert a stage between the connected stages or to delete the link. For Data Collector pipelines, you can also select the link to configure data rules and alerts. |
 |
Error icon | Indicates that one or more required properties are not defined. Can display
on a stage for stage properties or in the canvas for pipeline properties.
Related error messages display when you hover over the icon. You can also view the messages in the Validation Errors list. The icon can also display on tabs in the properties panel to indicate the location of missing properties. |
Classic Pipeline Canvas UI
The following image shows the classic pipeline canvas UI when you configure a pipeline:
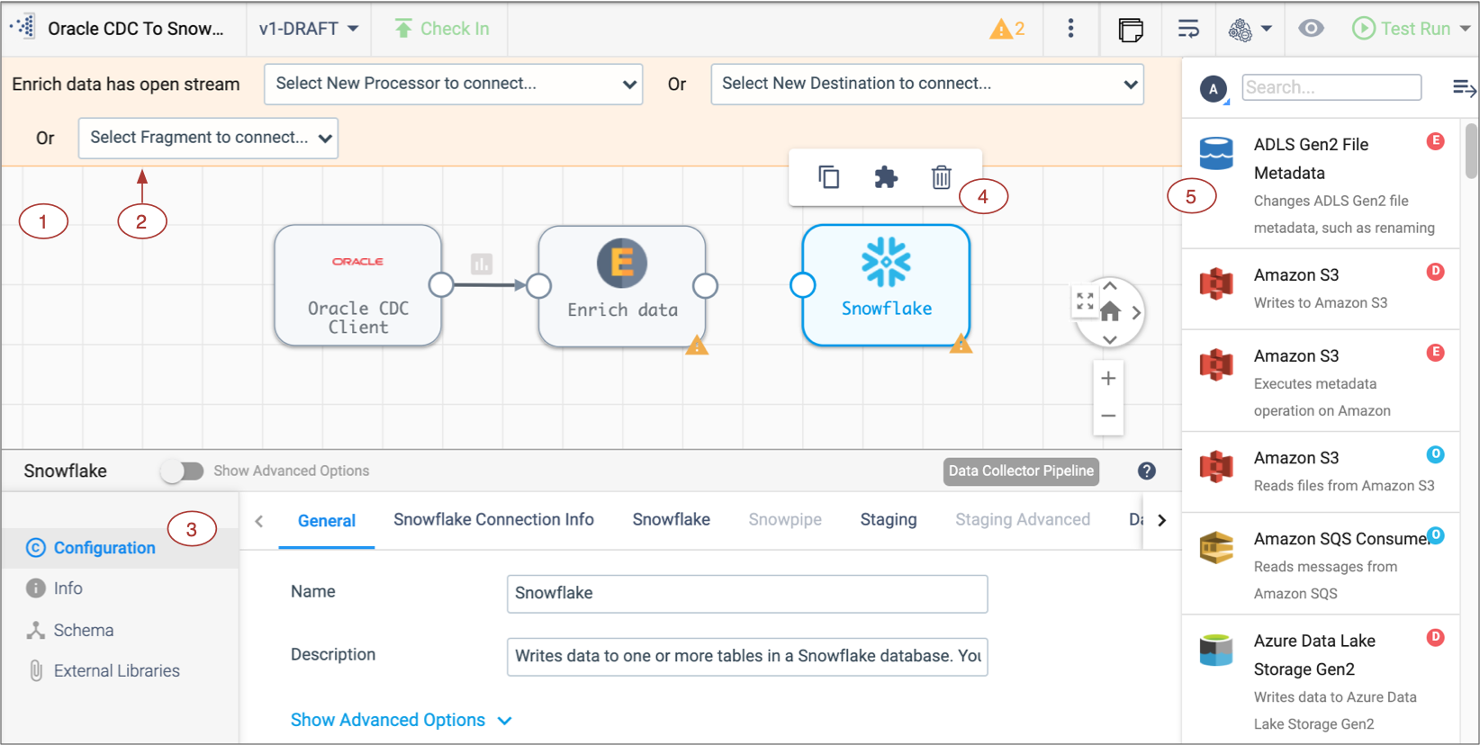
| Area/Icon | Name | Description |
|---|---|---|
| 1 | Pipeline Canvas | Displays the pipeline. Use to configure the pipeline data flow. |
| 2 | Pipeline Creation Help Bar | Offers lists of stages to help complete the pipeline. You can use the help bar to connect a stage to an open node. You can also add a stage between linked stages by clicking the link. |
| 3 | Properties panel | Displays the properties of the pipeline or selected stage when you configure a pipeline. |
| 4 | Selected stage pop-up menu | Displays the icons for commands that you can apply to the selected stages. |
| 5 | Stage library panel | List of available stages. Use to add stages to the pipeline. You can drag a
stage to a location on the canvas or click a stage to add it to the end of the
pipeline. You can view all stages, stages by type, or stages by library. You can also search for a stage by name. Stages that are not installed appear disabled, or greyed out. Click on a disabled stage to install the stage library that includes the stage. |
| Pipeline name display | Displays the name of the pipeline in the canvas. | |
| Pipeline version display and selection | The version of the pipeline in the canvas. To select a different version, click the icon and select the version to view. | |
| Check In icon | Publishes the pipeline or fragment in the canvas. Displays for pipelines
only when the pipeline passes implicit validation. When the pipeline has already been published, the Edit icon displays in the same location. Publish a pipeline to enable creating a job for the pipeline. Publish a fragment to enable using the fragment in a pipeline. |
|
| Edit icon | Enables editing the pipeline or fragment. Displays when the pipeline or
fragment has already been published and is being viewed in read only
mode. When the pipeline or fragment is already in edit mode, the Check In icon displays in the same location. |
|
| Compare with Previous Version icon | Compares the pipeline or fragment in the canvas with a previous version. | |
| History icon | Displays the history of the pipeline or fragment in the canvas. | |
| Undo icon |
Reverts recent changes. On Mac, you can also use Command+Z. On Windows, you can use Ctrl+Z. |
|
| Redo icon |
Restores changes that were reverted. On Mac, you can also use Command+Shift+Z. On Windows, you can use Ctrl+Y. |
|
| Delete Draft or Delete Pipeline icon | Deletes the draft version or published version of a pipeline. | |
| Validation Errors icon | Lists the number of validation errors for implicit validation. Click to view the error messages. | |
| More icon | Provides additional pipeline actions to take. | |
| Sticky Note icon | Adds a sticky note to the pipeline canvas that you can use to communicate with other users. | |
| Auto Arrange icon | Automatically arranges the stages on the canvas. | |
| Authoring icon | Authoring engine associated with the pipeline. You can click the icon and select a different engine to use. | |
| Preview icon | Starts data preview. Available for valid pipelines and fragments. | |
| Create Job icon | Creates a job based on the pipeline. Creates a job for a published pipeline. | |
| Stage Library icon | Toggles the display of the Stage Library panel. | |
| Duplicate Stage icon | Duplicates the selected stage. | |
| Create Pipeline Fragment icon | Creates a pipeline fragment from the selected stages. | |
| Delete icon | Deletes the selected item in the canvas. | |
| Expand Fragments icon | Expands either all or the selected fragment stages in the pipeline, displaying all the stages in the fragments. | |
| Collapse Fragments icon | Collapses expanded pipeline fragments, displaying a single fragment stage for each fragment. | |
| Stream link icon | Indicates the flow of data through the pipeline or fragment. Select to
configure data rules and alerts. Darker icons indicate that a data rule is configured for the link. |
|
| Error icon | Indicates that one or more required properties are not defined. Can display
on a stage for stage properties or in the canvas for pipeline properties.
Related error messages display when you hover over the icon. You can also view the messages in the Validation Errors list. The icon can also display on tabs in the properties panel to indicate the location of missing properties. |
Pipeline Canvas Tips
- Authoring engine
- You must select the authoring engine to use when configuring a pipeline or pipeline fragment that runs on a Data Collector or Transformer execution engine, or a deployed Transformer for Snowflake execution engine. Pipelines that run on a hosted Transformer for Snowflake engine are authored on the hosted engine.
- Create a pipeline or fragment
- When you create a pipeline or pipeline fragment, you can start with a blank canvas or an existing template.
- Edit a published pipeline or fragment
- When viewing a published pipeline or pipeline fragment, Control Hub displays the pipeline or fragment in read-only mode.
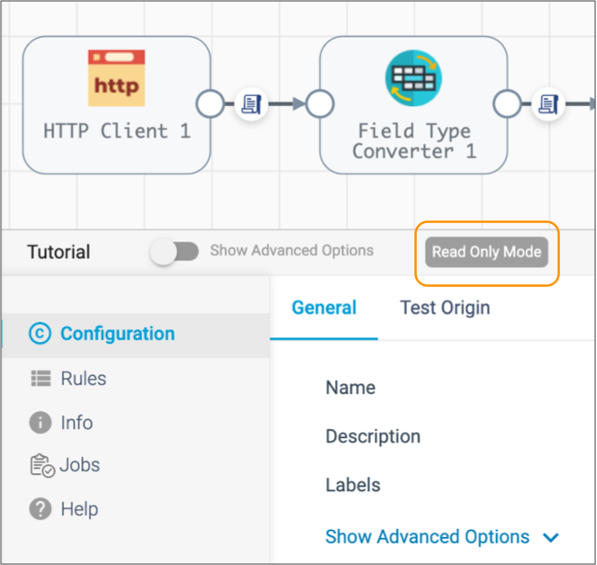
- To edit a published pipeline or fragment, click the Edit icon: . The pipeline or fragment then enters edit
mode.
- Select multiple stages
- When editing a pipeline or pipeline fragment, you can select multiple stages in the pipeline canvas and then move, delete, or copy the selected stages. To select multiple stages in the canvas, press the Shift key and then click each stage.
- Copy and paste multiple stages and fragments
- After selecting multiple stages or fragments in the pipeline canvas, you can
copy them to the clipboard by clicking Copy to Clipboard in the properties
panel below the canvas. Or, to copy the selected stages and fragments to the
clipboard on Mac, you can also use
Command+C. On Windows, you can useCtrl+C. - Zoom in or out of the pipeline canvas
- When editing a pipeline or pipeline fragment, use the following icons in the canvas to zoom in or out of the canvas:
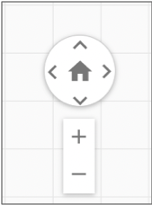
- By default, you can also zoom in or out of the canvas using the mouse scroll
wheel or using the trackpad. To enable or disable scroll zoom, click the
More icon (
 ) and then click Enable
Scroll Zoom or Disable Scroll
Zoom.
) and then click Enable
Scroll Zoom or Disable Scroll
Zoom. - Update stage libraries for the pipeline
- When editing a Data Collector or Transformer pipeline or pipeline fragment, you can use the Update Stage Libraries dialog box to update the stage libraries for multiple stages in the pipeline or fragment. Transformer for Snowflake does not include stage libraries.
- To update multiple stage libraries at one time, click the
More icon (
 ),
then select Update.
),
then select Update. 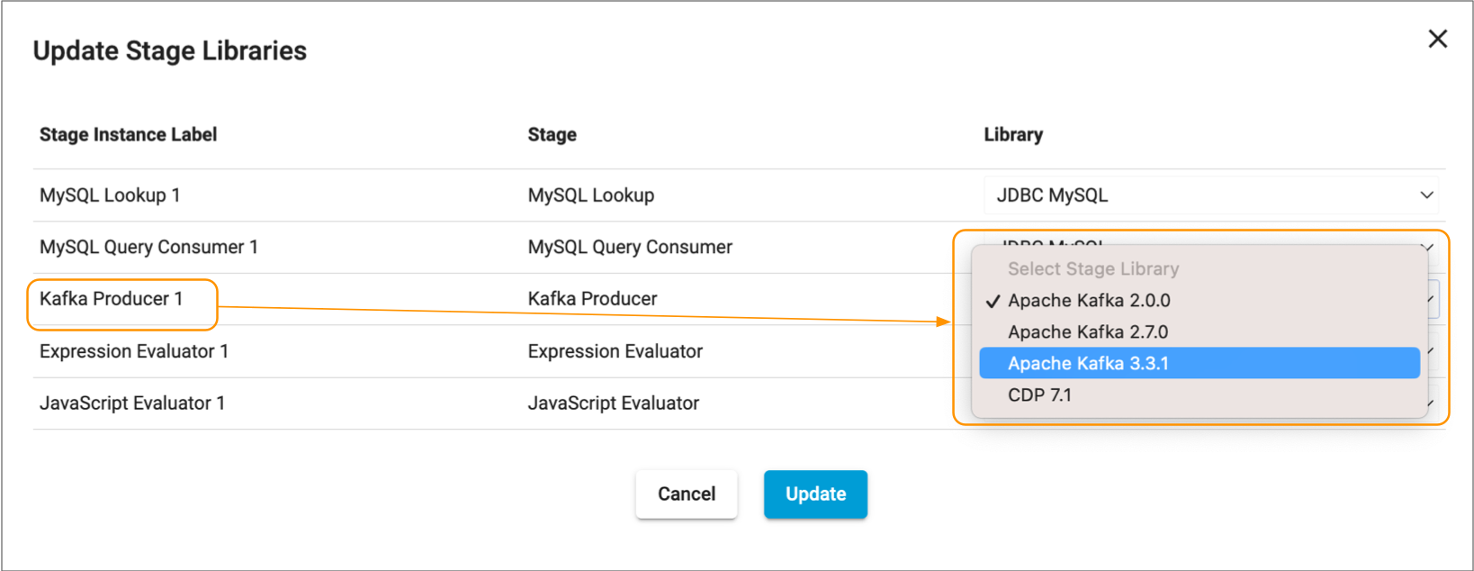
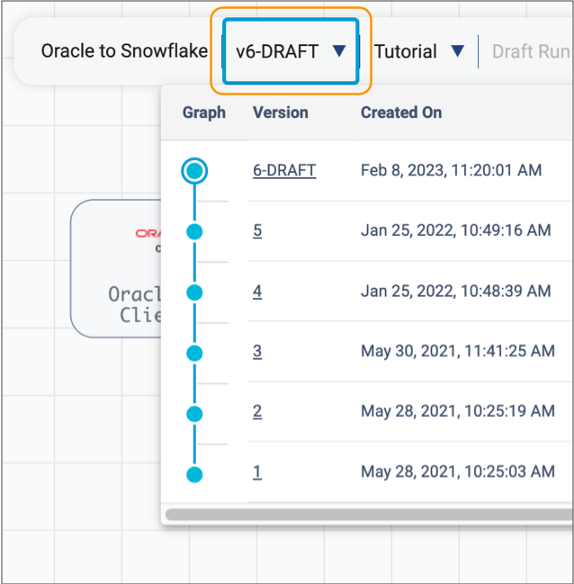
- Work with versions
- When you have multiple versions of a pipeline or pipeline fragment, Control Hub indicates the version of the pipeline or fragment that you are viewing. You can click the pipeline or fragment version to select a different version to view, as follows:
- Use sticky notes
- When editing a pipeline or pipeline fragment, you can add sticky notes to the pipeline canvas so that you can communicate with other users.
- Create a connection
- When editing a pipeline or pipeline fragment, you can create a new connection for a stage. Simply click the
Add New Connection icon (
 ) next to the Connection property for the
stage.
) next to the Connection property for the
stage. - Start a draft run of a draft pipeline
- When editing a pipeline, you can start a draft run to quickly test the pipeline logic. You can start a draft run for a fully configured draft pipeline.
- Publish a pipeline or fragment
- When you have completed work on a pipeline or fragment, you publish or check in the pipeline or fragment. Publish a pipeline to create and run jobs based on the pipeline. Publish a fragment to make it available for testing or use in pipelines.
- Use the Check In icon to publish a valid pipeline or fragment: . Enter a commit message stating what changed
in this version so that you can track the commit history of the pipeline or
fragment.
- Create a job
- After you publish a pipeline, you can create a job.
- You can create a job using the Create Job icon () in the toolbar above
the pipeline canvas. Or, you can create a job from the Job Instances view.