Getting Started with Connections
To get started with connections, create a connection, share the connection with other users, and then use the connection in pipelines or pipeline fragments.
Create a Connection
Create a connection to define the information required to connect to an external system.
- In the Navigation panel, click , and then click the Add icon:
 .
. - While configuring a stage in the pipeline canvas, click the Add New
Connection icon () next to the
Connection property for the stage.
Define the Connection
Define the connection essentials, including the connection name, the authoring Data Collector to use for creating the connection, and the connection type.
-
Enter the following information to define the connection:
Define Connection Property Description Name Name for the connection. When data engineers use the connection in a pipeline, they can view only the connection name and description.
Tip: Use a name that clearly distinguishes each connection from other connections of the same type. For example, if you create two JDBC connections, one for the Oracle customers database and the other for the MySQL stores database, you might name those connections Oracle_customers and MySQL_stores.Description Description for the connection. Use the description to add additional details about the connection use case.
Authoring Data Collector Available authoring Data Collector that determines the connection types you can create. Select an authoring Data Collector to create a standard connection. If you select an authoring Data Collector, make sure it meets the requirements for the connection that you want to configure. Each connection type requires that the appropriate stage library is installed on the selected authoring Data Collector.
By default, the connection is engineless, which allows you to create connections with all stage libraries available in the latest Data Collector release.
Note: The Data Collector with the most recent reported time is selected by default.Type Type of connection to create. You cannot change the connection type after you save the connection. Note: If you select an uninstalled connection type, you can update the deployment with the missing stage library that includes the connection type.When creating a connection from the pipeline canvas, the connection type is determined by the stage type and cannot be edited.
Tags Optional tags that identify similar connections. Use connection tags to easily search and filter connections. Enter nested tags using the following format:
<tag1>/<tag2>/<tag3> -
Click one of the following buttons:
- Cancel - Cancels creating the connection and exits the wizard.
- Save & Next - Saves the connection definition and continues.
Configure the Connection
Configure the properties for the selected connection type, and then test the connection.
-
Configure the connection properties.
The available properties depend on the selected connection type. For a description of each property, see Connection Types.
-
To verify that you correctly configured the connection properties, click
Test Connection.
For more information, see Testing Connections.Note: You cannot test an engineless connection when configuring a connection. To test if an engineless connection works as expected, you can configure a pipeline to use the connection, then perform a draft run or create and run a job.
-
Click one of the following buttons:
- Cancel - Cancels changes made to the connection configuration and exits the wizard.
- Save - Saves the connection configuration and exits the wizard.
Share the Connection
Before other users can use the connection when configuring pipelines and pipeline fragments, you must share the connection with them.
- In the Navigation panel, click .
-
Select a connection and then click the Share icon:
 .
.
- On the Sharing Settings window, select the users or groups that you want to share the connection with and then click Add.
- Assign the Read permission to each added user or group.
-
Click Save.
For more information about connection permissions, see Permissions.
Use the Connection
When configuring a pipeline or pipeline fragment, select an existing connection that contains the details needed to connect to the external system.
- While configuring a pipeline, select a stage that can use a connection to access an external system.
-
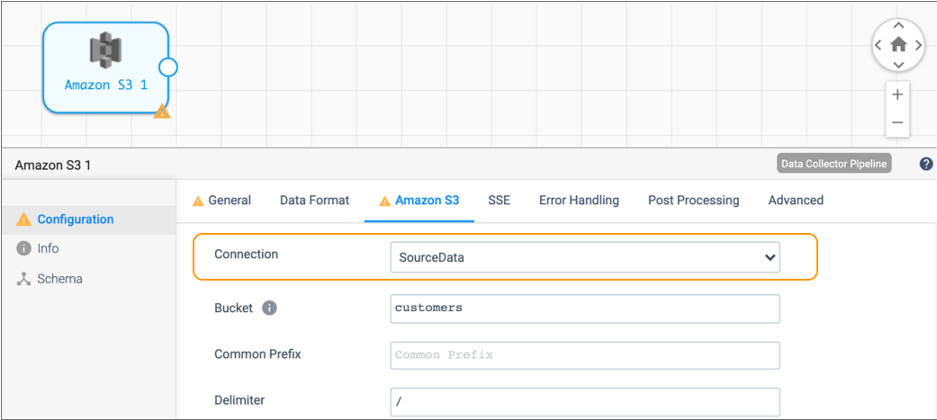
On the primary tab of the stage, such as the Amazon S3 tab for the Amazon S3
origin, select an available connection for the Connection
property.
Notice how the properties required to connect to the system no longer display after you select a connection.
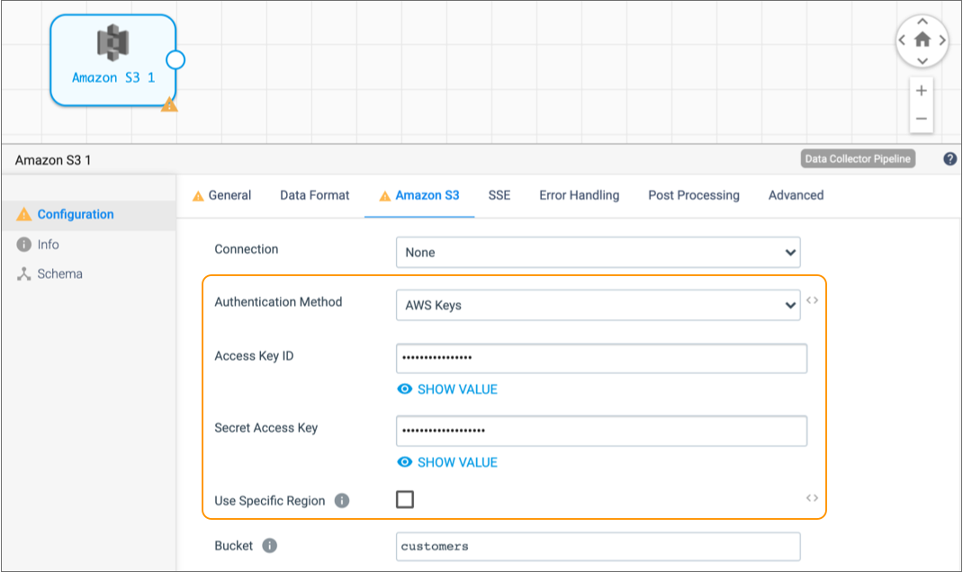
For example, the following image displays the Amazon S3 tab for an Amazon S3 origin when no connection is selected. The tab displays the connection properties such as Authentication Method and Use Specific Region so that you can directly specify the details in the origin:
The following image displays the same Amazon S3 tab after you select an available connection named SourceData. The tab no longer displays the connection properties. You cannot view the values of the properties defined in the SourceData connection: