Databricks Delta Lake
The Databricks Delta Lake destination writes data to one or more Delta Lake tables on Databricks. For information about supported versions, see Supported Systems and Versions.
Use the Databricks Delta Lake destination for the following use cases:
- Bulk load new data into Delta Lake tables
- Build a pipeline that bulk loads new data into Delta Lake tables on Databricks. When processing new data, the destination uses the COPY command to load data into Delta Lake tables. For a detailed solution of how to design this pipeline, see Bulk Loading Data into a Delta Lake Table.
- Merge changed data into Delta Lake tables
- Build a pipeline that reads change data capture (CDC) data from a database and replicates the changes to Delta Lake tables on Databricks. When processing CDC data, the destination uses the MERGE command to load data into Delta Lake tables. For a detailed solution of how to design this pipeline, see Merging Changed Data into a Delta Lake Table.
The Databricks Delta Lake destination first stages the pipeline data in text files in Amazon S3, Azure Data Lake Storage Gen2, or Google Cloud Storage. Then, the destination sends the COPY or MERGE command to Databricks to process the staged files.
The Databricks Delta Lake destination uses a JDBC URL to connect to the Databricks cluster. When you configure the destination, you specify the JDBC URL and credentials to use to connect to the cluster. You define the information that the destination uses to connect to the staging location.
You specify the tables in Delta Lake to write the data to. The destination writes data from record fields to table columns based on matching names. You can configure the destination to compensate for data drift by creating new columns in existing database tables when new fields appear in records or by creating new database tables. When the destination performs data drift and creates new tables, you can configure it to partition the tables based on specified fields in the record.
You can configure the root field for the row, and any first-level fields that you want to exclude from the record. You can also configure the destination to replace missing fields or fields with invalid data types with user-defined default values and to replace newline characters in string fields with a specified character. You can specify the quoting mode, define quote and escape characters, and configure the destination to trim spaces.
The Databricks Delta Lake destination can use CRUD operations defined in the
sdc.operation.type record header attribute to write data. For information about Data Collector change data
processing and a list of CDC-enabled origins, see Processing Changed Data.
Before you use the Databricks Delta Lake destination, you must complete a prerequisite task.
Prerequisite
Before configuring the Databricks Delta Lake destination, prepare your Databricks cluster.
In Databricks, configure and start your Databricks cluster, generate a personal access token, and locate the JDBC URL used to access the cluster.
- When using Amazon S3 as the staging location, see this Databricks article.
- When using Azure Data Lake Storage Gen2 as the staging location, see this Azure Databricks article.
- When using Google Cloud Storage as the staging location, see this Databricks article.
Load Methods
The Databricks Delta Lake destination can load data to Delta Lake tables using the following methods:
- COPY command for new data
- The COPY command, the default load method, performs a bulk synchronous load to Delta Lake, treating all records as INSERTS. Use this method to write new data to Delta Lake tables.
- MERGE command for CDC data
- Instead of treating all records as INSERT, the MERGE command inserts, updates, upserts, and deletes changed data to Delta Lake tables as appropriate. Use this method to write change data capture (CDC) data to Delta Lake tables using CRUD operations.
Use the recommended guidelines to optimize for performance and cost-effectiveness.
CRUD Operation Processing
When you configure the Databricks Delta Lake destination to use the MERGE command to load CDC data, the destination can insert, update, upsert, or delete data.
sdc.operation.type record header attribute. The destination
performs operations based on the following numeric values:- 1 for INSERT
- 2 for DELETE
- 3 for UPDATE
- 4 for UPSERT
If
your pipeline has a CRUD-enabled origin that processes
changed data, the destination simply reads the operation
type from the sdc.operation.type header
attribute that the origin generates. If your pipeline has
a non-CDC origin, you can use the Expression Evaluator
processor or a scripting processor to define the record
header attribute. For more information about Data Collector changed data processing and a list of CDC-enabled
origins, see Processing Changed Data.
Primary Key Location
When you configure the Databricks Delta Lake destination to use the MERGE command to load CDC data, you must provide primary key information.
You can configure the destination to access primary key information in the following ways:
- Use JDBC record header attribute
- The destination uses primary key columns stored in the
jdbc.primaryKeySpecificationrecord header attribute. - Use specified columns for each table
- The destination uses the primary key columns that you specify in the Table Key Columns properties.
Specifying Tables
You can use the Databricks Delta Lake destination to write to one or more tables. The destination writes data from record fields to the table columns based on matching names.
- Single table on Databricks File System (DBFS)
- To write data to a single table on DBFS, enter the name of the database and
table using the following
format:
<database_name>.<table_name> - Single external table
- To write data to a single external table, enter the name of the catalog,
schema, and table using the following
format:
<catalog_name>.<schema_name>.<table_name> - Multiple tables
- To write data to multiple tables, specify a field in the record that defines the database and tables to write to.
Use the Table Name property on the Databricks Delta Lake tab to specify the tables to write to.
Enabling Data Drift Handling
The Databricks Delta Lake destination can automatically compensate for changes in column or table requirements, also known as data drift.
- Create new columns
- The destination can create new columns in Delta Lake tables when new fields
appear in records. For example, if a record suddenly includes a new
Address2field, the destination creates a newAddress2column in the target table. - Create new tables
- When data drift handling is enabled, you can also configure the destination
to create new tables as needed. For example, say the destination writes data
to tables based on the region name in the
Regionfield. When a newSW-3region shows up in a record, the destination creates a newSW-3table in Delta Lake and writes the record to the new table.
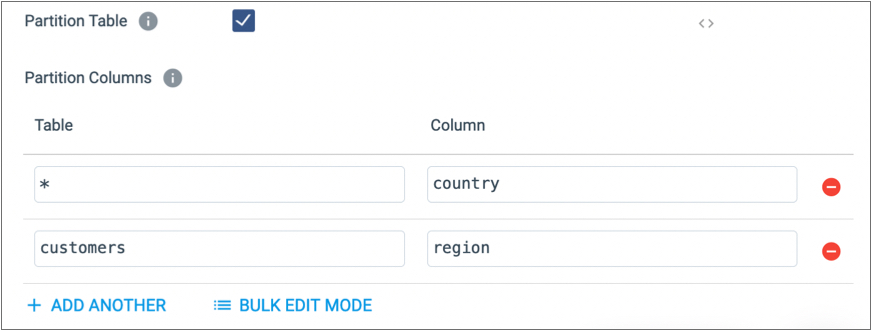
Partitioning Tables
When you enable data drift handling and automatic table creation, you can configure the Databricks Delta Lake destination to partition the tables and write to those partitions.
When partitioning tables, you specify the name of the table to partition and the name of the record field to become the partition column.
When appropriate, you can configure the destination to use the same partition column for all created tables. To do this, use an asterisk ( * ) for the Table property. Then, the destination uses the specified field as a partition column for all tables created by the destination.
For example, the following configuration uses the country field as a
partition in all tables, and the region field for the
customers table:
Performance Optimization
Use the following tips to optimize for performance and cost-effectiveness when using the Databricks Delta Lake destination:
- Increase the batch size
- The maximum batch size is determined by the origin in the pipeline and typically has a default value of 1,000 records. To take advantage of the Databricks loading abilities when writing to Delta Lake tables using the COPY or MERGE commands, increase the maximum batch size in the pipeline origin to 20,000-50,000 records. Be sure to increase the Data Collector java heap size, as needed.
- Use multiple threads
- When writing to Delta Lake tables using the COPY command, you can use multiple threads to improve performance by including a multithreaded origin in the pipeline. When Data Collector resources allow, using multiple threads enables processing multiple batches of data concurrently. As with increasing the batch size, when using multiple threads, you should make sure that the Data Collector java heap size is sized appropriately.
- Enable additional connections to Databricks
- When writing to multiple Delta Lake tables using the COPY or MERGE commands, increase the number of connections that the Databricks Delta Lake destination makes to Databricks. Each additional connection allows the destination to write to an additional table, concurrently.
Staging Location
The Databricks Delta Lake destination first stages the pipeline data in text files in a specified location. Then, the destination sends the COPY or MERGE command to Databricks to process the staged files.
- Amazon S3
- After selecting Amazon S3 as the staging location, specify the existing S3 bucket to stage the files to. You also specify the credentials that the destination uses to connect to Amazon S3.
- ADLS Gen2
- After selecting ADLS Gen2 as the staging location, specify the name of the existing Azure account and storage container to stage the files to. You then configure the destination to use the appropriate authentication method to connect to Azure Data Lake Storage Gen2.
- Google Cloud Storage
- After selecting Google Cloud Storage as the staging location, specify the project ID and an existing Google Cloud Storage bucket to use. You also define credential provider details.
For all staging locations, you specify the stage file name prefix and whether the destination removes a staged file after its data is written to Delta Lake tables.
Amazon S3 Credentials
When you configure the destination to connect to an Amazon S3 staging location, the destination must pass credentials to Amazon Web Services.
- Instance profile
- When Data Collector runs on an Amazon EC2 instance that has an associated instance profile, Data Collector uses the instance profile credentials to automatically authenticate with AWS.
- AWS access key pair
-
When Data Collector does not run on an Amazon EC2 instance or when the EC2 instance doesn’t have an instance profile, you can connect with an AWS access key pair.
To connect with an AWS access key pair, on the Staging tab, set the Authentication Method property to AWS Keys. Then define the access key ID and secret access key.Tip: To secure sensitive information such as access key pairs, you can use runtime resources or credential stores.
ADLS Gen2 Authentication Information
When you configure the destination to connect to an ADLS Gen2 staging location, you select the authentication method that the destination uses to connect to Azure Data Lake Storage Gen2.
- OAuth 2.0
- Connections made with OAuth 2.0 authentication require the following
information:
- Application ID - Application ID for the Azure Active Directory Data Collector
application. Also known as the client ID.
For information on accessing the application ID from the Azure portal, see the Azure documentation.
- Application Key - Authentication key or client secret
for the Azure Active Directory application. Also known as the
client secret.
For information on accessing the application key from the Azure portal, see the Azure documentation.
- Auth Token Endpoint - OAuth 2.0 token endpoint for
the Azure Active Directory v1.0 application for Data Collector. For example:
https://login.microsoftonline.com/<uuid>/oauth2/token.
- Application ID - Application ID for the Azure Active Directory Data Collector
application. Also known as the client ID.
- Shared Key
- Connections made with Shared Key authentication require the following
information:
Google Cloud Credentials
Before staging data on Google Cloud Storage, the Databricks Delta Lake destination must pass credentials to Google Cloud.
- Google Cloud default credentials
- Credentials in a file
- Credentials in a stage property
For details on how to configure each option, see Security in Google Cloud Stages.
Row Generation
When writing a record to a table, the Databricks Delta Lake destination includes all
record fields in the resulting row, by default. The destination uses the root field,
/, as the basis for the resulting row.
You can configure the Row Field property on the Data tab to specify a map or list-map field in the record as the basis for the row. The resulting record includes only the data from the specified map or list-map field and excludes all other record data. Use this functionality when the data that you want to write to Delta Lake tables exists in a single map or list-map field within the record.
When you want to use the root field, but do not want to include all fields in the resulting row, configure the destination to ignore all specified first-level fields.
/, as the basis for the resulting row. A record contains the
following
fields:{
"name": "Jane Smith",
"id": "557",
"address": {
"street": "101 3rd St",
"city": "Huntsville",
"state": "NC",
"zipcode": "27023"
}
}The destination treats the address map field as a field with an invalid
data type, processing the field as an error record by default. You can configure the
destination to ignore the field and process the remaining record data, as described in
Missing Fields and Fields with Invalid Types.
Missing Fields and Fields with Invalid Types
By default, the destination treats records with missing fields or with invalid data types in fields as error records.
You can configure the destination to ignore missing fields or fields with invalid data types, replacing the data in the field with an empty value.
The default for each data type is \N, which represents an empty
value in Delta Lake. You can specify a different default value to use for each data type
on the Data Advanced tab. For example, you might define the default value for a missing
String field or a String field with an invalid data type as none or
not_applicable.
To configure the destination to ignore missing fields and fields with invalid data types, select the Ignore Missing Fields and the Ignore Fields with Invalid Types properties on the Data Advanced tab.
Databricks Data Types
The Databricks Delta Lake destination converts Data Collector data types into Databricks data types before writing data to Delta Lake tables.
When you configure the destination to compensate for data drift, you can also configure the destination to create all new columns as String. However, by default, the destination converts record data to the appropriate data type.
The destination does not support nested Data Collector data types: List, List-Map, and Map. By default, the destination treats fields with invalid data types as an error record. You can configure the destination to ignore fields with invalid data types, as described in Missing Fields and Fields with Invalid Types.
The destination converts the following Data Collector data types into these Databricks data types:
| Data Collector Data Type | Databricks Data Type |
|---|---|
| Boolean | Boolean |
| Byte | Tinyint |
| Byte_Array | Binary |
| Char | String |
| Date | Date |
| Datetime | Timestamp |
| Decimal | Decimal |
| Double | Double |
| Float | Float |
| Integer | Int |
| Long | Bigint |
| Short | Smallint |
| String | String |
| Time | Timestamp |
| Zoned_Datetime | Date |
Configuring a Databricks Delta Lake Destination
Configure a Databricks Delta Lake destination to write data to one or more Delta Lake tables on Databricks. Before you configure the destination, be sure to complete the prerequisite task.
-
In the Properties panel, on the General tab, configure the
following properties:
General Property Description Name Stage name. Description Optional description. Required Fields Fields that must include data for the record to be passed into the stage. Tip: You might include fields that the stage uses.Records that do not include all required fields are processed based on the error handling configured for the pipeline.
Preconditions Conditions that must evaluate to TRUE to allow a record to enter the stage for processing. Click Add to create additional preconditions. Records that do not meet all preconditions are processed based on the error handling configured for the stage.
On Record Error Error record handling for the stage:- Discard - Discards the record.
- Send to Error - Sends the record to the pipeline for error handling.
- Stop Pipeline - Stops the pipeline.
-
On the Databricks Delta Lake tab, configure the following
properties:
Databricks Delta Lake Property Description JDBC URL JDBC URL used to connect to the Databricks cluster. Enter in the following format:
jdbc:databricks://<server_hostname>:443/default;transportMode=http:ssl=1;httpPath=sql/protocolv1/o/0/xxxx-xxxxxx-xxxxxxxx;AuthMech=3;Tip: In Databricks, you can locate the JDBC URL for your cluster on the JDBC/ODBC tab in the cluster configuration details. As a best practice, remove thePWDparameter from the URL, and then enter the personal access token value in the Token property below.Token Personal access token used to connect to the Databricks cluster. Tip: To secure sensitive information such as access key pairs, you can use runtime resources or credential stores.Table Name Table to write data to. Enter the table name in one of the following formats for the table name, depending on the table location:
When you specify a table name only, the destination locates the table in the default- DBFS -
<database_name>.<table_name> - External -
<catalog_name>.<schema_name>.<table_name>Note: The catalog and schema for external tables must be created before you can run the pipeline.
deltadatabase.To write data to a single table, enter the table name. To write data to multiple tables, enter an expression that evaluates to the field in the record that contains the table name.
For example:
${record:value('/table')}Or, to write data to tables based on the table name in the
jdbc.tablesrecord header attribute generated by an origin that reads from a relational database, you can use the following expression:${record:attribute('jdbc.tables')}Connection Pool Size Maximum number of connections that the destination uses to write data to Delta Lake tables. Default is 0, which ensures that the destination uses the same number of connections as threads used by the pipeline. When writing to multiple tables, increasing this property can improve performance.
Enable Data Drift Creates new columns in existing tables when new fields appear in records. When not enabled, the destination treats records that have new fields as error records.
Auto Create Table Automatically creates tables in Delta Lake if the tables specified in the destination do not exist. When not enabled, the destination treats a record attempting to write to a table that doesn't exist as an error record.
Available when data drift is enabled.
Table Location Path Directory for the Delta table location, specified as a path on Databricks File System (DBFS) or a URI path to an external location. Note: Tables used by Unity Catalog must be saved to an external location.The destination adds the specified Table Name value as a subdirectory of the Table Location Path to create the final table location. Here are some examples of table names, table location paths, and the final table locations:- DBFS - If you enter /mnt/deltalake as the table
location path and you enter
sales.accountsas the table name, the final table location is /mnt/deltalake/sales.accounts. - External - If you enter
abfss://azure_container@account.dfs.core.windows.net/azure_sales/as the table location path and you entercatalog.sales.accountsas the table name, the final table location isabfss://azure_container@account.dfs.core.windows.net/azure_sales/catalog.sales.accounts.
When you specify a location, the destination creates an unmanaged Delta table. When you do not specify a location, the destination creates a managed Delta table. For more information, see the Delta Lake documentation.
Available when data drift and automatic table creation are enabled.
Partition Table Enables partitioning a table. Available when data drift and automatic table creation are enabled.
Partition Columns Partition columns to use. Specify the following information: - Table - Name of the table to create the partition column for. Use an asterisk ( * ) to represent all tables.
- Column - Name of the field in the record to use as a partition column.
Available when data drift and automatic table creation are enabled.
Create New Columns as String Creates all new columns as String. By default, the destination infers the data type based on the type of data in the field. For example, if a new field contains an integer, the destination creates a column with the IntegerType data type.
Available when data drift is enabled.
Queries per Second Maximum number of queries to run in a second across all partitions and tables. Use 0 for no limit. Default is 0.
Query Maximum Wait Time (secs) Maximum number of seconds to wait for a query to finish before timing out. Use 0 for no limit. Default is 0.
Maximum Number of Retries Maximum number of times to retry a query. Default is 1.
Retry Interval (secs) Time between query retries in seconds. Default is 10.
- DBFS -
-
On the Staging tab, configure the following
properties:
Staging Property Description Staging Location Staging location to connect to and copy or merge data from: - Amazon S3 - Connects to an Amazon S3 staging location.
- ADLS Gen2 - Connects to an Azure Data Lake Storage Gen2 staging location.
- Google Cloud Storage - Connects to a Google Cloud Storage staging location.
Authentication Method Amazon authentication method: - AWS Keys
- Instance Profile - Uses the instance profile assigned to the EC2 instance where Data Collector runs to connect to Amazon S3.
- None
Available when using the Amazon S3 staging location.
Access Key ID AWS access key ID. Required when not using an instance profile.
Available when using the Amazon S3 staging location.
Secret Access Key AWS secret access key. Required when not using an instance profile.
Available when using the Amazon S3 staging location.Tip: To secure sensitive information such as access key pairs, you can use runtime resources or credential stores.Bucket Name of the existing bucket to write the staged files to. Available when using the Amazon S3 or Google Cloud Storage staging location.
Account FQDN Fully qualified domain name of the Azure storage account. The destination can access Azure Data Lake Storage Gen2 or Blob storage accounts in either global Azure or Azure Government services. For example, valid domain names for global Azure services include
<account-name>.dfs.core.windows.netor<account-name>.blob.core.windows.netValid domain names for Azure Government services include
<account-name>.dfs.core.usgovcloudapi.netor<account-name>.blob.core.usgovcloudapi.netAvailable when using the ADLS Gen2 staging location.
Storage Container / File System Name of the existing Azure storage container or file system to stage the files to. Available when using the ADLS Gen2 staging location.
Azure Authentication Method Authentication method used to connect to Azure: - OAuth 2.0
- Shared Key
Available when using the ADLS Gen2 storage location.
Application ID Application ID for the Azure Active Directory Data Collector application. Also known as the client ID. For information on accessing the application ID from the Azure portal, see the Azure documentation.
Available when using the OAuth 2.0 authentication method for Azure.
Application Key Authentication key or client secret for the Azure Active Directory application. Also known as the client secret. For information on accessing the application ID from the Azure portal, see the Azure documentation.
Available when using the OAuth 2.0 authentication method for Azure.
Auth Token Endpoint OAuth 2.0 token endpoint for the Azure Active Directory v1.0 application for Data Collector. For example: https://login.microsoftonline.com/<uuid>/oauth2/token.Available when using the OAuth 2.0 authentication method for Azure.
Account Shared Key Shared access key that Azure generated for the storage account. For more information on accessing the shared access key from the Azure portal, see the Azure documentation.
Available when using the Shared Key authentication method for Azure.
Project ID Google Cloud project ID to use.
Credentials Provider Provider for Google Cloud credentials: - Default credentials provider - Uses Google Cloud default credentials.
- Service account credentials file (JSON) - Uses credentials stored in a JSON service account credentials file.
- Service account credentials (JSON) - Uses JSON-formatted credentials information from a service account credentials file.
Credentials File Path (JSON) Path to the Google Cloud service account credentials file used to connect. The credentials file must be a JSON file. Enter a path relative to the Data Collector resources directory,
$SDC_RESOURCES, or enter an absolute path.Available when Credentials Provider is set to Service Account Credentials File (JSON).
Credentials File Content (JSON) Contents of a Google Cloud service account credentials JSON file used to connect. Enter JSON-formatted credential information in plain text, or use an expression to call the information from runtime resources or a credential store.
Available when Credentials Provider is set to Service Account Credentials (JSON).
Purge Stage File After Ingesting Purges a staged file after its data is successfully written to a Delta Lake table. Stage File Prefix Prefix to use for the name of the staged files. To create a unique name for each staged file, the destination appends a unique number to the prefix. For example, if you define the prefix as
sdc, the destination might name one of the staged filessdc-69021a22-1474-4926-856f-eb4589d14cca.You can optionally use the forward slash (/) to define a path to the staged files in the Amazon S3 or Google Cloud Storage bucket or the Azure storage container or file system. For example, if staging to Amazon S3 and you define the bucket as
stagingand the stage file prefix as/data/sdc, the destination writes the staged files to the following location:staging/data/sdc-<unique number>Specify AWS Region Enables specifying an AWS region to write to. Available when staging data on Amazon S3.
AWS Region AWS region to use. Available when staging data on Amazon S3.
-
When using Amazon S3 as the staging location, on the Staging
Advanced tab, configure the following properties:
Staging Advanced Property Description S3 Connection Timeout Seconds to wait for a response before closing the connection. S3 Socket Timeout Seconds to wait for a response to a query. S3 Max Error Retry Maximum number of times to retry requests. S3 Uploading Threads Size of the thread pool for parallel uploads. Used when working with multiple partitions and processing large objects in multiple parts. When working with multiple partitions, setting this property up to the number of partitions being used to can improve performance.
For more information about this and the following properties, see the Amazon S3 TransferManager documentation.
S3 Minimum Upload Part Size (MB) Minimum part size in bytes for multipart uploads. S3 Multipart Upload Threshold (MB) Minimum batch size in bytes for multipart uploads. S3 Proxy Enabled Specifies whether to use a proxy to connect. S3 Proxy Host Proxy host. S3 Proxy Port Proxy port. S3 Proxy Authentication Enabled Indicates that proxy authentication is used. S3 Proxy User S3 proxy user. S3 Proxy Password S3 proxy password. S3 Encryption Option that Amazon S3 uses to manage the encryption keys: - None
- SSE-S3 - Use Amazon S3-managed keys.
- SSE-KMS - Use Amazon Web Services KMS-managed keys.
Default is None.
S3 Encryption KMS ID Amazon resource name (ARN) of the AWS KMS encryption key. Use the following format: <arn>:<aws>:<kms>:<region>:<acct ID>:<key>/<key ID>Used for SSE-KMS encryption only.
S3 Encryption Context Key-value pairs to use for the encryption context. Click Add to add key-value pairs. Used for SSE-KMS encryption only.
-
On the Data tab, configure the following properties:
Data Property Description Staging File Format Format for staging files. Select one of the following options: - Delimited
- Avro
- Parquet
Row Field Map or list-map field to use as the basis for the generated row. Default is /, which includes all record fields in the resulting row.Column Fields to Ignore List of fields to ignore when writing to the Delta Lake table. You can enter a comma-separated list of first level fields to ignore. Null Value Characters in the data that represent a null value. Default is
\N.Merge CDC Data Uses the MERGE command to perform CRUD operations when writing to Delta Lake tables. Select to process CDC data. Important: To maintain the original order of data, do not use multiple threads or cluster execution mode when processing CDC data.For more information about the MERGE command, see Load Methods. For information about optimizing pipeline performance, see Performance Optimization.
Primary Key Location Location of primary key details: - JDBC Header - Use when primary key columns are
defined in the
jdbc.primaryKeySpecificationrecord header attribute. - Specify for Each Table - Use to list each target table and the primary key columns for the table.
Note: When key columns are known, entering them manually is more efficient than the other option.Table Key Columns Key columns in each Delta Lake table used to evaluate the MERGE condition. Click the Add icon to add additional tables. Click the Add icon in the Key Columns field to add additional key columns for a table.
Available when Primary Key Location is set to Specify for Each Table.
-
On the Data Advanced tab, configure the following
properties:
Data Advanced Property Description Ignore Missing Fields Allows writing records with missing fields to tables. Uses the specified default value for the data type of the missing field. When not enabled, records with missing fields are treated as error records.
Ignore Fields with Invalid Types Allows replacing fields that contain data of an invalid type with the specified default value for the data type. When not enabled, records with data of invalid types are treated as error records.
Boolean Default Default value to use when replacing missing Boolean fields or Boolean fields with invalid data. Default is \N, which represents an empty value in Delta Lake.
Numeric Types Default Default value to use when replacing missing fields or fields with invalid data that use one of the numeric data types. Numeric data types include Tinyint, Smallint, Int, and Bigint. Default is a \N, which represents an empty value in Delta Lake.
Double Default Default value to use when replacing missing Double fields or Double fields with invalid data. Default is \N, which represents an empty value in Delta Lake.
Float Default Default value to use when replacing missing Float fields or Float fields with invalid data. Default is \N, which represents an empty value in Delta Lake.
Decimal Default Default value to use when replacing missing Decimal fields or Decimal fields with invalid data. Default is \N, which represents an empty value in Delta Lake.
Date Default Default value to use when replacing missing Date fields or Date fields with invalid data. Default is \N, which represents an empty value in Delta Lake.
Timestamp Default Default value to use when replacing missing Timestamp fields or Timestamp fields with invalid data. Default is \N, which represents an empty value in Delta Lake.
String Default Default value to use when replacing missing String fields or String fields with invalid data. Default is \N, which represents an empty value in Delta Lake.
Binary Default Default value to use when replacing missing Binary fields or Binary fields with invalid data. Default is \N, which represents an empty value in Delta Lake.
Replace Newlines Replaces newline characters in string fields with the specified replacement character. Newline Replacement Character Character to use to replace newline characters. Trim Spaces Trims leading and trailing spaces from field data. Column Separator Character to use as a column separator. Quoting Mode Mode for handling special characters in the data, such as the column separator and newline character: - Quoted - Encloses data in each field with the
specified quote character.The following example uses asterisks to enclose the data in a field:
*string data, more string data* - Escaped - Precedes a special character with the
specified escape character. The following example uses a backtick to escape the comma column separator in a field:
string data`, more string data - Both - Performs both tasks described above.
Quote Character Character to enclose field data. Available when Quoting Mode is set to Quoted or Both.
Escape Character Character to precede special characters in field data. Available when Quoting Mode is set to Escaped or Both.
- Quoted - Encloses data in each field with the
specified quote character.