Delta Lake
The Delta Lake destination writes data to a Delta Lake table.
The destination can write data to a new or existing Delta Lake table. If the specified table doesn't exist, the destination creates a new Delta Lake table. When the pipeline runs on a Databricks cluster, you can configure the destination to create a managed table.
The Delta Lake destination writes to a Delta Lake table based on the specified write mode. The destination can append data to a table or overwrite data in a table. It can also perform upserts and deletes to enable complex use cases like change data capture, streaming upserts, and so on. When needed, the destination can execute update and delete commands unrelated to pipeline data.
When you configure the Delta Lake destination, you specify the table path to write to, the write mode to use, and related properties.
You also specify the storage system for the table. When writing to a table stored on Azure Data Lake Storage (ADLS) Gen2, you also specify connection-related details. For a table on Amazon S3 or HDFS, Transformer uses connection information stored in a Hadoop configuration file. You can configure security for connections to Amazon S3.
To access a table stored on ADLS Gen2, complete the necessary prerequisites before you run the pipeline. Also, before you run a local pipeline for a table on ADLS Gen2 or Amazon S3, complete these additional prerequisite tasks.
Storage Systems
- Amazon S3
- Azure Data Lake Storage (ADLS) Gen2
- HDFS
- Local file system
ADLS Gen2 Prerequisites
- If necessary, create a new Azure Active Directory
application for Transformer.
For information about creating a new application, see the Azure documentation.
- Ensure that the
Azure Active Directory Transformer application
has the appropriate access control to perform the necessary tasks.
To read from Azure, the Transformer application requires Read and Execute permissions. If also writing to Azure, the application requires Write permission as well.
For information about configuring Gen2 access control, see the Azure documentation.
- Install the Azure Blob File System driver on the cluster where the pipeline
runs.
Most recent cluster versions include the Azure Blob File System driver,
azure-datalake-store.jar. However, older versions might require installing it. For more information about Azure Data Lake Storage Gen2 support for Hadoop, see the Azure documentation. - Retrieve Azure Data Lake Storage Gen2 authentication information from the Azure
portal for configuring the destination.
You can skip this step if you want to use Azure authentication information configured in the cluster where the pipeline runs.
- Before using the stage in a local pipeline, ensure that Hadoop-related tasks are complete.
Retrieve Authentication Information
The Delta Lake destination provides several ways to authenticate connections to ADLS Gen2. Depending on the authentication method that you use, the destination requires different authentication details.
If the cluster where the pipeline runs has the necessary Azure authentication information configured, then that information is used by default. However, data preview is not available when using Azure authentication information configured in the cluster.
You can also specify Azure authentication information in stage properties. Any authentication information specified in stage properties takes precedence over the authentication information configured in the cluster.
- OAuth
- When connecting using OAuth authentication, the destination requires the
following information:
- Application ID - Application ID for the Azure Active
Directory Transformer
application. Also known as the client ID.
For information on accessing the application ID from the Azure portal, see the Azure documentation.
- Application Key - Authentication key for the Azure
Active Directory Transformer application. Also known as the client key.
For information on accessing the application key from the Azure portal, see the Azure documentation.
- OAuth Token Endpoint - OAuth 2.0 token endpoint for
the Azure Active Directory v1.0 application for Transformer. For example:
https://login.microsoftonline.com/<uuid>/oauth2/token.
- Application ID - Application ID for the Azure Active
Directory Transformer
application. Also known as the client ID.
- Managed Service Identity
- When connecting using Managed Service Identity authentication, the
destination requires the following information:
- Application ID - Application ID for the Azure Active
Directory Transformer
application. Also known as the client ID.
For information on accessing the application ID from the Azure portal, see the Azure documentation.
- Tenant ID - Tenant ID for the Azure Active Directory
Transformer
application. Also known as the directory ID.
For information on accessing the tenant ID from the Azure portal, see the Azure documentation.
- Application ID - Application ID for the Azure Active
Directory Transformer
application. Also known as the client ID.
- Shared Key
- When connecting using Shared Key authentication, the destination requires
the following information:
- Account Shared Key - Shared access key that Azure
generated for the storage account.
For more information on accessing the shared access key from the Azure portal, see the Azure documentation.
- Account Shared Key - Shared access key that Azure
generated for the storage account.
Amazon S3 Credential Mode
- Instance profile
- When Transformer runs on an Amazon EC2 instance that has an associated instance profile, Transformer uses the instance profile credentials to automatically authenticate with AWS.
- AWS access keys
- When Transformer does not run on an Amazon EC2 instance or when the EC2 instance doesn’t have an instance profile, you can authenticate using an AWS access key pair. When using an AWS access key pair, you specify the access key ID and secret access key to use.
- None
- When accessing a public bucket, you can connect anonymously using no authentication.
Creating a Table or Managed Table
The Delta Lake destination can write data to a new or existing Delta Lake table. When creating a table, the destination can create a Delta Lake table or a managed Delta Lake table:
- Delta Lake table
- The Delta Lake destination creates a Delta Lake table by default when the table specified in the Table Directory Path property does not exist.
- Managed Delta Lake table
- The Delta Lake destination can create a managed Delta Lake table when you run the pipeline on a Databricks cluster.
Creating a Delta Lake Table
-
On the Delta Lake tab, for the Table Directory
Path property, specify the directory for the table, as follows
/<path to directory>.If the table does not exist, the destination creates the table. - To define partitions for the table, for the Write Mode property, select either the Overwrite Data or Append Data write mode. Then, specify the partition columns to use.
Creating a Managed Delta Lake Table
- On the Cluster tab of the pipeline properties, set the Cluster Manager Type to Databricks.
-
On the Delta Lake tab of the destination, in the
Table Directory Path property, specify the directory
for the table, as follows
/<path to directory>. - To define partitions for the table, for the Write Mode property, select either the Overwrite Data or Append Data write mode. Then, specify the partition columns to use.
- On the Advanced tab of the destination, select the Create Managed Table property.
-
Configure the Table property.
To create a table in the default database, specify the table name, as follows:
<table name>.To create a table in a different database, specify the database and table name, as follows:
<database>.<table name>.
Partitioning
You can configure the Delta Lake destination to partition data by columns.
Partitioning by columns is particularly useful when
the destination writes to a Hive table used by
data scientists who run analytic queries on the data. To increase the analytics
performance, partition the data by the columns that the data scientists
frequently include in the WHERE or GROUP BY clauses in their queries. For
example, if the data scientists plan to run queries where the
date column is a certain value, sending all records with
the same date value to the same output file and subdirectory improves the
efficiency of those queries.
- Writes to a new table
-
When the Delta Lake destination writes to a new table and partition columns are not defined in stage properties, the destination uses the same number of partitions that Spark uses to process the upstream pipeline stages. The destination randomly redistributes the data to balance the data across the partitions, and then writes one output file for each partition to the specified table path. For example, if Spark splits the pipeline data into 20 partitions, the destination writes 20 output files to the specified table path.
When the destination writes to a new table and partition columns are defined in stage properties, the destination redistributes the data by the specified column, placing records with the same value for the specified column in the same partition. The destination creates a single file for each partition, writing each file to a subfolder within the table path.
For example, let's say that you configure the Delta Lake destination to write to the table path/delta/ordersand to partition the data by themonthcolumn. The destination creates 12 partitions, placing all records wheremonthisjanuaryin one partition, all records wheremonthisfebruaryin the next partition, and so on. The destination creates the following subdirectories and writes a single file to each subdirectory:/delta/orders/january /delta/orders/february ... /delta/orders/december - Writes to an existing table
- When the Delta Lake destination writes to an existing table and partition columns are not defined in stage properties, the destination automatically uses the same partitioning as the existing table.
Write Mode
- Write to a table
- When writing data to a table, consider whether you want to retain, update, or overwrite the existing data in the table. Also consider how to handle potential schema changes.
- Execute a command
- Instead of writing data, the destination can execute a command when it receives data. When executing a command, the destination does not use the records in the pipeline. Each batch that passes to the destination simply triggers command execution.
Append Data
The Append Data write mode appends new data to the table, leaving existing data in place.
When appending data to an existing table, the destination writes to the table using the existing partitioning. You can specify partition columns to use when the table is not partitioned or when it does not exist. If the table does not exist, the destination creates the table using the specified partition columns.
You can use the Merge Schema property to enable the destination to add new columns to the table. When enabled, the destination creates matching columns in the table to allow writing the data that contains unexpected fields. The destination does not delete columns from the table.
For example, say you want to append data to a table that partitions by state. When the data contains new fields, you want the destination to update the table schema and write the data to the table, rather than generate errors that stop the pipeline.
You can use the following configuration to achieve this behavior:
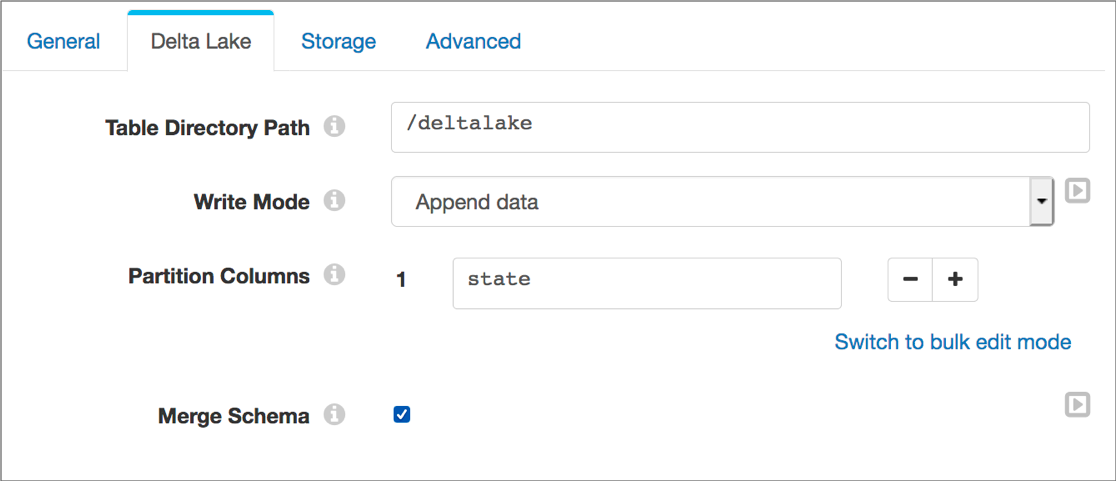
Note that since the table is already partitioned by state, the Partition Columns property is optional.
This is the default write mode for the destination.
Overwrite Data
The Overwrite Data write mode removes all existing data from the table before writing new data, by default. You can use an overwrite condition to remove only parts of the existing table.
When writing to an existing table, the destination writes to the table using the existing partitioning. You can specify partition columns to use when the table is not partitioned or when it does not exist. If the table does not exist, the destination creates the table using the specified partition columns.
- Overwrite Schema - When the pipeline starts, the destination updates the table
schema to match the schema of the first batch of data. The schema update occurs
only once, at the beginning of the pipeline run. Subsequent records with
incompatible schemas cause the pipeline to stop.
Use the Overwrite Schema option to write data with a different schema to the table, while enforcing a consistent schema within the pipeline run.
- Merge Schema - When the data contains unexpected fields, the destination creates
matching columns in the table to enable writing the data. The destination does
not delete columns from the table.
You can optionally define an overwrite condition to overwrite only the data within specified partitions.
Use the Merge Schema option to allow writing data with different schemas to the table throughout the pipeline run.
- No Schema Update - The destination performs no updates to the schema. Data with
unexpected fields or data types causes the pipeline to stop.
You can optionally define an overwrite condition to overwrite only the data within specified partitions.
Use the No Schema Update option to ensure that all data has a compatible schema.
For example, say you want to drop all existing data in the table before writing to it.
The table is not partitioned, but you want to use the region column as
a partition. Also, if records include new fields, you want the destination to update the
table schema to allow writing those records to the table.
You can use the following configuration to achieve this behavior:

Overwrite Condition
When the Delta Lake destination uses the Overwrite Data write mode, the destination removes all data in the existing table before writing new data, by default. You can define a condition to overwrite only the data within the specified partitions.
- The condition must evaluate to true or false.
- In the condition, use columns that the existing table is partitioned by.
- When you define a condition, you typically base it on field values in the record. For information about referencing fields in the condition, see Referencing Fields in Spark SQL Expressions.
- You can use any Spark SQL
syntax that can be used in the WHERE clause of a query, including functions such as
isnullortrimand operators such as=or<=.You can also use user-defined functions (UDFs), but you must define the UDFs in the pipeline. Use a pipeline preprocessing script to define UDFs.
For more information about Spark SQL functions, see the Apache Spark SQL Functions documentation.
order_date >= '2019-01-01' AND order_date <= '2019-01-31'Upsert Using Merge
The Upsert Using Merge write mode merges new data with existing data in the table based on the specified merge condition and merge clauses.
You can use this write mode to perform inserts, updates, and deletes to handle use cases like change data capture (CDC). You can also use the write mode to perform any subset of those operations, such as inserts only, or inserts and updates but no deletes. For an example, see Change Data Capture Example.
- Merge Condition
- The merge condition defines when the destination uses the specified merge configurations to write to the table.
- Merge Clause
- The merge clause specifies the actions the destination performs when a record meets the specified merge condition. You can specify multiple merge clauses for the destination to perform.
- Timestamp
- Field in the record that contains the time that each transaction is committed. The destination uses this property only when the configured merge condition returns multiple matching records within a batch. Configure this property to ensure that the latest matching record is upserted.
Change Data Capture Example
Say you
want to write CDC data to a table by matching on a userId field. In the
record, an operation field specifies the operation to perform:
i for insert, u for update, and d
for delete. A timestamp field contains the time that the transaction
was committed.
You want to insert a record when the table does not include a matching user ID, perform
an update if an existing row has a matching ID, and delete a row with a matching ID only
when the operation field is set to d. You also want
the destination to write only the latest change when a batch contains multiple changes
for the same user ID.
You can use the following configuration to achieve this behavior:
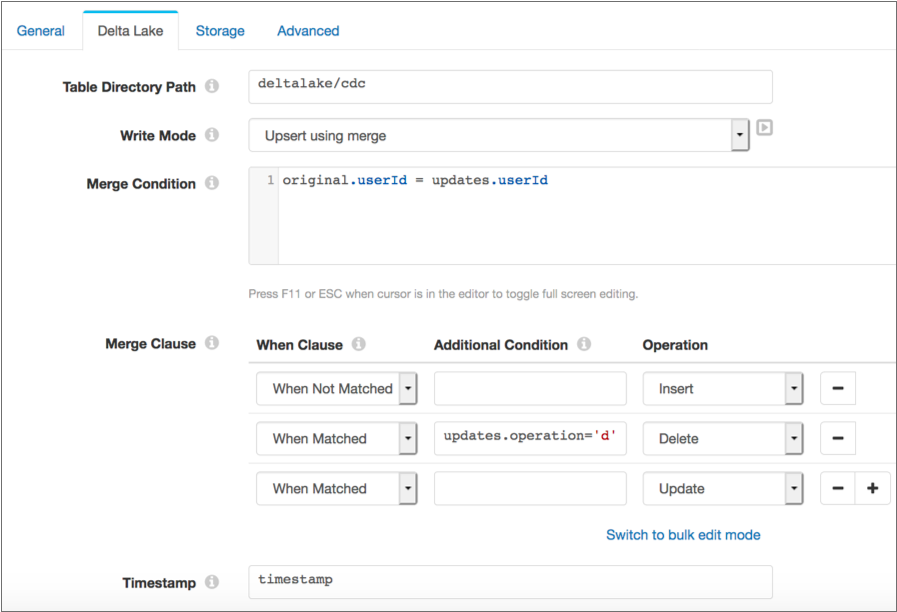
With these clauses, it's important to position the Delete operation above the Update operation so deletes are performed before updates. If the positions are reversed, every record that matches the merge condition will be treated as update.
Since update records have the operation field set to u,
you could alternatively set an additional condition for the Update clause as
follows:
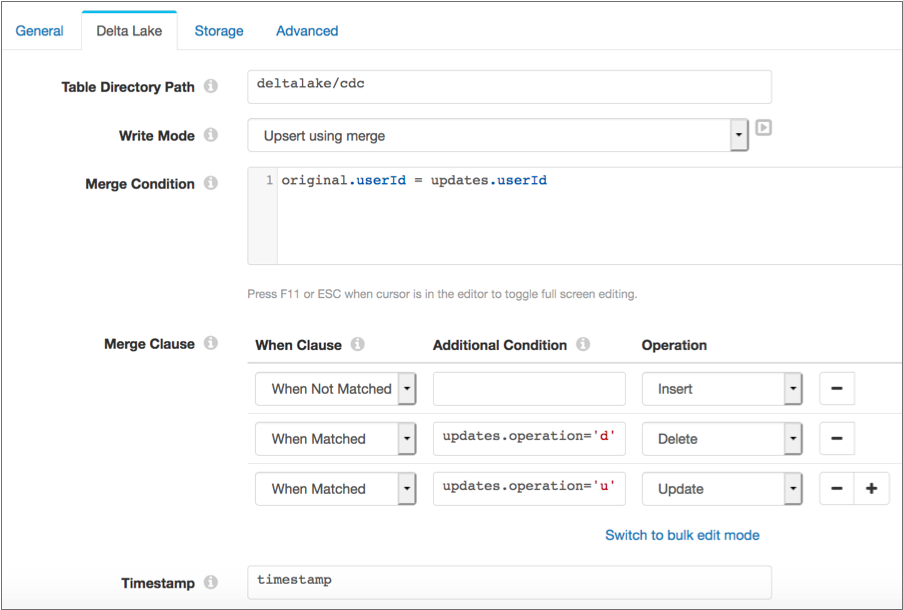
With this configuration, the order of the clauses is not as important because the additional condition clarifies when to apply the clauses. However, only the records explicitly set to update are updated.
Update Table
The Update Table write mode updates an existing table based on an update condition and update rules. When defining the update rules, you specify the columns to update and a string value for each column. You cannot use an expression or field values to update table columns.
The Delta Lake documentation recommends that you use this write mode to perform targeted data updates, such as fixing typos.
For example, the following configuration updates all instances of Wst in
the region field to West:
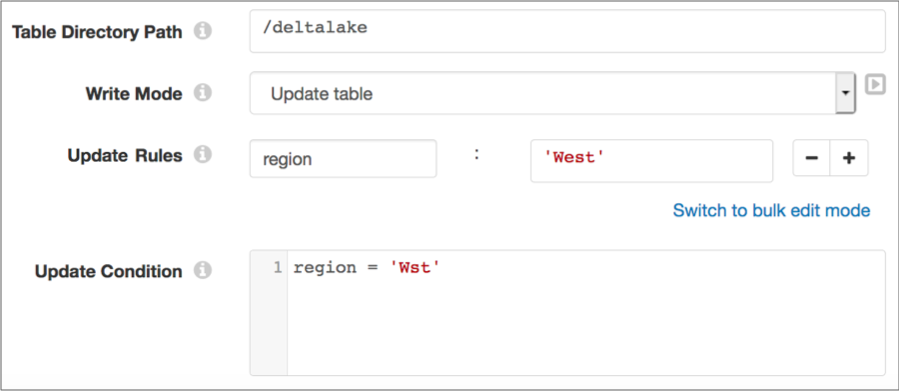
For more information about the Update Table write mode, see the Delta Lake documentation. To perform updates based on records that pass through the pipeline, use the Upsert Using Merge write mode.
Delete from Table
The Delete from Table write mode deletes rows from an existing table that match the specified condition. This write mode performs deletes only.
For example, the following configuration deletes existing records from the table where
the region field is set to Central:
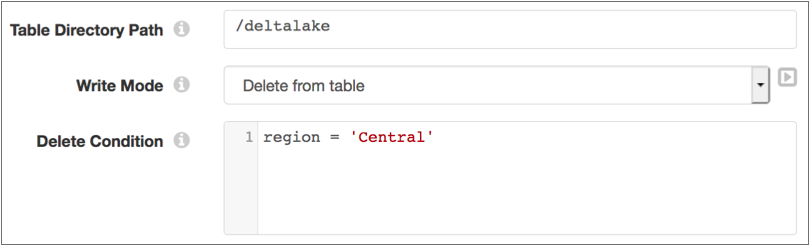
For more information about the Delete from Table write mode, see the Delta Lake documentation. To perform deletes based on records that pass through the pipeline, use the Upsert Using Merge write mode.
Writing to a Local File System
- On the Cluster tab of the pipeline properties, set Cluster Manager Type to None (Local).
- On the General tab of the stage properties, set Stage Library to Delta Lake Transformer-provided libraries.
- On the Delta Lake tab, for the Table Directory Path property, specify the directory to use.
- On the Storage tab, set Storage System to HDFS.
Configuring a Delta Lake Destination
Configure a Delta Lake destination to write data to or execute a command on a Delta Lake table.
Complete the necessary prerequisites before writing to a table stored on ADLS Gen2. Also, before you run a local pipeline for a table on ADLS Gen2 or Amazon S3, complete these additional prerequisite tasks.
-
On the Properties panel, on the General tab, configure the
following properties:
General Property Description Name Stage name. Description Optional description. Stage Library Stage library to use to connect to Delta Lake: - Delta Lake cluster-provided libraries - The cluster where the pipeline runs has Delta Lake libraries installed, and therefore has all of the necessary libraries to run the pipeline.
- Delta Lake Transformer-provided libraries - Transformer passes the necessary libraries with the pipeline
to enable running the pipeline.
Use when running the pipeline locally or when the cluster where the pipeline runs does not include the Delta Lake libraries.
Note: When using additional Delta Lake stages in the pipeline, ensure that they use the same stage library. -
On the Delta Lake tab, configure the following
properties:
Delta Lake Property Description Table Directory Path Path to the Delta Lake table to write to, as follows: /<path to directory>.The destination creates the table if the table does not exist. For information about creating a table or a managed table, see Creating a Table or Managed Table.
Write Mode Mode to write to an existing Delta Lake table: - Append Data - Appends new data to the table, leaving existing data in place.
- Overwrite Data - Removes all existing data from the table before writing new data, by default. You can use an overwrite condition to remove only parts of the existing table.
- Upsert Using Merge - Merges new data with
existing data in the table based on the specified
merge condition, merge clauses, and timestamp
field.
You can use this write mode to perform inserts, updates, and deletes.
- Update Table - Updates an existing table based on an update condition and update set rules. This write mode executes the configured updates each time the destination receives a batch of records, but does not use the records to perform the updates.
- Delete from Table - Deletes rows from an existing table that match the specified condition. This write mode deletes records each time the destination receives a batch of records, but does not delete the records that it receives. It performs the deletes based only on the specified condition.
By default, the destination appends data to existing tables.
Partition Columns List of table columns to partition the data by. The destination partitions the data so that records with the same value for the specified columns are in the same partition. Used when an existing table has no defined partition columns or when the destination creates a new table. When writing to an existing table with partitions, this property is ignored.
Click the Add icon to specify another column to partition by. You can use simple or bulk edit mode to configure the columns.
Available with the Append Data and Overwrite Data write modes.
Merge Schema Adds new columns to the existing table when records contain unexpected fields or data types. Available with the Append Data write mode.
Update Schema Method used to update the schema of existing tables: - Overwrite Schema - When the pipeline starts, the destination updates the table
schema to match the schema of the first batch of data. The schema update occurs
only once, at the beginning of the pipeline run. Subsequent records with
incompatible schemas cause the pipeline to stop.
Use the Overwrite Schema option to write data with a different schema to the table, while enforcing a consistent schema within the pipeline run.
- Merge Schema - When the data contains unexpected fields, the destination creates
matching columns in the table to enable writing the data. The destination does
not delete columns from the table.
You can optionally define an overwrite condition to overwrite only the data within specified partitions.
Use the Merge Schema option to allow writing data with different schemas to the table throughout the pipeline run.
- No Schema Update - The destination performs no updates to the schema. Data with
unexpected fields or data types causes the pipeline to stop.
You can optionally define an overwrite condition to overwrite only the data within specified partitions.
Use the No Schema Update option to ensure that all data has a compatible schema.
Available with the Overwrite Data write mode.
Overwrite Condition Condition that data must match to be removed. Specify partition columns in the condition. When not defined, the destination removes all data in the table before writing new data.
Available with the Overwrite Data write mode when either the Merge Schema or No Schema Update option is selected.
Merge Condition Condition on which the merge clauses are based. When defining the merge condition, use the following guidelines:- To reference a column in the table, use
original.<column
                        name>
. - To reference a matching field in pipeline data, use
updates.<field
                        name>
.
Available with the Upsert Using Merge write mode.
Merge Clause Actions performed when a record meets the specified merge condition. Configure the following properties for each merge clause, as needed. - When Clause - Determines when the clause is applied:
either when the record matches or does not match the specified merge condition.Use the
When Matchedoption with the Update and Delete operations. Use theWhen Not Matchedoption with the Insert operation.Important: The destination performs merge clauses in the specified order. When configuring multiple merge clauses of the same type, carefully consider the order that you use. - Additional Condition - An optional condition to apply. Use to narrow the condition on which the merge occurs.
- Operation - The operation to perform: Insert, Update, or Delete. The operation that you can use is dependent on the When Clause option that you select.
Available with the Upsert Using Merge write mode.
Timestamp Field in the record that contains the time that each transaction is committed. The destination uses this property only when the configured merge condition returns multiple matching records within a batch. Configure this property to ensure that the latest matching record is upserted.
Available with the Upsert Using Merge write mode.
Update Rules The update rules to apply when the update condition is met.
Specify the columns to update and a string value for each column. You cannot use an expression or field values to update table columns.
Available with the Update Table write mode.
Update Condition Condition to use to update data. Available with the Update Table write mode.
Delete Condition Condition to use to delete data. Available with the Delete From Table write mode.
-
On the Storage tab, configure storage and connection
information:
Storage Description Storage System Storage system for the Delta Lake table: - Amazon S3 - Use for a table stored on Amazon S3. To connect, Transformer uses connection information stored in HDFS configuration files.
- ADLS Gen2 - Use for a table stored on Azure Data Lake Storage Gen2. To connect, Transformer uses the specified connection details.
- HDFS - Use for a table stored on HDFS or a local
file system.
To connect to HDFS, Transformer uses connection information stored in HDFS configuration files. To connect to a local file system, Transformer uses the directory path specified for the table.
Credential Mode Authentication method used to connect to Amazon Web Services (AWS): - AWS Keys - Authenticates using an AWS access key pair.
- Instance Profile - Authenticates using an instance profile associated with the Transformer EC2 instance.
- None - Connects to a public bucket using no authentication.
Access Key ID AWS access key ID. Required when using AWS keys to authenticate with AWS. Secret Access Key AWS secret access key. Required when using AWS keys to authenticate with AWS. Application ID Application ID for the Azure Active Directory Transformer application. Also known as the client ID. Used to connect to Azure Data Lake Storage Gen2 with OAuth or Managed Service Identity authentication.
When not specified, the stage uses the equivalent Azure authentication information configured in the cluster where the pipeline runs.
For information on accessing the application key from the Azure portal, see the Azure documentation.
Application Key Authentication key for the Azure Active Directory Transformer application. Also known as the client key. Used to connect to Azure Data Lake Storage Gen2 with OAuth authentication.
When not specified, the stage uses the equivalent Azure authentication information configured in the cluster where the pipeline runs.
For information on accessing the application key from the Azure portal, see the Azure documentation.
OAuth Token Endpoint OAuth 2.0 token endpoint for the Azure Active Directory v1.0 application for Transformer. For example: https://login.microsoftonline.com/<uuid>/oauth2/token.Used to connect to Azure Data Lake Storage Gen2 with OAuth authentication.
When not specified, the stage uses the equivalent Azure authentication information configured in the cluster where the pipeline runs.
Tenant ID Tenant ID for the Azure Active Directory Transformer application. Also known as the directory ID. Used to connect to Azure Data Lake Storage Gen2 with Managed Service Identity authentication.
When not specified, the stage uses the equivalent Azure authentication information configured in the cluster where the pipeline runs.
For information on accessing the tenant ID from the Azure portal, see the Azure documentation.
Account Shared Key Shared access key that Azure generated for the storage account. Used to connect to Azure Data Lake Storage Gen2 with Shared Key authentication.
When not specified, the stage uses the equivalent Azure authentication information configured in the cluster where the pipeline runs.
For more information on accessing the shared access key from the Azure portal, see the Azure documentation.
-
Optionally configure the following advanced properties:
Advanced Property Description Create Managed Table Creates a Delta Lake managed table at the specified directory path. Use only when the pipeline runs on a Databricks cluster.
Table Name Name of the table to create. To create a table in the default database, specify the table name, as follows:
<table name>.To create a table in a different database, specify the database and table name, as follows:
<database>.<table name>.Additional Configuration Additional HDFS configuration properties to use. Properties set here override the Hadoop configuration file. To add properties, click the Add icon and define the HDFS property name and value. You can use simple or bulk edit mode to configure the properties. Use the property names and values as expected by your version of Hadoop.