Syslog
The Syslog destination writes syslog messages to a Syslog server.
For example, you might have network devices that write log messages to flat files. You need to send these flat files to a centralized Syslog server, but the messages first must be converted to syslog messages. You design a pipeline that reads the flat files, performs some processing on the data, and then uses a Syslog destination that formats the data into syslog messages and writes the messages to the Syslog server.
When you configure the Syslog destination, you define the host name and port number of the Syslog server. You also define whether to use the UDP or TCP protocol to send messages to the server. If using the TCP protocol, you can optionally enable SSL or TLS for the destination.
You construct the syslog message content by specifying expressions that evaluate to the message values - such as the timestamp, facility code, severity level, message ID, and the log message itself.
You'll typically want to write the log message using the text data format. However, if needed, you can configure the Syslog destination to use a different data format for the log message.
Protocol
Using SSL/TLS
You can configure the Syslog destination to use SSL, TLS, and mutual TLS encryption. By default, the destination does not use SSL or TLS.
- SSL
- To use SSL encryption, the Syslog destination requires configuring Java configuration options in the deployment in addition to configuring the destination to use SSL. For more information, see Enabling SSL.
- TLS
- You can configure the destination to use TLS by selecting the Enable TLS property. SSL must be enabled before you can enable TLS.
- Mutual TLS
- You can configure the destination to use mutual TLS encryption by selecting the Enable Mutual TLS property. SSL and TLS must be enabled before you can enable mutual TLS.
Enabling SSL
If you configure the Syslog destination to use the TCP protocol, you can enable the destination to use SSL to connect to the Syslog server.
- In the Syslog Connection tab, select the Enable SSL property.
-
If the Syslog server certificate is signed by a private CA or not trusted by
the default Java truststore, create a custom truststore file or modify a copy of
the default Java truststore file to add the CA to the file. Then configure Data Collector to use the modified truststore file.
By default, Data Collector uses the Java truststore file located in $JAVA_HOME/jre/lib/security/cacerts. If your certificate is signed by a CA that is included in the default Java truststore file, you do not need to create a truststore file and can skip this step.
In these steps, we show how to modify the default truststore file to add an additional CA to the list of trusted CAs. If you prefer to create a custom truststore file, see the keytool documentation.Note: If Data Collector is already configured to use a custom truststore file to enable HTTPS or for secure connections to an LDAP server, then simply add this additional CA to the same modified truststore file.
Message Content
A syslog message includes fields such as a timestamp, facility code, severity level, message ID, and the log message itself. You construct the syslog message content by specifying the values for message fields on the Message tab. The content of the log message depends on how you configure the Data Format tab.
Use the Message tab to construct the syslog message properties by entering values or expressions for the message properties. In most cases, you'll want to define expressions to call fields in the record that contain the message values.
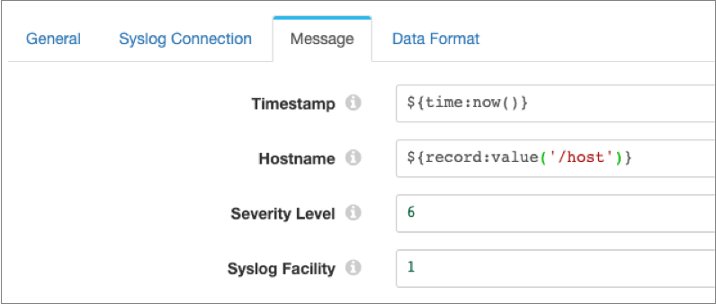
For example, the following image shows the timestamp and host name message properties defined with expressions and the severity level and syslog facility set to the default values of 6 and 1:
The content of the log message itself depends on the data format selected on the Data Format tab. For the Text data format, the destination writes data from a single text field in the record to the log message field. For the Binary data format, the destination writes data from a single field in the record to the log message field. For the remaining data formats, the destination writes data from all fields in the record to the log message field.
Data Formats
The Syslog destination writes data to the log message based on the data format that you select.
The destination can use the following data formats:
- Avro
- The stage writes records based on the Avro schema. You can use one of the following methods to specify the location of the Avro schema definition:
- Binary
- The stage writes binary data to a single field in the record.
- Delimited
- The destination writes records as delimited data. When you use this data format, the root field must be list or list-map.
- JSON
- The destination writes records as JSON data. You can use one of
the following formats:
- Array - Each file includes a single array. In the array, each element is a JSON representation of each record.
- Multiple objects - Each file includes multiple JSON objects. Each object is a JSON representation of a record.
- Protobuf
- Writes one record in a message. Uses the user-defined message type and the definition of the message type in the descriptor file to generate the message.
- SDC Record
- The destination writes records in the SDC Record data format.
- Text
- The destination writes data from a single text field to the destination system. When you configure the stage, you select the field to use.
- XML
- The destination creates a valid XML document for each record. The
destination requires the record to have a single root field that
contains the rest of the record data. For details and
suggestions for how to accomplish this, see Record Structure Requirement.
The destination can include indentation to produce human-readable documents. It can also validate that the generated XML conforms to the specified schema definition. Records with invalid schemas are handled based on the error handling configured for the destination.
Configuring a Syslog Destination
Configure a Syslog destination to write syslog messages to a Syslog server.
-
In the Properties panel, on the General tab, configure the
following properties:
General Property Description Name Stage name. Description Optional description. Required Fields Fields that must include data for the record to be passed into the stage. Tip: You might include fields that the stage uses.Records that do not include all required fields are processed based on the error handling configured for the pipeline.
Preconditions Conditions that must evaluate to TRUE to allow a record to enter the stage for processing. Click Add to create additional preconditions. Records that do not meet all preconditions are processed based on the error handling configured for the stage.
On Record Error Error record handling for the stage: - Discard - Discards the record.
- Send to Error - Sends the record to the pipeline for error handling.
- Stop Pipeline - Stops the pipeline.
-
On the Syslog Connection tab, configure the following
properties:
Syslog Connection Property Description Protocol Protocol to send messages to the Syslog server: - UDP
- TCP
Syslog Host Syslog server host name. Syslog Port Syslog server port number. Message Format For the UDP protocol, syslog message format to use: - RFC 5424
- RFC 3164
If using the TCP protocol, the destination uses the RFC 6587 message format.
Enable SSL For the TCP protocol, enables SSL between Data Collector and the Syslog server. If the Syslog server certificate is signed by a private CA or not trusted by the default Java truststore, you also must define the truststore file and password in the SDC_JAVA_OPTS environment variable, as described in Enabling SSL.
Enable TLS For the TCP protocol, enables TLS between Data Collector and the Syslog server. Available if Enable SSL is active.
Enable Mutual TLS For the TCP protocol, enables mutual TLS between Data Collector and the Syslog server. Available if Enable TLS is active.
TrustStore Path If SSL is enabled, path to the TrustStore file. Enter an absolute path to the file or a path relative to the Data Collector resources directory:
$SDC_RESOURCES.TrustStore Password Password to access the TrustStore file. KeyStore Path If mutual TLS is enabled, path to the KeyStore file. Enter an absolute path to the file or a path relative to the Data Collector resources directory:
$SDC_RESOURCES.KeyStore Password Password to access the KeyStore file. Socket Connection Timeout (ms) For the TCP protocol, maximum time in milliseconds to wait for a socket connection. TCP Connection Retries For the TCP protocol, maximum number of times to retry a TCP connection. -
On the Message tab, configure the following
properties:
Message Property Description Timestamp Timestamp for the syslog message. Default is the processing time, defined with the expression
${time:now()}. To use a time associated with the record, use an expression that calls a field and resolves to a datetime value, such as${record:value("/Timestamp")}.Hostname Host name to use for the syslog message. Enter the host name or enter an expression that evaluates to the host name.
Severity Level Numerical code from 0 through 7 representing the severity level for the syslog message. For a list of codes, see https://tools.ietf.org/html/rfc5424#section-6.2.1.
Enter the numerical code or enter an expression that evaluates to the code.
Syslog Facility Numerical code from 0 through 23 representing the facility for the syslog message. For a list of codes, see https://tools.ietf.org/html/rfc5424#section-6.2.1.
Enter the numerical code or enter an expression that evaluates to the code.
Application Name Application name to use for the syslog message. Enter the application name or enter an expression that evaluates to the name.
Message ID Message ID to use for the syslog message. Enter the message ID or enter an expression that evaluates to the ID.
Process ID Process ID to use for the syslog message. Enter the process ID or enter an expression that evaluates to the ID.
-
On the Data Format tab, configure the following
property:
Data Format Property Description Data Format Format of data to be written. Use one of the following options: - Avro
- Binary
- Delimited
- JSON
- Protobuf
- SDC Record
- Text
- XML
-
For Avro data, on the Data Format tab, configure the
following properties:
Avro Property Description Avro Schema Location Location of the Avro schema definition to use when writing data: - In Pipeline Configuration - Use the schema that you provide in the stage configuration.
- In Record Header - Use the schema in the avroSchema record header attribute. Use only when the avroSchema attribute is defined for all records.
- Confluent Schema Registry - Retrieve the schema from Confluent Schema Registry.
Avro Schema Avro schema definition used to write the data. You can optionally use the
runtime:loadResourcefunction to load a schema definition stored in a runtime resource file.Register Schema Registers a new Avro schema with Confluent Schema Registry. Schema Registry URLs Confluent Schema Registry URLs used to look up the schema or to register a new schema. To add a URL, click Add and then enter the URL in the following format: http://<host name>:<port number>Basic Auth User Info User information needed to connect to Confluent Schema Registry when using basic authentication. Enter the key and secret from the
schema.registry.basic.auth.user.infosetting in Schema Registry using the following format:<key>:<secret>Tip: To secure sensitive information such as user names and passwords, you can use runtime resources or credential stores. For more information about credential stores, see Credential Stores in the Data Collector documentation.Look Up Schema By Method used to look up the schema in Confluent Schema Registry: - Subject - Look up the specified Avro schema subject.
- Schema ID - Look up the specified Avro schema ID.
Schema Subject Avro schema subject to look up or to register in Confluent Schema Registry. If the specified subject to look up has multiple schema versions, the stage uses the latest schema version for that subject. To use an older version, find the corresponding schema ID, and then set the Look Up Schema By property to Schema ID.
Schema ID Avro schema ID to look up in Confluent Schema Registry. Include Schema Includes the schema in each message. Note: Omitting the schema definition can improve performance, but requires the appropriate schema management to avoid losing track of the schema associated with the data.Avro Compression Codec The Avro compression type to use. When using Avro compression, do not enable other compression available in the destination.
-
For binary data, on the Data Format tab, configure the
following property:
Binary Property Description Binary Field Path Field that contains the binary data. -
For delimited data, on the Data Format tab, configure the
following properties:
Delimited Property Description Delimiter Format Format for delimited data: - Default CSV - File that includes comma-separated values. Ignores empty lines in the file.
- RFC4180 CSV - Comma-separated file that strictly follows RFC4180 guidelines.
- MS Excel CSV - Microsoft Excel comma-separated file.
- MySQL CSV - MySQL comma-separated file.
- Tab-Separated Values - File that includes tab-separated values.
- PostgreSQL CSV - PostgreSQL comma-separated file.
- PostgreSQL Text - PostgreSQL text file.
- Custom - File that uses user-defined delimiter, escape, and quote characters.
Header Line Indicates whether to create a header line. Delimiter Character Delimiter character for a custom delimiter format. Select one of the available options or use Other to enter a custom character. You can enter a Unicode control character using the format \uNNNN, where N is a hexadecimal digit from the numbers 0-9 or the letters A-F. For example, enter \u0000 to use the null character as the delimiter or \u2028 to use a line separator as the delimiter.
Default is the pipe character ( | ).
Record Separator String Characters to use to separate records. Use any valid Java string literal. For example, when writing to Windows, you might use \r\n to separate records. Available when using a custom delimiter format.
Escape Character Escape character for a custom delimiter format. Select one of the available options or use Other to enter a custom character. Default is the backslash character ( \ ).
Quote Character Quote character for a custom delimiter format. Select one of the available options or use Other to enter a custom character. Default is the quotation mark character ( " ).
Replace New Line Characters Replaces new line characters with the configured string. Recommended when writing data as a single line of text.
New Line Character Replacement String to replace each new line character. For example, enter a space to replace each new line character with a space. Leave empty to remove the new line characters.
Charset Character set to use when writing data. -
For JSON data, on the Data Format tab, configure the
following properties:
JSON Property Description JSON Content Method to write JSON data: - JSON Array of Objects - Each file includes a single array. In the array, each element is a JSON representation of each record.
- Multiple JSON Objects - Each file includes multiple JSON objects. Each object is a JSON representation of a record.
Charset Character set to use when writing data. -
For protobuf data, on the Data Format tab, configure the
following properties:
Protobuf Property Description Protobuf Descriptor File Descriptor file (.desc) to use. The descriptor file must be in the Data Collector resources directory, $SDC_RESOURCES.For more information about environment variables, see Data Collector Environment Configuration in the Data Collector documentation. For information about generating the descriptor file, see Protobuf Data Format Prerequisites.
Message Type Fully-qualified name for the message type to use when writing data. Use the following format:
Use a message type defined in the descriptor file.<package name>.<message type>. -
For text data, on the Data Format tab, configure the
following properties:
Text Property Description Text Field Path Field that contains the text data to be written. All data must be incorporated into the specified field. Record Separator Characters to use to separate records. Use any valid Java string literal. For example, when writing to Windows, you might use \r\n to separate records. By default, the destination uses \n.
On Missing Field When a record does not include the text field, determines whether the destination reports the missing field as an error or ignores the missing field. Insert Record Separator if No Text When configured to ignore a missing text field, inserts the configured record separator string to create an empty line. When not selected, discards records without the text field.
Charset Character set to use when writing data. -
For XML data, on the Data Format tab, configure the
following properties:
XML Property Description Pretty Format Adds indentation to make the resulting XML document easier to read. Increases the record size accordingly. Validate Schema Validates that the generated XML conforms to the specified schema definition. Records with invalid schemas are handled based on the error handling configured for the destination. Important: Regardless of whether you validate the XML schema, the destination requires the record in a specific format. For more information, see Record Structure Requirement.XML Schema The XML schema to use to validate records.