Azure IoT Hub Producer
The Azure IoT Hub Producer destination writes data to Microsoft Azure IoT Hub. To write to Microsoft Azure Data Lake Storage, use the Azure Data Lake Storage destination. To write to Microsoft Azure Event Hub, use the Azure Event Hub Producer destination. For information about supported versions, see Supported Systems and Versions in the Data Collector documentation.
Use the Azure IoT Hub Producer destination in a pipeline when you want to send device data - such as temperature or sensor data - to Azure IoT Hub after processing the data.
Data Collector functions as a simulated device that sends messages to Azure IoT Hub. Before you configure the Azure IoT Hub Producer destination, register Data Collector as a simulated device in your IoT hub.
When you configure the Azure IoT Hub Producer destination, you specify connection information such as the IoT hub name and device ID. You also specify the authentication key that the destination uses to identify itself when it sends messages to your IoT hub.
Register Data Collector as an IoT Hub Device
Data Collector functions as a simulated device that sends messages to Azure IoT Hub. Before you configure the Azure IoT Hub Producer destination, register Data Collector as a device in your IoT hub.
Data Collector cannot connect to your IoT hub unless it has an entry in the identity registry. When you register Data Collector as a simulated device, Azure IoT Hub generates a unique device ID and authentication key that Data Collector uses to identify itself when it sends messages to your IoT hub.
- Log in to the Azure portal: https://portal.azure.com.
- Open your IoT hub.
- In the Navigation panel, click Device Explorer.
- To create a device, click Add.
- On the Add Device page, enter the following information:
- Device ID: Enter the ID to use for Data Collector. Device IDs are case sensitive.
- Authentication Type: Select Symmetric Key.
- Auto Generate Keys: Select the checkbox.
- Connect device to IoT Hub: Click Enable.
- Click Save.
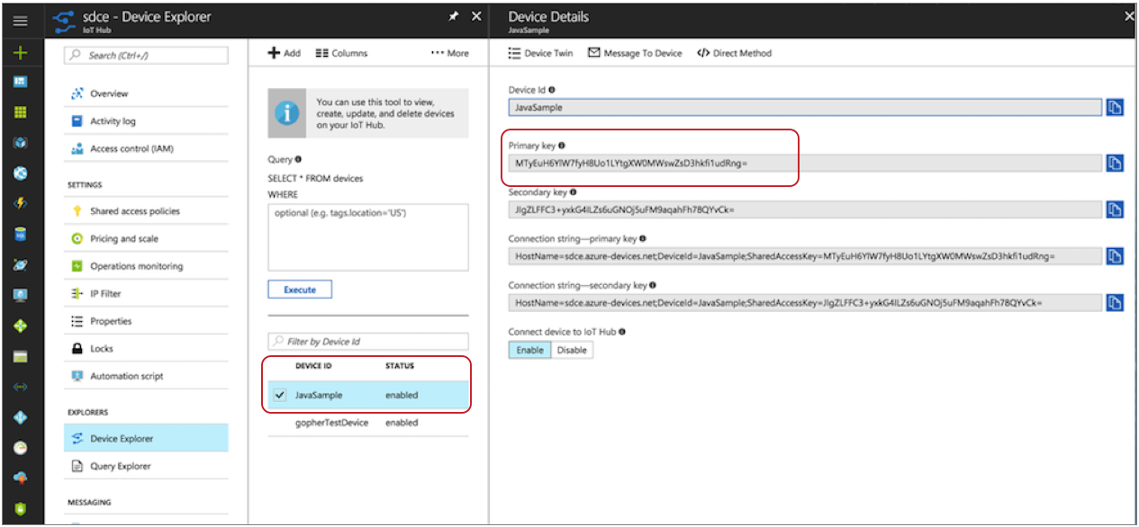
- In the Device Explorer pane, select the newly created device.
- Make a note of the device ID and the primary key. When you configure the Azure IoT
Hub Producer destination, use these values for the Device ID property and the Shared
Access Key stage property.
Data Formats
The Azure IoT Hub Producer destination writes data to Microsoft Azure IoT Hub based on the data format that you select. You can use the following data formats:
- Binary
- The stage writes binary data to a single field in the record.
- JSON
- The destination writes records as JSON data. You can use one of
the following formats:
- Array - Each file includes a single array. In the array, each element is a JSON representation of each record.
- Multiple objects - Each file includes multiple JSON objects. Each object is a JSON representation of a record.
- SDC Record
- The destination writes records in the SDC Record data format.
- Text
- The destination writes data from a single text field to the destination system. When you configure the stage, you select the field to use.
- XML
- The destination creates a valid XML document for each record. The
destination requires the record to have a single root field that
contains the rest of the record data. For details and
suggestions for how to accomplish this, see Record Structure Requirement.
The destination can include indentation to produce human-readable documents. It can also validate that the generated XML conforms to the specified schema definition. Records with invalid schemas are handled based on the error handling configured for the destination.
Configuring an Azure IoT Hub Producer Destination
Configure an Azure IoT Hub Producer destination to write data to Microsoft Azure IoT Hub. Be sure to register Data Collector as a device in your IoT hub before you configure the destination.
-
In the Properties panel, on the General tab, configure the
following properties:
General Property Description Name Stage name. Description Optional description. Required Fields Fields that must include data for the record to be passed into the stage. Tip: You might include fields that the stage uses.Records that do not include all required fields are processed based on the error handling configured for the pipeline.
Preconditions Conditions that must evaluate to TRUE to allow a record to enter the stage for processing. Click Add to create additional preconditions. Records that do not meet all preconditions are processed based on the error handling configured for the stage.
On Record Error Error record handling for the stage:- Discard - Discards the record.
- Send to Error - Sends the record to the pipeline for error handling.
- Stop Pipeline - Stops the pipeline.
-
On the IoT Hub tab, configure the following
properties:
IoT Hub Property Description IoT Hub Name Name of your IoT hub. Device ID ID for the Data Collector device registered in your IoT hub. Device IDs are case sensitive. Shared Access Key Shared access primary key string for the Data Collector device registered in your IoT hub. Enter the primary key value for the Data Collector device created in the Azure portal. Maximum Request Time Maximum number of seconds to wait for a request to complete. -
On the Data Format tab, configure the following
property:
Data Format Property Description Data Format Data format for messages: - Binary
- JSON
- SDC Record
- Text
- XML
-
For binary data, on the Data Format tab, configure the
following property:
Binary Property Description Binary Field Path Field that contains the binary data. -
For JSON data, on the Data Format tab, configure the
following properties:
JSON Property Description JSON Content Method to write JSON data: - JSON Array of Objects - Each file includes a single array. In the array, each element is a JSON representation of each record.
- Multiple JSON Objects - Each file includes multiple JSON objects. Each object is a JSON representation of a record.
Charset Character set to use when writing data. -
For text data, on the Data Format tab, configure the
following properties:
Text Property Description Text Field Path Field that contains the text data to be written. All data must be incorporated into the specified field. Record Separator Characters to use to separate records. Use any valid Java string literal. For example, when writing to Windows, you might use \r\n to separate records. By default, the destination uses \n.
On Missing Field When a record does not include the text field, determines whether the destination reports the missing field as an error or ignores the missing field. Insert Record Separator if No Text When configured to ignore a missing text field, inserts the configured record separator string to create an empty line. When not selected, discards records without the text field.
Charset Character set to use when writing data. -
For XML data, on the Data Format tab, configure the
following properties:
XML Property Description Pretty Format Adds indentation to make the resulting XML document easier to read. Increases the record size accordingly. Validate Schema Validates that the generated XML conforms to the specified schema definition. Records with invalid schemas are handled based on the error handling configured for the destination. Important: Regardless of whether you validate the XML schema, the destination requires the record in a specific format. For more information, see Record Structure Requirement.XML Schema The XML schema to use to validate records.