Wait for Jobs
The Wait for Jobs processor waits for one or more jobs or job instances to complete.
The Wait for Jobs processor is an orchestration stage that you use in orchestration pipelines. Orchestration stages perform tasks, such as schedule and start pipelines and Control Hub jobs, that you can use to create an orchestrated workflow across StreamSets.
Use this processor when you want to wait for jobs that were started upstream to complete, before performing other orchestration tasks. For example, you might use this processor to wait for jobs to complete that were started by a Start Jobs origin, before starting additional related jobs with a Start Jobs processor.
The Wait for Jobs processor checks the status of all jobs listed in the incoming orchestration records. When the jobs complete, the processor updates the jobs status details in the record and passes a single orchestration record downstream.
When you configure the Wait for Jobs processor, you specify the Control Hub URL where the jobs or job instances run, and you specify how long to wait between job-status checks. You also configure the Control Hub credentials used to monitor jobs. You can optionally configure properties used to maintain the HTTP connection, to establish an HTTP proxy, and to enable SSL/TLS.
You can also use a connection to configure the processor.
Stage Processing and Pipeline Implementation
Use the Wait for Jobs processor downstream from a Start Jobs origin or Start Jobs processor that starts jobs that run in the background. When running jobs in the background, a Start Jobs stage passes its orchestration record downstream immediately after starting jobs, rather than waiting for them to complete.
When a Wait for Jobs processor receives an orchestration record, it uses the job IDs listed in the record to check for the status of those jobs with the Control Hub URL specified in the stage. After all of the jobs complete, the processor updates the job status information in the orchestration record and passes the record downstream.
If you pass orchestration records from multiple stages to the processor, the processor waits until all jobs associated with those records are complete, then passes a single merged orchestration record downstream.
For example, instead of using a Wait for Jobs processor immediately after a Start Jobs origin that starts a job in the background, you can just configure the origin to run the job in the foreground. Then, the Start Jobs origin passes its orchestration record downstream after the job completes, with no need for a Wait for Jobs processor.
In contrast, say you want three jobs and a pipeline to start when you start your orchestration pipeline. You also want them all to complete before starting an additional set of jobs. To do this, you create the following pipeline:

You configure a Start Jobs origin to start the three jobs in the background, which passes an orchestration record to a Start Pipelines processor as soon as the jobs start. This enables the jobs and the pipeline to run concurrently.
You configure the Start Pipelines processor to run its pipeline in the foreground, so the processor passes the updated orchestration record downstream only after the pipeline completes. That takes care of the pipeline, but the jobs may still be running. To ensure that the jobs complete before starting the next set of jobs, you add the Wait for Jobs processor.
When the processor receives the orchestration record from the Start Pipelines processor, it notes the IDs of the jobs that were started by the Start Jobs origin, and waits for them to complete. After all of the jobs complete, the Wait for Jobs processor updates job status information in the orchestration record and passes the record to the Start Jobs processor, which starts the additional set of jobs.
Generated Record
When the Wait for Jobs processor completes its task, it updates the job status and related information in the orchestration record before passing the record downstream.
| Field Name | Description |
|---|---|
| <unique task name>/success | Boolean field that indicates whether all jobs
completed successfully.
The processor adds this field. |
| <job ID>/jobStatus | Status of the job. For more information see
Job Status The processor updates this field. |
| <job ID>/jobStatusColor | Status color of the job. For more
information see Job Status. The processor updates this field. |
| <job ID>/errorMessage | Error message associated with the
job. The processor updates this field as needed. |
| <job ID>/finishedSuccessfully | Boolean field that
indicates whether a job completed successfully. Contains the following
field:
The processor adds these fields. |
For example, the following preview shows the fields that a Wait for Jobs processor adds and updates in comparison to the incoming record:
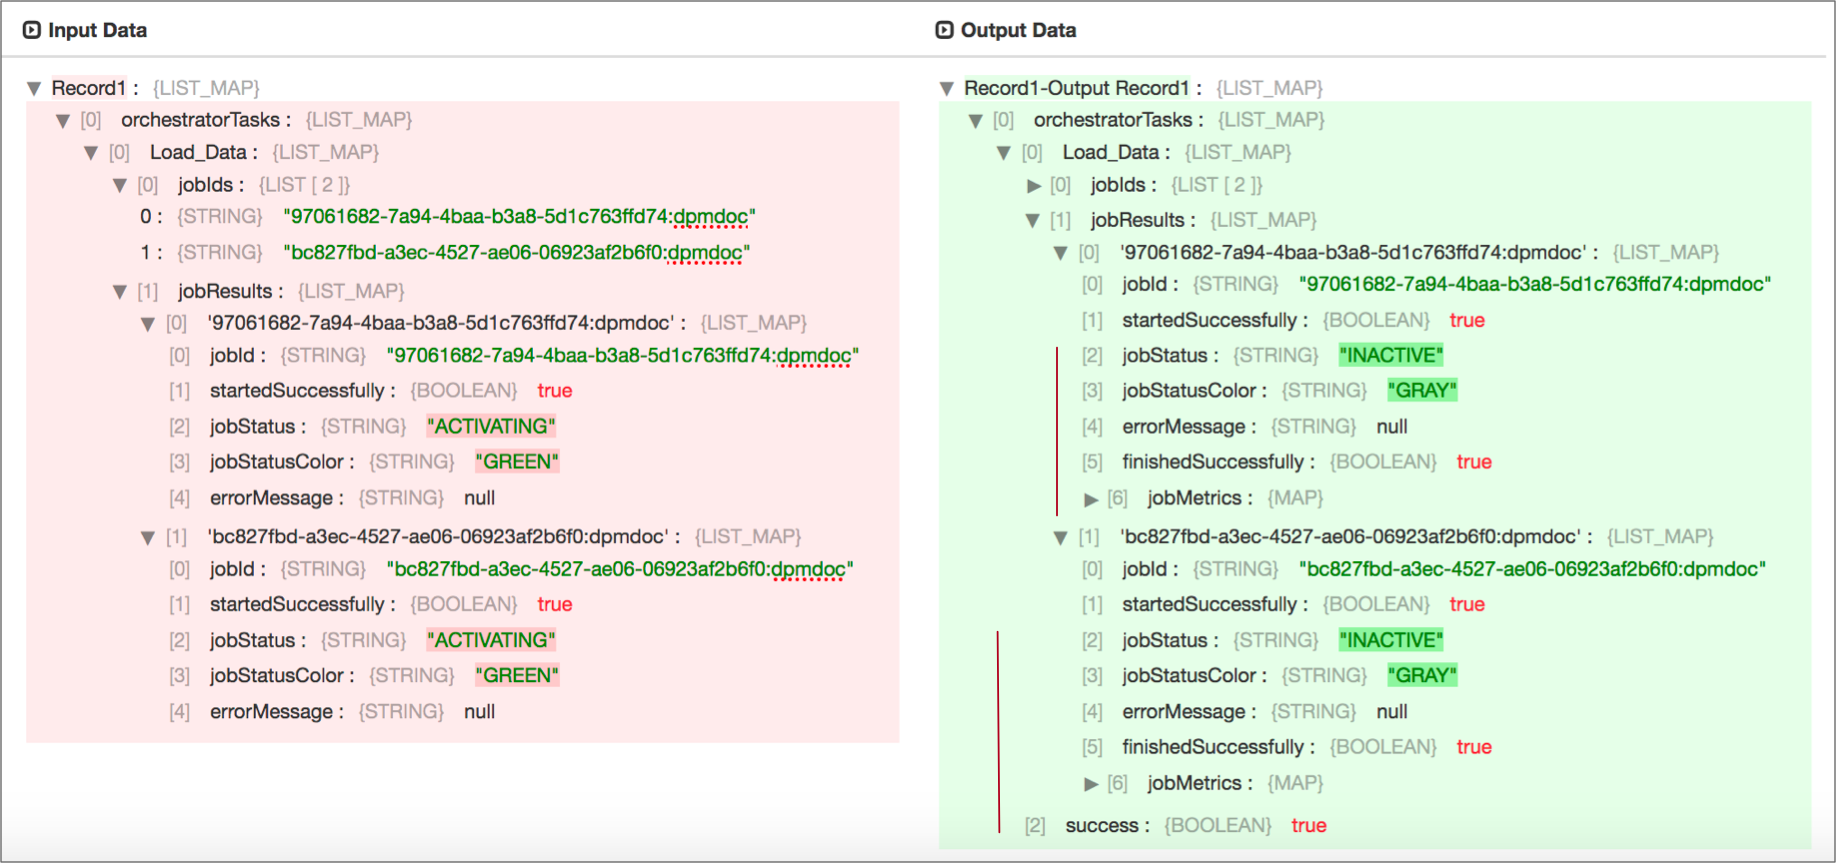
Notice how the processor updated the jobStatus and
jobStatusColor fields, and added the
finishedSuccessfully, jobMetrics, and
success fields. All of the changes indicate that the job completed
successfully.
Configuring a Wait for Jobs Processor
Configure a Wait for Jobs processor to wait for Control Hub jobs to complete before passing an orchestration record downstream. The Wait for Jobs processor is an orchestration stage that you use in orchestration pipelines.
-
In the Properties panel, on the General tab, configure the
following properties:
General Property Description Name Stage name. Description Optional description. Required Fields Fields that must include data for the record to be passed into the stage. Tip: You might include fields that the stage uses.Records that do not include all required fields are processed based on the error handling configured for the pipeline.
Preconditions Conditions that must evaluate to TRUE to allow a record to enter the stage for processing. Click Add to create additional preconditions. Records that do not meet all preconditions are processed based on the error handling configured for the stage.
On Record Error Error record handling for the stage: - Discard - Discards the record.
- Send to Error - Sends the record to the pipeline for error handling.
- Stop Pipeline - Stops the pipeline.
-
On the Job tab, configure the following properties:
Job Property Description Connection Connection that defines the information required to connect to an external system. To connect to an external system, you can select a connection that contains the details, or you can directly enter the details in the pipeline. When you select a connection, Control Hub hides other properties so that you cannot directly enter connection details in the pipeline.
Control Hub URL URL to the Control Hub instance that runs jobs: - For Control Hub cloud, enter https://cloud.streamsets.com.
- For Control Hub on-premises, enter the URL provided by your system administrator. For example, https://<hostname>:18631.
Status Check Interval Milliseconds to wait before checking the specified Control Hub URL for the completion status of the jobs listed in the incoming orchestration record. -
On the Credentials tab, configure
the following properties:
Credentials Property Description Authentication Type Method for specifying authentication details: - User & Password (SCH 3.x only) - Use when Data Collector is registered with Control Hub cloud or Control Hub on-premises version 3.x.
- API User Credentials - Use when Data Collector is deployed from Control Hub in StreamSets.
User Name Control Hub user that starts the jobs. Enter in the following format: <ID>@<organization ID>Available when Authentication Type is set to User & Password.
Auth ID ID of a Control Hub API credential for someone authorized to run the job. For information on creating a Control Hub API credential, see the Control Hub documentation.
Available when Authentication Type is set to API User Credentials.
Password Password for the specified Control Hub user or the token for the specified Control Hub API credential. Tip: To secure sensitive information such as user names and passwords, you can use runtime resources or credential stores. For more information about credential stores, see Credential Stores in the Data Collector documentation. -
On the HTTP tab, configure the following properties:
HTTP Property Description Use Proxy Enables using an HTTP proxy to connect to Control Hub. Connection Timeout Maximum number of milliseconds to wait for a connection. Read Timeout Maximum number of milliseconds to wait for data. Max Number Of Tries Maximum number of times to submit a request to Control Hub. Retry Interval Number of milliseconds to wait before resubmitting a request to Control Hub. -
To use an HTTP proxy, on the Proxy tab, configure the
following properties:
Proxy Property Description Proxy URI Proxy URI. Username Proxy user name. Password Proxy password. Tip: To secure sensitive information such as user names and passwords, you can use runtime resources or credential stores. For more information about credential stores, see Credential Stores in the Data Collector documentation. -
To use SSL/TLS, click the TLS tab and
configure the following properties.
TLS Property Description Use TLS Enables the use of TLS. Use Remote Truststore Enables loading the contents of the truststore from a remote credential store or from values entered in the stage properties. For more information, see Remote Keystore and Truststore. Trusted Certificates Each PEM certificate used in the remote truststore. Enter a credential function that returns the certificate or enter the contents of the certificate. Using simple or bulk edit mode, click the Add icon to add additional certificates.
Truststore File Path to the local truststore file. Enter an absolute path to the file or enter the following expression to define the file stored in the Data Collector resources directory:
${runtime:resourcesDirPath()}/truststore.jksBy default, no truststore is used.
Truststore Type Type of truststore to use. Use one of the following types:- Java Keystore File (JKS)
- PKCS #12 (p12 file)
Default is Java Keystore File (JKS).
Truststore Password Password to the truststore file. A password is optional, but recommended.
Tip: To secure sensitive information such as passwords, you can use runtime resources or credential stores. For more information about credential stores, see Credential Stores in the Data Collector documentation.Truststore Trust Algorithm Algorithm to manage the truststore.
Default is SunX509.
Use Default Protocols Uses the default TLSv1.2 transport layer security (TLS) protocol. To use a different protocol, clear this option. Transport Protocols TLS protocols to use. To use a protocol other than the default TLSv1.2, click the Add icon and enter the protocol name. You can use simple or bulk edit mode to add protocols. Note: Older protocols are not as secure as TLSv1.2.Use Default Cipher Suites Uses a default cipher suite for the SSL/TLS handshake. To use a different cipher suite, clear this option. Cipher Suites Cipher suites to use. To use a cipher suite that is not a part of the default set, click the Add icon and enter the name of the cipher suite. You can use simple or bulk edit mode to add cipher suites. Enter the Java Secure Socket Extension (JSSE) name for the additional cipher suites that you want to use.