OPC UA Client
The OPC UA Client origin processes data from an OPC UA server. The OPC UA Client origin can poll the server at regular intervals, returning the latest data from all specified nodes. Or it can subscribe to specific nodes and receive messages from the server each time a change related to a specified node occurs. For information about supported versions, see Supported Systems and Versions.
The origin can also browse all available nodes to provide the node details that you need to configure the origin.
When you configure the OPC UA Client origin, you specify connection information and optional security information, such as user name and password, TLS properties, client private key alias, and security policy. You can also use a connection to configure the origin.
You configure tag information, and you select the processing mode for the origin and specify the NodeIds for the nodes you want to use. You can use one of several different methods to provide the NodeIds.
You can also configure encoding limits, such as the maximum chunk or message size.
When a pipeline stops, the OPC UA Client origin notes where it stops reading. When the pipeline starts again, the origin continues processing from where it stopped by default. You can reset the origin to process all requested data.
Processing Mode
- Polling
- The origin polls the OPC UA server at regular user-defined intervals, returning the current status of every specified node.
- Subscribe
- The origin subscribes to the specified nodes. The OPC UA server sends an update each time a change occurs with one of the specified nodes. When node changes occur, the server sends each change to the origin separately.
- Browse nodes
- Browse nodes mode is a tool to aid pipeline development. In browse nodes mode, the origin connects to the OPC UA server to retrieve all available node details, such as the node identifier and namespace index.
- For example, say previewing your OPC UA server in browse nodes mode returns
the following information:
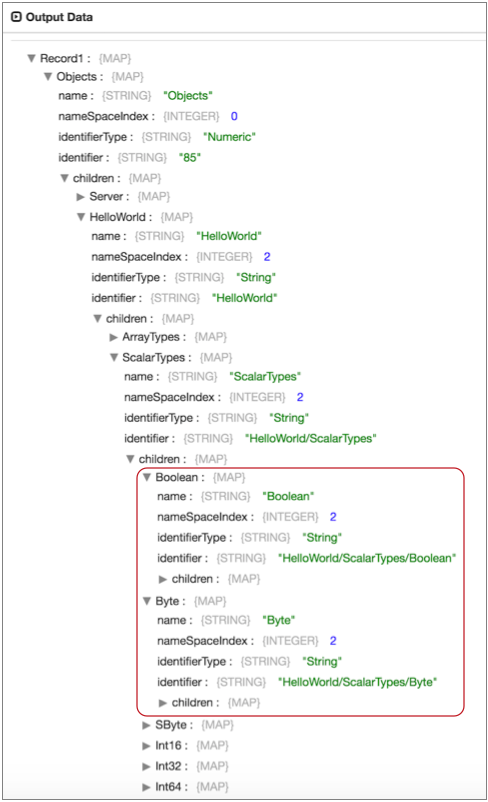
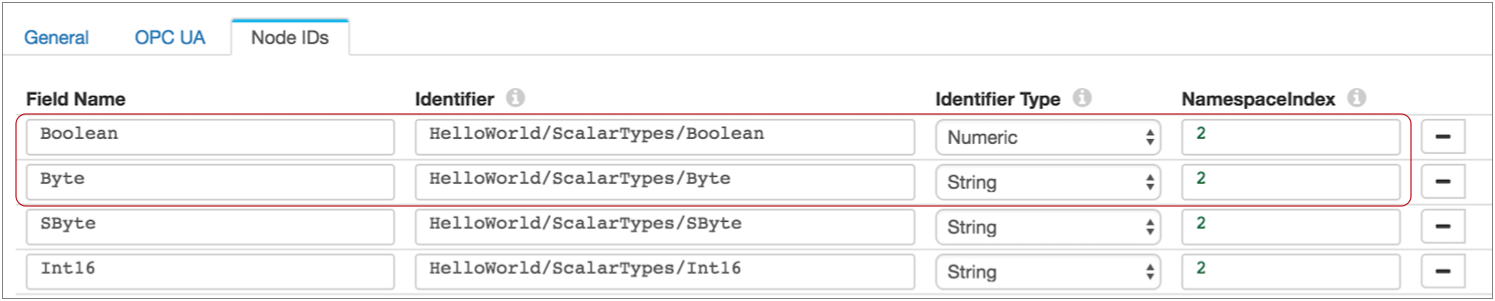
You can then use this information to configure the nodes that you want to subscribe to, as follows:
Providing NodeIds
- Manual
- Manually enter the NodeId information. Use this method when you have a specific set and low volume of nodes that you want to use. You can use simple or bulk edit mode.
- File
- Provide a file of NodeId information. Use this method when you have a relatively static set of nodes that you want to use. You can update the file as needed, but will need to restart the pipeline to capture the latest nodes.
- Browse Nodes
- Specify a root NodeId, allowing the origin to browse for all available nodes under the root node. Use this method when you want to process data from a dynamic set of nodes that are under a single root node.
Security
You can choose to connect to the OPC UA server anonymously or you can choose to authenticate with a user name and password. To authenticate with a user name and password, select the Use Username and Password check box on the OPC UA tab and then enter the user name and password on the Security tab.
- Basic128Rsa15
- Basic 256
- Basic256Sha256
- None
When using a security policy, you must configure the associated TLS properties. When necessary, you can specify a private key alias.
Configuring an OPC UA Client Origin
Configure an OPC UA Client origin to process data from an OPC UA server.
-
In the Properties panel, on the General tab, configure the
following properties:
General Property Description Name Stage name. Description Optional description. On Record Error Error record handling for the stage: - Discard - Discards the record.
- Send to Error - Sends the record to the pipeline for error handling.
- Stop Pipeline - Stops the pipeline.
-
On the OPC UA tab, configure the following
properties:
OPC UA Property Description Connection Connection that defines the information required to connect to an external system. To connect to an external system, you can select a connection that contains the details, or you can directly enter the details in the pipeline. When you select a connection, Control Hub hides other properties so that you cannot directly enter connection details in the pipeline.
To create a new connection, click the Add New Connection icon:
 . To view and edit the details of the
selected connection, click the Edit
Connection icon:
. To view and edit the details of the
selected connection, click the Edit
Connection icon:  .
.Resource URL OPC UA resource URL to use. Application Name Application name to use for contact with the OPC UA server. This name can appear in reporting tools to identify the application that sent a request. Application URI Application URI to use for contact with the OPC UA server. Enter a unique ID that begins with urnas follows:
This name can appear in reporting tools to identify the application that sent a request.urn:<application URI>Use Username and Password Connects to the OPC UA server with the user name and password specified on the Security tab. If not selected, the origin connects to the OPC UA server anonymously.
Request Timeout Milliseconds to wait for a response before timing out. Session Timeout Maximum milliseconds to wait for data before ending a session. When the Processing Mode property is set to Polling, the origin attempts to start a new session. If it cannot establish a new session, it stops the pipeline.
When using other processing modes, the origin simply stops the pipeline when the session times out.
Processing Mode Mode to use to retrieve data from the OPC UA server: - Polling - Use to request data at regular intervals.
- Subscribe - Use to receive data only when changes occur for subscribed nodes.
- Browse Nodes - Use during pipeline development to provide node details for configuring Node IDs. Do not use in production.
For more information about mode types and the data returned in each mode, see Processing Mode.
Polling Interval (ms) Milliseconds to wait between polling. Used with the polling mode only. -
On the NodeIds tab, select the NodeId Fetch
Mode.
For more information about the different ways you can provide node information, see Providing NodeIds.
-
When using the Manual mode, use simple or bulk edit mode to enter the nodes that you want to use.
Click the Add icon to add additional nodes.
Node Property Description Field Name The name of the node. Identifier The identifier for the node within the OPC UA Server address space. Identifier Type The format and data type of the identifier. Use one of the following types: - Numeric
- String
- UUID
- Opaque
Namespace Index The index that the OPC UA Server uses for a namespace URI. -
When using the File mode, configure the following
property:
File Property Description NodeId File Path Path to the file that contains NodeId information for the nodes that you want to process. Use a file local to Data Collector that includes the NodeId information in the appropriate format. For more information, see Providing NodeIds. Default is
${runtime:loadResource('nodeIdConfigs.json',
                                                false)}
, which assumes you are using a runtime resource file named nodeIdConfigs.json. -
When using Browse mode, configure the following
properties:
Browse Property Description Root Node Identifier The identifier for the root node within the OPC UA Server address space. The origin processes data from all nodes under the root node. For more information about browsing nodes, see Providing NodeIds.
Root Node Identifier Type The format and data type of the root node identifier. Use one of the following types: - Numeric
- String
- UUID
- Opaque
Root Node Namespace Index The index that the OPC UA Server uses for a namespace URI. NodeId Refresh Interval (sec) Seconds to wait before browsing the root node for an updated list of nodes to use. -
On the Encoding Limits tab, you can configure the
following properties:
Encoding Limits Property Description Max Chunk Size Maximum size of a single chunk. Must be set to 8192 or larger. Default is 65536.
Max Chunk Count Maximum number of chunks in a message. Default is 32.
Max Message Size Maximum size of a message after all chunks are assembled. The default is 2097152, which is
<default Max Chunk Size> * <default Max Chunk Count>.Max Recursion Depth Maximum depth when browsing subtypes recursively. Default is 128.
-
On the Security tab, optionally configure the following
properties:
Security Property Description Security Policy The security policy to use. Select one of the following policies: - Basic128Rsa15
- Basic 256
- Basic256Sha256
- None
When using a security policy, enable TLS and configure the associated properties.
Client Private Key Alias Optional private key alias to use. Username User name to use when connecting with the OPC UA server. Available when Use Username and Password is enabled on the OPC UA tab.
Password Password to use when connecting with the OPC UA server. Available when Use Username and Password is enabled on the OPC UA tab.
Use TLS Enables the use of TLS. Use Remote Keystore Enables loading the contents of the keystore from a remote credential store or from values entered in the stage properties. For more information, see Remote Keystore and Truststore. Private Key Private key used in the remote keystore. Enter a credential function that returns the key or enter the contents of the key. Certificate Chain Each PEM certificate used in the remote keystore. Enter a credential function that returns the certificate or enter the contents of the certificate. Keystore File Path to the local keystore file. Enter an absolute path to the file or enter the following expression to define the file stored in the Data Collector resources directory:
${runtime:resourcesDirPath()}/keystore.jksBy default, no keystore is used.
Keystore Type Type of keystore to use. Use one of the following types: - Java Keystore File (JKS)
- PKCS #12 (p12 file)
Default is Java Keystore File (JKS).
Keystore Password Password to the keystore file. A password is optional, but recommended.
Tip: To secure sensitive information such as passwords, you can use runtime resources or credential stores.Keystore Key Algorithm Algorithm to manage the keystore.
Default is SunX509.
Use Default Protocols Uses the default TLSv1.2 transport layer security (TLS) protocol. To use a different protocol, clear this option. Transport Protocols TLS protocols to use. To use a protocol other than the default TLSv1.2, click the Add icon and enter the protocol name. You can use simple or bulk edit mode to add protocols. Note: Older protocols are not as secure as TLSv1.2.Use Default Cipher Suites Uses a default cipher suite for the SSL/TLS handshake. To use a different cipher suite, clear this option. Cipher Suites Cipher suites to use. To use a cipher suite that is not a part of the default set, click the Add icon and enter the name of the cipher suite. You can use simple or bulk edit mode to add cipher suites. Enter the Java Secure Socket Extension (JSSE) name for the additional cipher suites that you want to use.