Map Jobs in a Topology
Create a topology in Control Hub to map multiple related jobs into a single view. You can map all dataflow activities that serve the needs of one business function in a single topology.
You can add the following components to a topology canvas:
- Jobs
- Add jobs that belong to your organization. When you add a job to the canvas, Control Hub displays the job and all external systems connected to the job. Control Hub uses a rectangle to represent the job, and uses circles to represent the external systems, such as origin and destination systems.
- Systems
- Add any external system that your jobs connect to. When you add a system to the canvas, Control Hub displays a single circle to represent the external system type.
Example
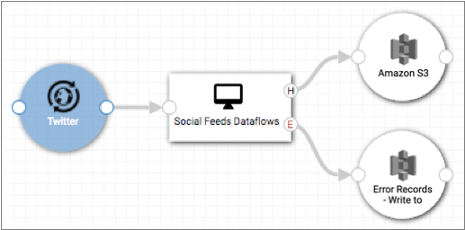
Let's say that we created a job for a Data Collector pipeline that uses the HTTP Client origin to read Twitter social feeds, performs some calculations, and writes the processed data to an Amazon S3 destination. In addition, the pipeline is configured to write error records to another bucket in Amazon S3. When we add the job to the topology, Control Hub displays the job and external systems in the canvas as follows:
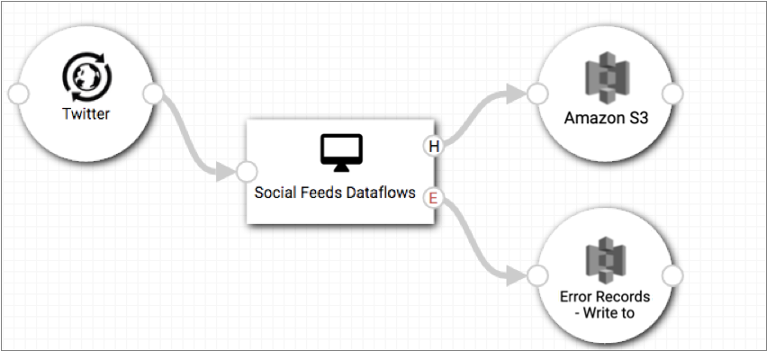
- Origin systems
- Each job that includes a Data Collector pipeline has one origin system. A job that includes a Transformer pipeline can have one or more origin systems. In the image above, Twitter is the origin system.
- Job
- The rectangle represents the job, with inputs and outputs. In the image above, Social Feeds Dataflows is the job. The input represents the origin for the pipeline. The outputs represent all destinations for the pipeline and the error handling system for the pipeline.
- Destination systems
- Each job has one or more destination systems. In the image above, the job has one destination system, Amazon S3.
- Error system
- Each job has one error system, based on how the pipeline is configured to handle errors. In the image above, Error Records is the error system because the pipeline is configured to write error records to Amazon S3.
Connect Multiple Jobs to a Single System
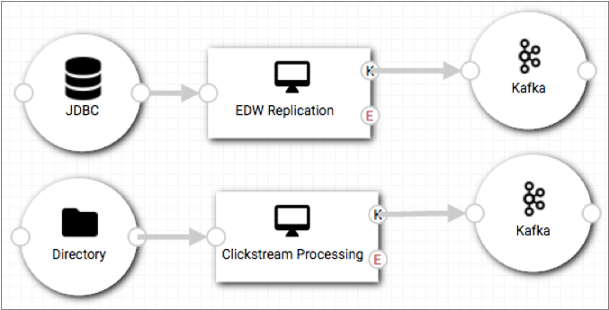
If you have multiple jobs that read from or write to a single system, you can connect the jobs into a single system in the topology canvas. When you monitor a system connected to multiple jobs, you can measure and monitor all the data passing into or out of the system from each of those jobs.
For example, let's say that you have two jobs that collect customer data from different source systems. Each job processes and writes the data to the same Kafka system for temporary storage. You add both jobs to the topology canvas, which by default adds two Kafka systems to the canvas:
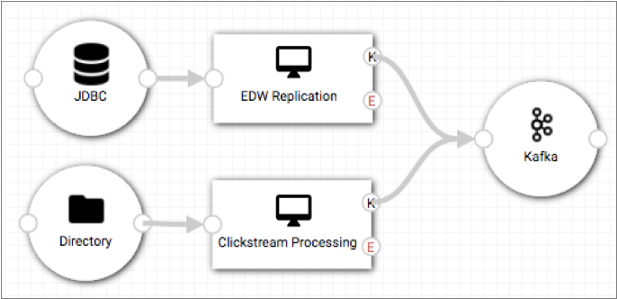
However, the jobs write to the same Kafka system, so you'd like to visually represent that in the topology canvas. You delete the Kafka system from the Clickstream Processing job, and then connect that job to the remaining Kafka system, like so:
Create Topologies
After you create jobs for published pipelines, create a topology and map the related jobs and connecting systems in the topology.
You can create topologies from the Topologies view or the Jobs view.
When you create a topology from the Topologies view, you create a topology with an empty canvas. You then map jobs and systems in the topology.
When you create a topology from the Jobs view, you select multiple jobs in the Jobs view and then create a topology that includes those jobs. Control Hub suggests how you might want to connect the systems, which you can accept or reject. After you create the topology, you can modify any of the connections and can map additional jobs and systems.
Creating an Empty Topology
Use the Topologies view to create a topology with an empty canvas. You then map jobs and systems in the topology.
- In the Navigation panel, click Topologies.
-
Click the Add Topology icon (
 ),
enter a name for the topology, and click Save.
Control Hub displays a blank topology canvas and versions the topology as v1-DRAFT:
),
enter a name for the topology, and click Save.
Control Hub displays a blank topology canvas and versions the topology as v1-DRAFT: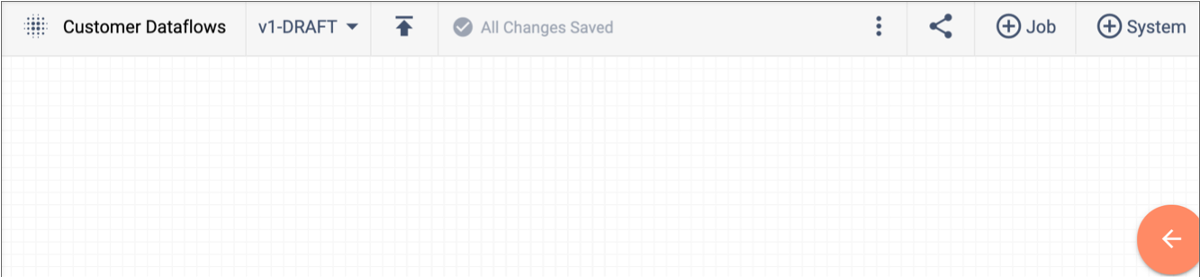
Map related jobs and systems in the topology as described in Mapping Jobs and Systems in a Topology.
Creating a Topology for Multiple Jobs
Use the Jobs view to select multiple jobs and then create a topology that includes those jobs. Control Hub suggests how you might want to connect the systems, which you can accept or reject. You can then map additional jobs and systems in the topology.
- In the Navigation panel, click Jobs.
-
Select related jobs in the list, click the More icon
(
 )
and then click Create Topology.
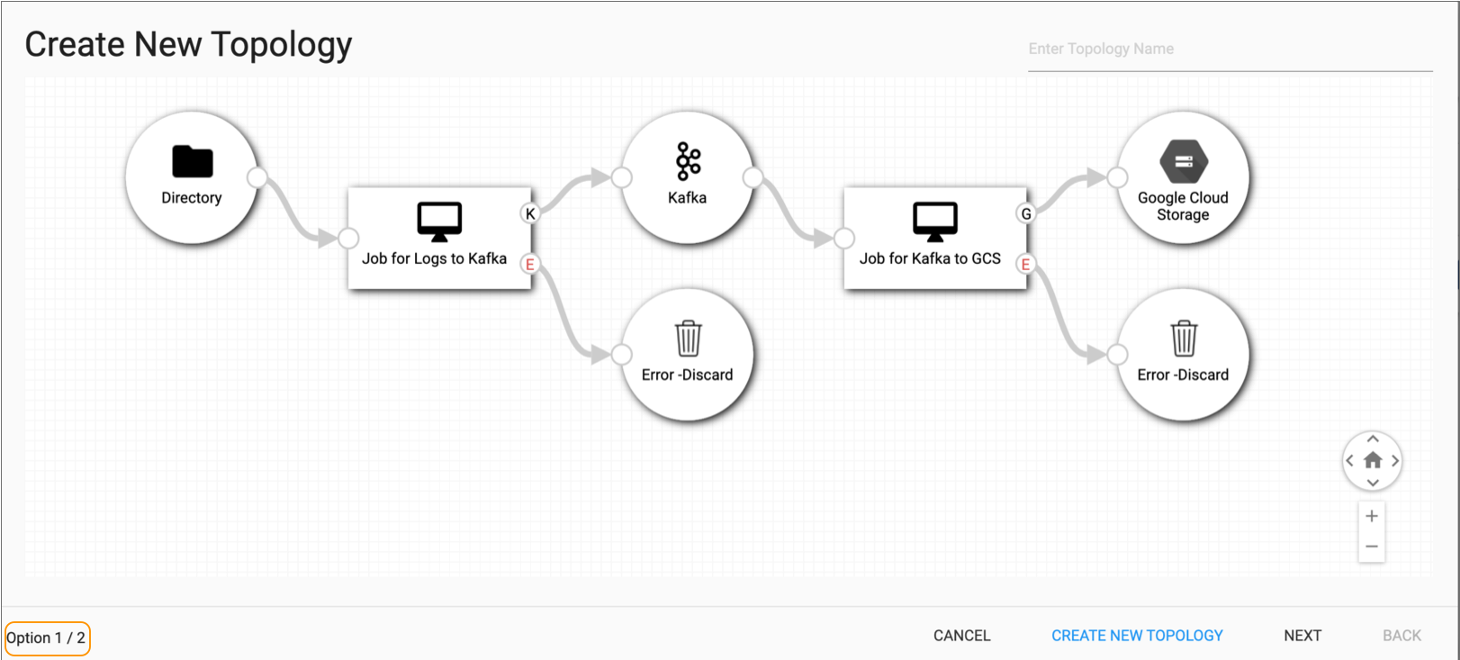
The Create Topology window displays. The canvas includes the jobs you selected, with suggested options of how you might want to connect the systems.
)
and then click Create Topology.
The Create Topology window displays. The canvas includes the jobs you selected, with suggested options of how you might want to connect the systems.Notice the number of suggested options to connect the jobs:
- Enter a name for the topology.
- Click Next to view all of the suggested options to connect the jobs.
-
When you've decided on the option to use, display that option in the canvas,
and then click Create Topology.
Control Hub displays the topology canvas with the selected jobs and versions the topology as v1-DRAFT.
You can modify any of the connections or map additional jobs and systems in the topology as described in Mapping Jobs and Systems in a Topology.
Mapping Jobs and Systems in a Topology
Map jobs and systems in a topology that is in a draft state.
- In the Navigation panel, click Topologies.
-
Click the name of a topology in the Topologies view.
You can edit topologies that are in a draft state. If you selected a published topology, click the Create Draft icon (
 )
to create another draft version.
)
to create another draft version. Control Hub displays the topology canvas and versions the topology as <version>-DRAFT. Note the Add Job and Add System icons. You'll use these icons to map related jobs and systems in the topology:

-
Click the Add Job icon and then select the first job
that you want to map in the topology.
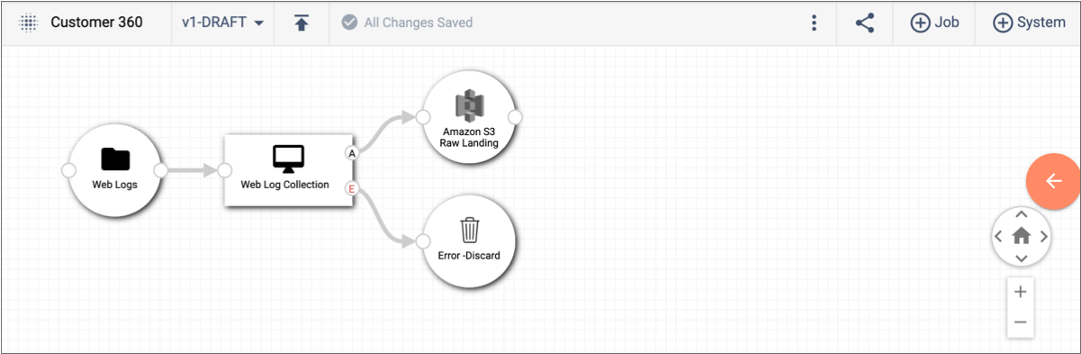
Control Hub adds the job to the canvas. It uses a rectangle to represent the job and circles to represent the external systems:
-
To map a related job that reads from a destination system of the first job,
select the connecting destination system, click the
Add Job icon, and then select the related
job.
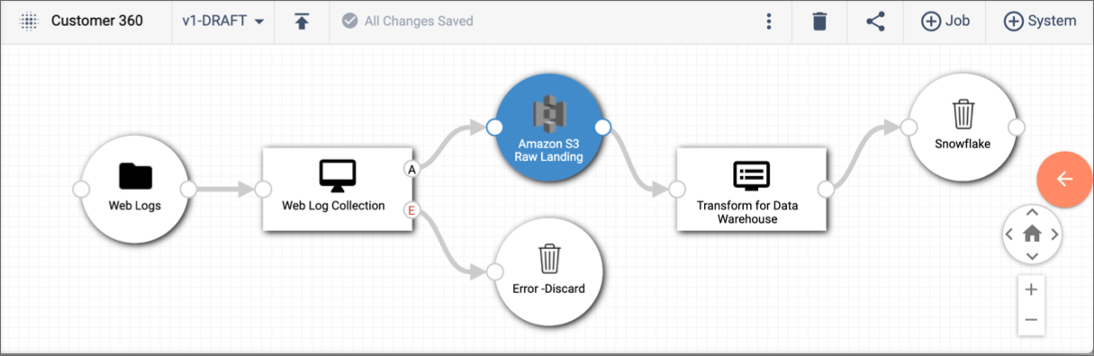
Control Hub adds the related job, automatically connecting it to the selected destination system, as follows:
 Tip: If you add a related job without first selecting the connecting system, Control Hub adds a duplicate of the system and cannot connect the jobs. Simply select one of the duplicate systems and click the Delete icon (
 ) to remove the duplicate from the topology
canvas. Then, connect the related job to the system just as you connect
stages in the pipeline canvas. Or, you can instruct Control Hub to automatically discover connecting systems.
) to remove the duplicate from the topology
canvas. Then, connect the related job to the system just as you connect
stages in the pipeline canvas. Or, you can instruct Control Hub to automatically discover connecting systems. -
Add additional related jobs as necessary.
Tip: If you mistakenly delete a connecting system, you can add the system back to the topology canvas using the Add System icon. Then, you can connect the system to related jobs.
- Optionally add error handling jobs that process error records written to an error system.
-
When the topology is complete, click the Publish
Topology icon (
 ) to commit this version of the topology.
Auto Discover Connecting Systems
Control Hub can automatically discover connecting systems for multiple jobs added to a topology. Control Hub suggests how you might want to connect the systems, which you can accept or reject.
After adding multiple jobs to the topology canvas, click the More
(![]() ) icon
above the canvas and then click Auto Discover Connections.
) icon
above the canvas and then click Auto Discover Connections.
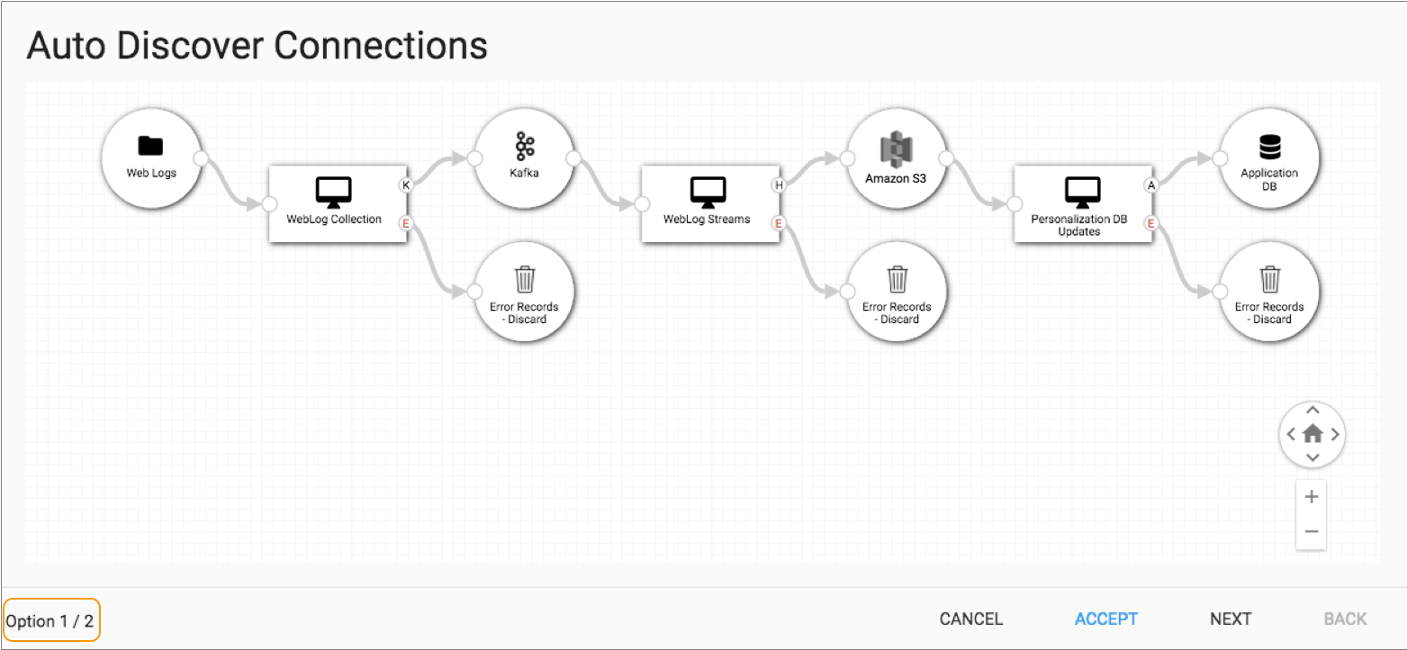
The Auto Discover Connections window includes the jobs you selected, with suggested options of how you might want to connect the systems. Notice the number of suggested options to connect the jobs:
Click Next to view all of the suggested options to connect the jobs. When you've decided on the option to use, display that option in the canvas, and then click Accept.
You cannot make any changes to the suggested options in the Auto Discover Connections window. However, once you accept an option, you can modify any of the connections or map additional jobs and systems in the topology canvas.
Managing Jobs from a Topology
After you map jobs in a topology, you can perform most available actions for jobs from the topology.
- Start a specific job or start all jobs.
- Monitor a job.
- Acknowledge job errors.
- Stop a specific job or stop all jobs.
- Force stop a job.
- Reset the origin for a job.
- Synchronize a job.
- Update a job to use the latest pipeline version.
For more information about each of these tasks, see Jobs Overview.
Customizing System Icons
You can customize the icon for any system displayed in the topology canvas.
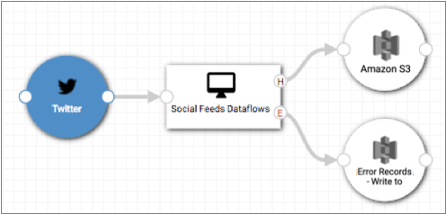
For example, let's say that you have a pipeline that uses the HTTP Client origin to read Twitter social feeds. You add a job for the pipeline to a topology. The HTTP Client icon in the topology canvas doesn’t indicate that the origin is a Twitter system:
You can import a custom icon for the HTTP Client system to visually indicate that this is a Twitter system, as follows:
- In the Navigation panel, click Topologies.
-
Click the name of the topology that you want to edit.
Control Hub displays the topology in the canvas. You can edit topologies that are in a draft state. If you selected a published topology, click the Create Draft icon () to create another draft version.
- Double-click the canvas or click the Open Detail Pane arrow to display the detail pane.
- Select a system in the topology canvas.
- In the detail pane, expand the name of the selected system.
- Click Upload New Icon.
- Select the icon and then click Open.
- Click as directed to update the icon in the canvas.