Pipeline and Job samples
Section Contents
Pipeline and Job samples#
The following section includes example scripts of some common tasks and objectives for Pipelines and Jobs.
These examples are intended solely as a jumping-off point for developers new to the SDK; to provide an idea of how some common tasks might be written out programmatically using the SDK.
Create a Pipeline and Run It on Control Hub#
This example will show how to use the SDK to create and run a brand new pipeline on StreamSets Control Hub. It is assumed that this Control Hub instance will have at least one Data Collector registered with it, with the ‘sdk example’ label assigned to that Data Collector instance. We will use <Engine ID> when referring to this Data Collector’s ID while building the pipeline.
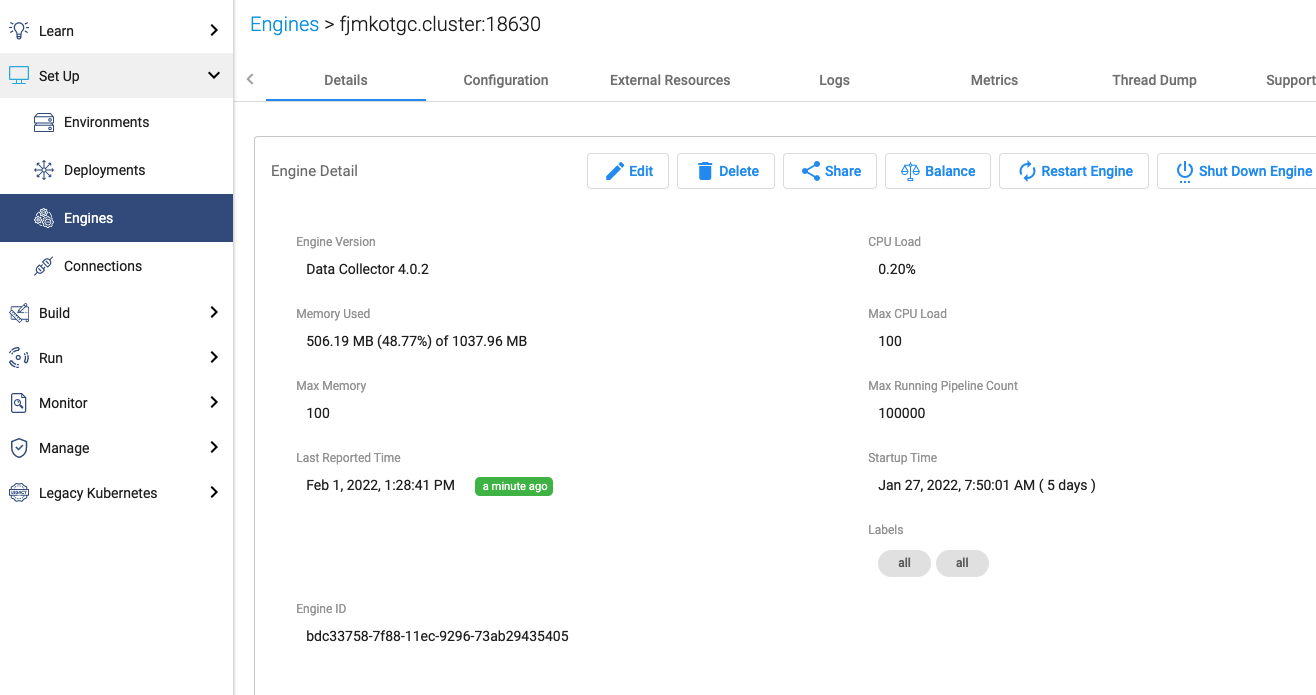
Find the engine ID#
In the Control Hub UI, select a particular engine. The Engine ID can be seen at the bottom of the diagram:

Note
You don’t need an engine ID for Transformer for Snowflake.
Example#
Looking for the full script from this example? Check it out here.
The following steps will be taken to create and run a brand new pipeline on Control Hub:
Connect to a Control Hub instance
Instantiate a
streamsets.sdk.sch_models.PipelineBuilderand add stages to the pipelineConfigure the stages in the pipeline
Connect the stages of the pipeline together
Build the pipeline and publish it to Control Hub
Create and start a Job on Control Hub to run the pipeline
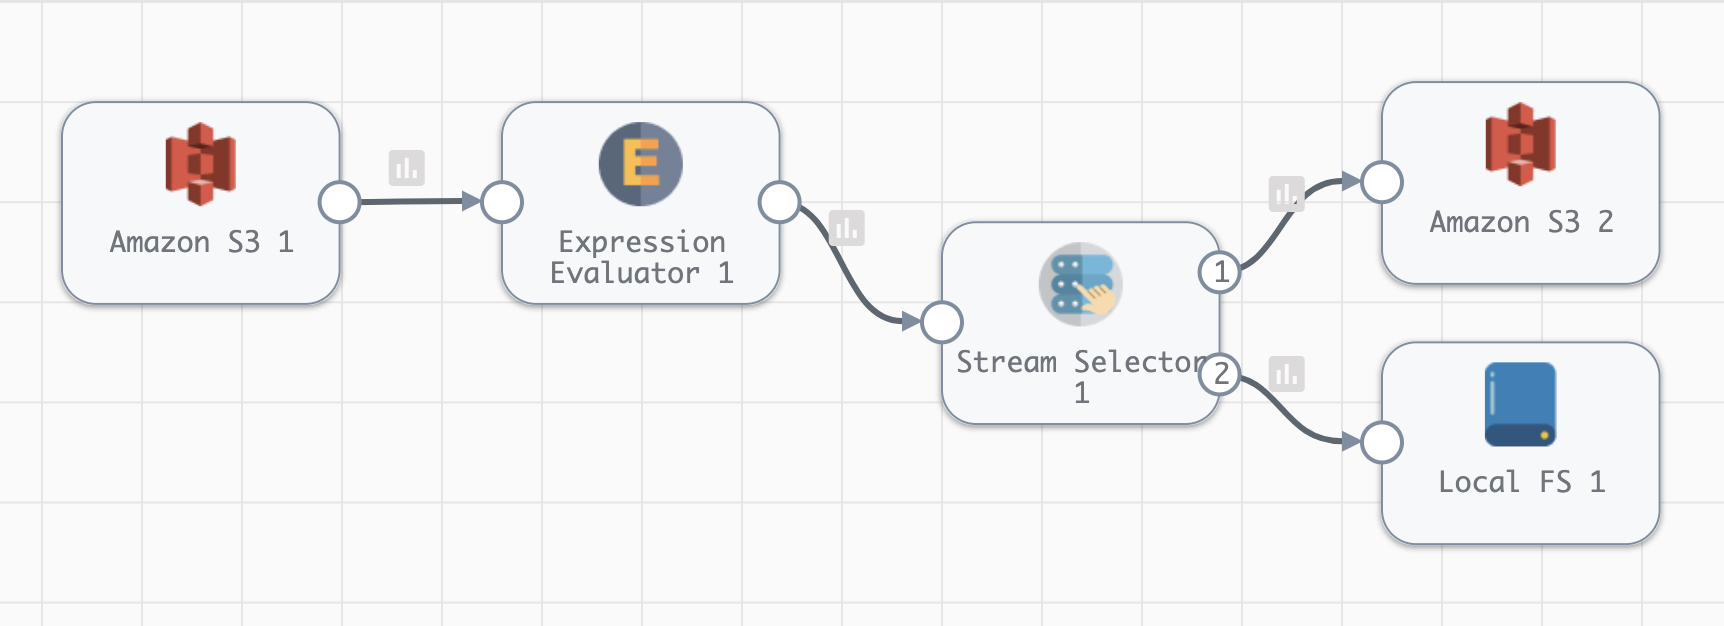
This pipeline will read CSV files from S3 via the Amazon S3 origin, modify the data using an Expression Evaluator processor, and then write the data either to a new bucket in Amazon S3 (if a particular field in the record is set to True) or to the local filesystem of the Data Collector engine (if the field is set to False).
To help visualize the pipeline that this example builds, here’s the representation of the pipeline as it appears in the Control Hub UI:

1. Connect to a StreamSets Control Hub Instance#
To get started, import the streamsets.sdk.ControlHub class from the SDK and then connect to the
Control Hub instance you wish to create the pipeline on.
# Import the ControlHub class from the SDK.
from streamsets.sdk import ControlHub
# Connect to the Control Hub instance you want to interact with.
sch = ControlHub(credential_id=<credential id>, token=<token>)
2. Instantiate a PipelineBuilder and Add Stages#
Now it’s time to build a pipeline by creating a streamsets.sdk.sch_models.PipelineBuilder instance and
adding stages to it.
Note
When a stage is created by passing a stage label to streamsets.sdk.sch_models.PipelineBuilder.add_stage(),
the method picks the first stage that matches that label. In some cases, the same label is used by multiple stages
(e.g., the Amazon S3 origin and the Amazon S3 destination). In order to clarify
which you’re referring to, include the type parameter and specify it as an origin or destination.
# Retrieve the Engine instance to use when building the pipeline
engine = sch.engines.get(engine_url='<engine_url>')
# Instantiate the PipelineBuilder instance to build the pipeline, and add stages to the pipeline.
pipeline_builder = sch.get_pipeline_builder(engine_type='data_collector', engine_id=engine.id)
s3_origin = pipeline_builder.add_stage('Amazon S3', type='origin')
expression_eval = pipeline_builder.add_stage('Expression Evaluator', library='streamsets-datacollector-basic-lib')
stream_selector = pipeline_builder.add_stage('Stream Selector')
s3_destination = pipeline_builder.add_stage('Amazon S3', type='destination')
localfs_destination = pipeline_builder.add_stage('Local FS')
3. Configure the Stages#
Now that all of the stages have been added to the pipeline_builder, they can be configured as needed.
Tip
If you’re unsure what configurations a stage exposes through the SDK, utilize the built-in dir() function to
display all attributes for that particular stage.
The Amazon S3 origin will use access key and secret key credentials as the authentication method by default. The following configures the access key and secret key to use, specifies the bucket to read from, specifies the prefix pattern of the files to read (i.e., which files to include for reading), and finally configures the Data Format of the files being ingested (CSV files in this example).
s3_origin.access_key_id = 'ABCDEF123456'
s3_origin.secret_access_key = '98765ZYXWV1234LMNOP'
s3_origin.bucket = 'files-to-process'
# Read all CSV files found in this directory by setting the prefix_pattern to the expression '*.csv'.
s3_origin.prefix_pattern = '*.csv'
# Configure the pipeline to read CSV files by setting the data_format to 'DELIMITED'. You could also configure
# the delimiter_format_type if the format of the files was something other than standard CSV, however the
# default is sufficient for this example.
s3_origin.data_format = 'DELIMITED'
/invoice field of incoming records for a specific field value. If that
field’s value is ‘UNPAID’, the evaluator will add a /paymentRequired field set to True, otherwise it will add a
/paymentRequired field set to False. In addition, the evaluator will also include a /processedAt field with
a timestamp of when the record was ingested.# Configure the Expression Evaluator to write True or False to the '/paymentRequired' field based on a conditional
# statement written in expression language.
# Compared to the Expression Evaluator Stage as seen in the Control Hub UI, the 'fieldToSet' below
# corresponds to 'Output Field' in the UI while 'expression' below corresponds to 'Field Expression' in the UI.
expression_eval.field_expressions = [{'fieldToSet': '/paymentRequired', 'expression': '${(record:value(\'/invoice\') == "UNPAID") ? "True" : "False"}'},
{'fieldToSet': '/processedAt', 'expression': '${time:now()}'}]
s3_destination.access_key_id = 'ABCDEF123456'
s3_destination.secret_access_key = '98765ZYXWV1234LMNOP'
s3_destination.bucket = 'invoices-unpaid'
# Set the object suffix for the files created on S3.
s3_destination.object_name_suffix = 'csv'
# Configure the pipeline to write CSV files by setting the data_format to 'DELIMITED'.
s3_destination.data_format = 'DELIMITED'
# Configure the directory_template to point to the filepath where the output records should be written on the
# local filesystem.
localfs_destination.directory_template = '/data/paid-invoices'
# Configure the data_format to be CSV.
localfs_destination.data_format = 'DELIMITED'
/paymentRequired is True, it will be routed to another S3 bucket - otherwise, the
record will be routed to the local filesystem.4. Connecting the Stages Together#
>>operator in this case). Since the Stream Selector stage has two expected output paths, it needs to be attached twice.
s3_origin >> expression_eval >> stream_selector >> s3_destination
stream_selector >> localfs_destination
/paymentRequired is True and if so, will route to the first output
lane and be written to the Amazon S3 bucket. The second condition will be the default condition, meaning it did not
meet the first condition’s requirement, and will instead be written to the local filesystem via the second
output lane.# Show that the stream_selector stage does, in fact, have two output lanes as expected.
stream_selector.output_lanes
# Configure the Stream Selector stage to write to two output paths based on a conditional statement written in
# expression language.
# The 'predicate' attribute below corresponds to the Stream Selector's condition value configuration as seen in the
# Control Hub UI. Each condition's order in the list determines it's numerical value shown in the UI
stream_selector.condition = [dict(outputLane=stream_selector.output_lanes[0], predicate='${record:value("/paymentRequired") == "True"}'),
dict(outputLane=stream_selector.output_lanes[1], predicate='default')]
Output:
['StreamSelector_01OutputLane5c875fa7_c7e2_4bb8_ba4d_3f280f1b15f5', 'StreamSelector_01OutputLane8514c1a5_acad_4955_a83f_1f80ef966188']
5. Building the Pipeline and Publishing It to Control Hub#
Now that all of the stages are completely configured and connected as desired, the pipeline can be built and added to the Control Hub instance.
# Use the pipeline_builder to build the pipeline and name it 'SDK Example Pipeline'.
sdk_example_pipeline = pipeline_builder.build('SDK Example Pipeline')
# Add the pipeline to the SCH instance, effectively publishing the pipeline for use.
sch.publish_pipeline(sdk_example_pipeline)
# For demo purposes, show that the pipeline is now visible on the SCH instance.
sch.pipelines.get(name='SDK Example Pipeline')
Output:
<Pipeline (pipeline_id=cec1eb68-597a-4c64-bafe-79243872dbc2:org, commit_id=77dc14bb-82d1-46d2-acea-a800727c4021:org, name=SDK Example Pipeline, version=1)>
The pipeline has now successfully been built and added to your Control Hub instance!
6. Creating and Starting a Job to Run the Pipeline#
With the pipeline created and added to Control Hub, you can now create a Job to run the pipeline.
First, instantiate a streamsets.sdk.sch_models.JobBuilder object to help create the Job. Then, specify the pipeline created previously while
building the new Job instance. Next, modify the Job’s data_collector_labels, which Control Hub uses to determine
which Data Collector instance(s) a Job can be executed on, to match the ‘sdk example’ label (for the Data Collector
instance that this example assumes is registered with Control Hub). Finally, add the job to Control Hub and start it.
# Instantiate the JobBuilder instance to use to build the job
job_builder = sch.get_job_builder()
# Build the job and specify the sdk_example_pipeline created previously.
job = job_builder.build(job_name='Job for SDK Example Pipeline', pipeline=sdk_example_pipeline)
# Modify to the Job's data_collector_labels to enable it to run on the SDC instance
job.data_collector_labels = ['sdk example']
# Add the job to Control Hub, and start it
sch.add_job(job)
sch.start_job(job)
Output:
# sch.add_job(job)
<streamsets.sdk.sch_api.Command object at 0x7fa3e2481400>
# sch.start_job(job)
<streamsets.sdk.sch_api.StartJobsCommand object at 0x7fa3e5df80b8>
Congratulations! You’ve now successfully built, configured, published and run your very first pipeline completely from the StreamSets Platform SDK for Python!
Bringing It All Together#
The complete script from this example can be found below. Commands that only served to verify some output from the example have been removed.
# Import the ControlHub module from the SDK.
from streamsets.sdk import ControlHub

# Connect to the Control Hub instance you want to interact with.
sch = ControlHub(credential_id=<credential id>, token=<token>)

# Instantiate the PipelineBuilder instance to build the pipeline, and add stages to the pipeline.
pipeline_builder = sch.get_pipeline_builder(engine_type='data_collector', engine_id=<Engine ID>)
s3_origin = pipeline_builder.add_stage('Amazon S3', type='origin')
expression_eval = pipeline_builder.add_stage('Expression Evaluator')
stream_selector = pipeline_builder.add_stage('Stream Selector')
s3_destination = pipeline_builder.add_stage('Amazon S3', type='destination')
localfs_destination = pipeline_builder.add_stage('Local FS')

# Configure the S3 origin stage
s3_origin.access_key_id = 'ABCDEF123456'
s3_origin.secret_access_key = '98765ZYXWV1234LMNOP'
s3_origin.bucket = 'files-to-process'
# Read all CSV files found in this directory by setting the prefix_pattern to the expression '*.csv'.
s3_origin.prefix_pattern = '*.csv'
# Configure the pipeline to read CSV files by setting the data_format to 'DELIMITED'.
s3_origin.data_format = 'DELIMITED'

# Configure the Expression Evaluator to write True or False to the '/paymentRequired' field based on a conditional
# statement written in expression language.
expression_eval.field_expressions = [{'fieldToSet': '/paymentRequired', 'expression': '${(record:value(\'/invoice\') == "UNPAID") ? "True" : "False"}'},
                                     {'fieldToSet': '/processedAt', 'expression': '${time:now()}'}]

# Configure the S3 destination stage
s3_destination.access_key_id = 'ABCDEF123456'
s3_destination.secret_access_key = '98765ZYXWV1234LMNOP'
s3_destination.bucket = 'invoices-unpaid'
# Set the object suffix for the files created on S3.
s3_destination.object_name_suffix = 'csv'
# Configure the pipeline to write CSV files by setting the data_format to 'DELIMITED'.
s3_destination.data_format = 'DELIMITED'

# Configure the directory_template to point to the filepath where the output records should be written on the
# local filesystem.
localfs_destination.directory_template = '/data/paid-invoices'
# Configure the data_format to be CSV.
localfs_destination.data_format = 'DELIMITED'

# Connect the stages of the pipeline together
s3_origin >> expression_eval >> stream_selector >> s3_destination
stream_selector >> localfs_destination
# Configure the Stream Selector stage to write to two output paths based on a conditional statement written in
# expression language.
stream_selector.condition = [dict(outputLane=stream_selector.output_lanes[0], predicate='${record:value("/paymentRequired") == "True"}'),
                             dict(outputLane=stream_selector.output_lanes[1], predicate='default')]

# Use the pipeline_builder to build the pipeline and name it 'SDK Example Pipeline'.
sdk_example_pipeline = pipeline_builder.build('SDK Example Pipeline')
# Add the pipeline to the SCH instance, effectively publishing the pipeline for use.
sch.publish_pipeline(sdk_example_pipeline)

# Instantiate the JobBuilder instance to use to build the job
job_builder = sch.get_job_builder()
# Build the job and specify the sdk_example_pipeline created previously.
job = job_builder.build(job_name='Job for SDK Example Pipeline', pipeline=sdk_example_pipeline)
# Modify to the Job's data_collector_labels to enable it to run on the SDC instance
job.data_collector_labels = ['sdk example']
# Add the job to Control Hub, and start it
sch.add_job(job)
sch.start_job(job)