Webhooks
You can configure a pipeline to use webhooks.
A webhook is a user-defined HTTP callback - an HTTP request that the pipeline sends automatically when certain actions occur. You can use webhooks to automatically trigger external tasks based on an HTTP request. Tasks can be as simple as sending a message through an application API or as powerful as passing commands to the Data Collector command line interface.
| Trigger | Description | Configuration Location |
|---|---|---|
| Alert | The pipeline sends all alert webhooks each time an alert is
triggered. For example, if your text message application has a webhook API, you can have the pipeline send texts when alerts are triggered. For details on how to configure an alert webhook, see Configuring an Alert Webhook. |
Pipeline Rules tab > Webhook tab |
| State notification | The pipeline sends all state notification webhooks when the
pipeline transitions to the selected pipeline states. For example, you can send an HTTP request to the Data Collector REST API to start a different pipeline when the current pipeline transitions to a Finished state. For details on how to configure a state notification webhook, see the Notifications properties in Configuring a Pipeline. |
Pipeline Configuration tab > Notifications tab |
The flexibility of webhooks enables you to automatically trigger a wide range of tasks, depending on the ability of external systems to support webhooks or process HTTP requests.
When you configure a webhook, you specify the URL to send the request and the HTTP method to use. Some HTTP methods allow you to include a request body or payload. In the payload, you can use parameters to include information about the cause of the trigger, such as the text of the alert or the latest pipeline state. You can also include request headers, content type, authentication type, username and password as needed.
Request Method
- GET
- PUT
- POST
- DELETE
- HEAD
Payload and Parameters
You can include a request body or payload for PUT, POST, and DELETE request webhooks. Depending on the receiving system, the payload might not be used. For example, when using the Data Collector REST API, you simply include all required information in the URL.
When you configure a payload, you can use any valid content type, then specify the content type in the webhook properties. When defining a message, be sure to consider when the pipeline sends the webhook and include the information that the recipient needs.
You can use parameters in the payload to include information about the action that triggered the webhook. For example, when configuring a webhook that sends a text message when a pipeline stops, you might include the pipeline name, pipeline state, and the time parameters in the message.
{{<parameter name>>}}- state notification parameters
- When configuring a state notification webhook, you can use the following
parameters:
- PIPELINE_TITLE - The pipeline title or name.
- PIPELINE_URL - The direct URL to the pipeline.
- PIPELINE_STATE - The current state of the pipeline.
- TIME - The time of the triggered request.
- PIPELINE_STATE_MESSAGE - The pipeline state and any related information, such as the last-saved offset or the error message for error states.
- PIPELINE_INPUT_RECORDS_COUNT - The number of records read.
- PIPELINE_OUTPUT_RECORDS_COUNT - The number of records written.
- PIPELINE_ERROR_RECORDS_COUNT - The number of error records.
- PIPELINE_ERROR_MESSAGES_COUNT - The number of error messages.
- PIPELINE_RUNTIME_PARAMETERS - The number of pipeline parameters.
- PIPELINE_METRICS - Metrics data for the pipeline.
- alert parameters
- When configuring an alert webhook, you can use the following parameters:
- ALERT_CONDITION - The condition of the rule associated with the alert.
- ALERT_NAME - The alert label or name.
- ALERT_TEXT - The text configured for the alert.
- ALERT_VALUE - The value that triggered the condition. For example, if the alert is configured to trigger upon reaching 1000 error records, the alert value will be 1000.
- PIPELINE_TITLE - The pipeline title.
- PIPELINE_URL - The direct URL to the pipeline.
- TIME - Time of the triggered request.
Examples
Here are some examples of how you might use webhooks:
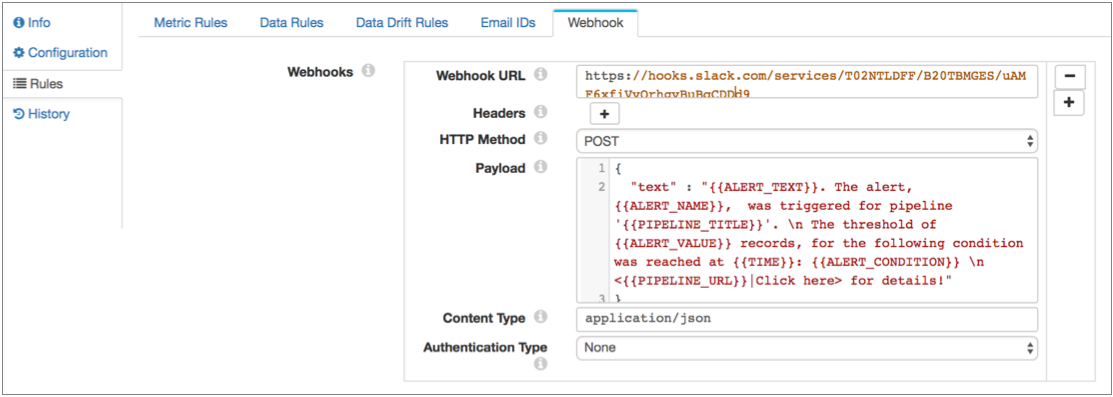
- Send webhooks to a Slack channel
- You can configure a pipeline to send webhooks to a Slack channel. For example, you could have all alerts sent to an Operations Slack channel so someone on your operations team can respond to the alert.
- To do this, you perform the following steps:
- Configure Slack for incoming webhooks for the channel you want to
use.
At the time of writing, you can enable webhooks in Slack starting from this page. When you enable webhooks, Slack generates a URL for you to use. If you have already enabled webhooks, check your account information for the Slack URL.
- Copy the URL that Slack generates and use this to configure the
pipeline.The URL looks something like this:
https://hooks.slack.com/services/<random string>/<random string>/<random string>Slack also offers instructions on how to configure the payload. At this time, they suggest a text field with the contents of the message, like Data Collector default payload.
- Configure the webhook in the pipeline.
For Slack, you can just enter the URL and accept the defaults for everything else.
Here's how a Slack alert webhook might look:
- Configure Slack for incoming webhooks for the channel you want to
use.
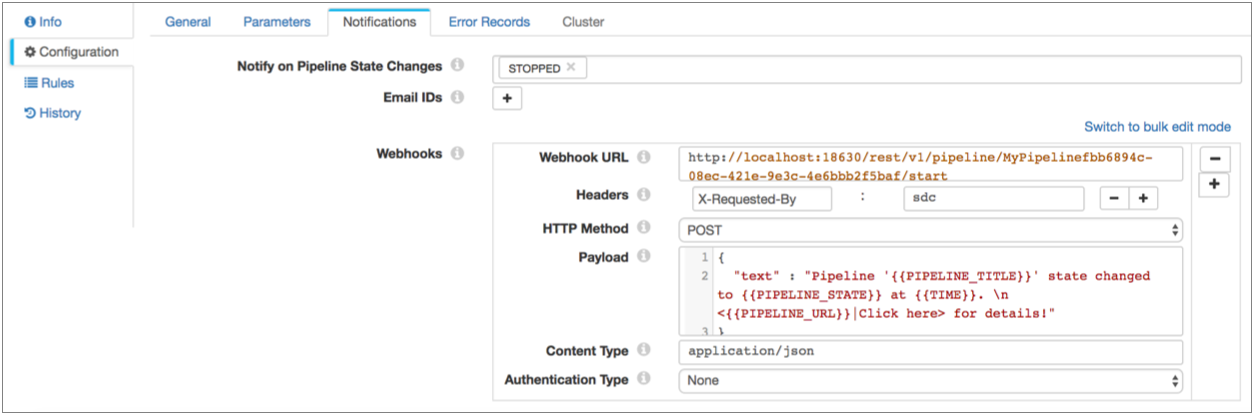
- Start another pipeline
- You can start a pipeline after the first pipeline completes all processing using dataflow triggers, the Pipeline Finisher executor, and a state notification webhook.
-
- In the pipeline properties, click the Notifications tab and click Add to add a webhook.
- For the URL, enter the command to start the pipeline.
The command looks something like this:
<http|https>://<system ip>.<http port>/rest/v1/pipeline/<pipeline id>/startFor example: http://localhost:18630/rest/v1/pipeline/MyPipelinefbb6894c-08ec-421e-9e3c-4e6bbb2f5baf/start
- Using simple or bulk edit mode, click the
Add icon to add a request header, and add
the following header:
X-Requested-ByAnd set the value to:
sdc.You can use the default method and authentication type, and keep or delete the payload, since they aren't used by the REST API.
This is how the webhook might look: