Installing Control Hub
You can install Control Hub on the same machine as the required databases or on a remote machine. For best performance, we recommend installing on a remote machine.
During the Control Hub installation process, you can optionally install and configure a system Data Collector. When installed, administrators can enable or disable the system Data Collector for use as the default authoring Data Collector in Control Hub.
After starting Control Hub, log in to the instance and create the required organizations.
Control Hub also includes a separate Admin tool to monitor and troubleshoot Control Hub issues. For example, if Control Hub becomes inaccessible, the Admin tool remains running. You can still log into the Admin tool to troubleshoot the Control Hub issues.
Step 1. Install the System Data Collector (Optional)
You can optionally install and configure a Data Collector that functions as the system Data Collector for Control Hub. For more information about how Control Hub uses the system Data Collector, see System Data Collector.
If you do not install the system Data Collector, then organization administrators must register Data Collectors for the organization before users can design pipelines and fragments.
Requirements
The system Data Collector must meet all of the following requirements:
- Version
- StreamSets recommends using the latest version of Data Collector.
The minimum supported Data Collector version is 3.0.0.0. To design pipeline fragments, the minimum supported Data Collector version is 3.2.0.0.
- Installation type
- Use any of the supported installation methods for the system Data Collector - including a tarball, RPM, Cloudera Manager, or Docker installation.
- Installation location
- In a development environment, you can install the system Data Collector on the same machine as the Control Hub instance as long as the machine has enough resources.
For best performance in a production environment, we recommend installing on a remote machine within the same internal network as the Control Hub instance. The Control Hub instance must be able to access the system Data Collector URL.
- Authentication
- Configure the system Data Collector to use the default file-based authentication and the form authentication type. By default, a new installation uses filed-based authentication with the form type. If you choose to use an existing Data Collector, verify that the http.authentication property is set to form in the $SDC_CONF/sdc.properties file.
Installing and Configuring the System Data Collector
-
Install the required version of Data Collector.
For installation instructions, see Installation in the Data Collector documentation.
-
Configure a single Data Collector user account with the admin or creator role.
The system Data Collector uses Data Collector authentication - unlike registered Data Collectors that use Control Hub authentication. Users do not directly log in to the system Data Collector. However, a single user account is required so that Control Hub can make requests to the system Data Collector.
You can use the default admin account. However, be sure to change the default password for the account.
For instructions on configuring users for file-based authentication, see Configure Users, Groups, and Roles in the Data Collector documentation.
-
Start Data Collector.
Important: Do not register the system Data Collector with Control Hub.
Step 2. Set Up Time Synchronization
When you install the databases and Control Hub on separate machines, you must set up time synchronization using Network Time Protocol (NTP).
NTP synchronizes all participating machines to within a few milliseconds of Coordinated Universal Time (UTC). To use NTP, install and set up an NTP server as described in your operating system documentation.
If you do not set up time synchronization, Control Hub might stop processing tasks due to out of order timestamps among the machines.
Step 3. Install from the Tarball or RPM Package
You can install Control Hub from the tarball and start it manually. Or, you can install Control Hub from the tarball or RPM package and run it as a service.
Tarball for a Manual Start
You can install the Control Hub tarball and start it manually on all supported operating systems.
Install the tarball on a machine that meets the installation requirements. The tarball does not include Java; you must manually install Java on the machine.
When you start Control Hub manually from the command line, Control Hub runs as the system user account logged into the command prompt when you run the start command. You can alternatively impersonate another user account when you run the command.
- Download the tarball from the Control Hub on-premises email that you received from StreamSets.
-
Use the following command to extract the tarball:
tar xzvf streamsets-dpm-<version>.tar.gzFor example, to extract version 3.61.0, use the following command:tar xzvf streamsets-dpm-3.61.0.tar.gz
Tarball for a Service Start for SysV Init Systems
You can install the Control Hub tarball and start it as a service for supported operating systems that use the SysV init system - including CentOS 6.x, Oracle Linux 6.x, Red Hat Enterprise Linux 6.x, or Ubuntu 14.04.
Install the tarball on a machine that meets the installation requirements. The tarball does not include Java; you must manually install Java on the machine.
Installing Control Hub as a service requires sudo privileges on the root directory.
- Download the tarball from the Control Hub on-premises email that you received from StreamSets.
-
Use the following command to extract the tarball to the desired location,
typically /opt/streamsets-dpm:
tar xzvf streamsets-dpm-<version>.tar.gzFor example, to extract version 3.61.0, use the following command:tar xzvf streamsets-dpm-3.61.0.tar.gz -
Create a system user and group named dpm.
For example, use the following command to create a system user and group with the next available group ID and user ID:
groupadd -r dpm && useradd -r -d <installation dir> -g dpm -s /sbin/nologin dpmIf you’re installing Control Hub on multiple machines for high availability, we recommend explicitly specifying a group ID and user ID to ensure that the IDs are consistent across the machines. Use the -g and -u flags respectively to specify the ID.
-
Use the following command from the directory where you extracted the tarball to
copy initd/_dpminitd_prototype to the
/etc/init.d directory:
cp initd/_dpminitd_prototype /etc/init.d/dpm -
Use the following command to change ownership of the
/etc/init.d/dpm file to dpm:
chown dpm:dpm /etc/init.d/dpm - Edit the /etc/init.d/dpm file and set the DPM_DIST and DPM_HOME environment variables to the location where you extracted the tarball.
-
Use the following command to make the dpm file executable:
chmod 755 /etc/init.d/dpm -
Use the following command to create the Control Hub configuration directory at /etc/dpm:
mkdir /etc/dpm -
Use the following command from the directory where you extracted the tarball to
copy all files from etc into the Control Hub configuration directory that you just created:
cp -R etc/* /etc/dpm -
Use the following command to change the owner of the
/etc/dpm directory and all files in the directory to
dpm:dpm:
chown -R dpm:dpm /etc/dpm -
Use the following commands to create the Control Hub log directory at /var/log/dpm and change the owner to
dpm:dpm:
mkdir /var/log/dpm
chown dpm:dpm /var/log/dpm
Tarball for a Service Start for Systemd Init Systems
You can install the Control Hub tarball and start it as a service for supported operating systems that use the systemd init system - including CentOS 7.x, Oracle Linux 7.x - 8.x, or Red Hat Enterprise Linux 7.x - 8.x.
Install the tarball on a machine that meets the installation requirements. The tarball does not include Java; you must manually install Java on the machine.
Installing Control Hub as a service requires sudo privileges on the root directory.
- Download the tarball from the Control Hub on-premises email that you received from StreamSets.
-
Use the following command to extract the tarball to the desired location,
typically /opt/streamsets-dpm:
tar xzvf streamsets-dpm-<version>.tar.gzFor example, to extract version 3.61.0, use the following command:tar xzvf streamsets-dpm-3.61.0.tar.gz -
Use the following command from the directory where you extracted the tarball to
copy systemd/dpm.service to the
/etc/systemd/system directory:
cp systemd/dpm.service /etc/systemd/system/dpm.service -
If you did not extract the tarball to the default directory
/opt/streamsets-dpm, override the
/etc/systemd/system/dpm.servicefile to modify the DPM_HOME and ExecStart values.Override the default values in the dpm.service file using the same procedure that you use to override unit configuration files on a systemd init system. For an example, see "Example 2. Overriding vendor settings" in this systemd.unit manpage.
-
Use the following command from the directory where you extracted the tarball to
copy systemd/dpm.socket to the
/usr/lib/systemd/system or
/etc/systemd/system directory:
cp systemd/dpm.socket /etc/systemd/system/dpm.socket - Optionally, edit the /etc/systemd/system/dpm.socket file to modify the Control Hub port number. The port must match the one defined in dpm.properties. Default is 18631.
-
Create a system user and group named dpm.
For example, use the following command to create a system user and group with the next available group ID and user ID:
groupadd -r dpm && useradd -r -d <installation dir> -g dpm -s /sbin/nologin dpmIf you’re installing Control Hub on multiple machines for high availability, we recommend explicitly specifying a group ID and user ID to ensure that the IDs are consistent across the machines. Use the -g and -u flags respectively to specify the ID.
-
Use the following command to reload the systemd manager configuration:
systemctl daemon-reload -
Use the following command to create the Control Hub configuration directory at /etc/dpm:
mkdir /etc/dpm -
Use the following command from the directory where you extracted the tarball to
copy all files from etc into the Control Hub configuration directory that you just created:
cp -R etc/* /etc/dpm -
Use the following command to change the owner of the
/etc/dpm directory and all files in the directory to
dpm:dpm:
chown -R dpm:dpm /etc/dpm -
Use the following commands to create the Control Hub log directory at /var/log/dpm and change the owner to
dpm:dpm:
mkdir /var/log/dpm
chown dpm:dpm /var/log/dpm
RPM Package for a Service Start
You can install the Control Hub RPM package on CentOS, Oracle Linux, or Red Hat Enterprise Linux.
Install the RPM package on a machine that meets the installation requirements. Each RPM package includes a supported version of Java. The installation process automatically installs the selected Java version if it is not already installed on the machine.
When you install from the RPM package, Control Hub runs as a service using the default system user account and group named dpm. If a dpm user and a dpm group do not exist on the machine, the installation creates the user and group for you and assigns them the next available user ID and group ID.
Installing Control Hub as a service requires sudo privileges on the root directory.
-
Download the RPM package for your operating system from the Control Hub on-premises email that you received from StreamSets:
- For CentOS 6.x, Oracle Linux 6.x, or Red Hat Enterprise Linux 6.x, download the RPM EL6 package that includes the Java version you want Control Hub to use.
- For CentOS 7.x, Oracle Linux 7.x, or Red Hat Enterprise Linux 7.x, download the RPM EL7 package that includes the Java version you want Control Hub to use.
- For Oracle Linux 8.x or Red Hat Enterprise Linux 8.x, download the RPM EL8 package that includes the Java version you want Control Hub to use.
-
Use the following command to install the RPM package:
yum localinstall streamsets-dpm-3.61.0-1.x86_64.rpmNote: The installation process automatically installs the selected Java version if it is not already installed. However, if a different Java version already exists on the machine, then the environment variables or system defaults might not be updated to reflect the Java version installed with Control Hub. In this case, verify that Control Hub uses the appropriate Java version.
Step 4. Download the JDBC Driver
Control Hub requires a JDBC driver to connect to the relational database.
-
Download the JDBC driver for the relational database instance that you are
using:
- MariaDB or MySQL when Control Hub uses Java 8 - Download the MySQL JDBC driver version 5 (5.1.44 or later) from the following location: https://dev.mysql.com/downloads/connector/j/5.1.html
- MariaDB or MySQL when Control Hub uses Java 11 - Download the MySQL JDBC driver version 8 (8.0.19 or later) from the following location: https://dev.mysql.com/downloads/connector/j/8.0.html
- PostgreSQL - Download the PostgreSQL JDBC driver version 42.1.4 or later from the following location: https://jdbc.postgresql.org/download/
-
Copy the driver to the following directory:
$DPM_HOME/extra-lib
For example, copy the driver to the following directory in an RPM installation:
/opt/streamsets-dpm/extra-lib
Step 5. Set Environment Variables
Before you run the Control Hub installation scripts, you must set the DPM_HOME and DPM_CONF environment variables on the command line.
-
Use the following command to set the DPM_HOME environment variable:
export DPM_HOME=<home directory>For example, for a tarball installation use:
export DPM_HOME=/dpm/streamsets-dpm-3.61.0For an RPM installation use:
export DPM_HOME=/opt/streamsets-dpm -
Use the following command to set the DPM_CONF environment variable:
export DPM_CONF=<configuration directory>For example, for a tarball installation use:
export DPM_CONF=/dpm/streamsets-dpm-3.61.0/etcFor an RPM installation use:
export DPM_CONF=/etc/dpm
Step 6. Set Up Control Hub
- Install the dialog command line utility.For CentOS, Oracle Linux, or Red Hat Enterprise Linux, use the following command:
yum install dialogFor Ubuntu, use the following commands:apt-get update apt-get install dialog - If using PuTTY as the SSH client to install Control Hub on a remote machine,
configure PuTTY to use linux as the terminal emulation mode.
By default, PuTTY uses xterm emulation which does not correctly display the dialog command line utility.
In the PuTTY Configuration dialog box, click and then set Terminal-type string to linux.
- Use the following command to run the Control Hub
setup script from the $DPM_HOME directory:
dev/setup.sh
When you run the script for the first time, configure all of the properties. If necessary, you can run the script again to change a few properties, navigating to the appropriate configuration group.
See the sections below for a description of each property.
Navigation Tips
The Control Hub setup script contains multiple configuration groups that you navigate through to configure the required properties. The initial dialog box displays the configuration groups:
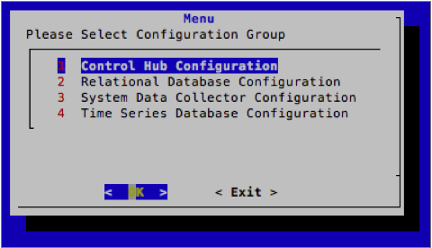
Use the arrow keys, the numbers assigned to each section, and the OK, Cancel, and Back options to navigate through the dialog boxes. Type a number to jump to that section rather using arrow keys to cycle through each section.
In dialog boxes that offer a selection of two options, use the space bar to select another option. Let's look at the Mail Transport Protocol dialog box:
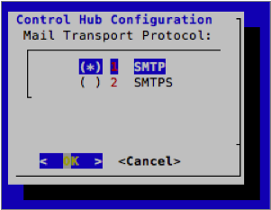
In this example, the SMTP protocol is currently set, as displayed by the asterisk (*) next to the option. To change to the SMTPS protocol, press the down arrow or the number 2 to highlight SMTPS. Then press the space bar to switch the selection - the screen displays the asterisk next to the SMTPS option. Then press Enter with the OK option highlighted to save your selection.
Control Hub Configuration
| Control Hub Configuration Property | Description |
|---|---|
| Control Hub Base URL | URL to access Control Hub based on your installation type:
|
| Admin Tool 'admin' Password | For the Control Hub Admin tool, enter a password for the default "admin" user account. To protect the password, store the password in an external location and then use a function to retrieve the password. |
| Mail Transport Protocol | Protocol to use for the SMTP account used for emails. Use the
space bar to select SMTP or SMTPS - the asterisk (*) shows your
selection - and then press Enter with the OK option
highlighted. Default is SMTP. Note: In a development
environment, you can choose not to use an SMTP server and
instead configure Control Hub to use the user ID for each user’s initial password. |
| Mail Server Host | Host name of the mail server. |
| Mail Server Port | Port number of the mail server. |
| Mail 'From' Address | Email address to use to send email. |
| Mail Server Authentication | Whether the mail server host uses authentication. Use the space
bar to select enabled or disabled - the asterisk (*) shows your
selection - and then press Enter with the OK option
highlighted. Default is disabled. |
| Mail Server Username | If the mail server host uses authentication, user name for the email account to send email. |
| Mail Server Password | If the mail server host uses authentication, password for the email account. To protect the password, store the password in an external location and then use a function to retrieve the password. |
Relational Database Configuration
The Relational Database configuration group includes the connection details for the databases created for each application in MariaDB, MySQL, or PostgreSQL.
Select each application, and then enter the following database connection details:
| Relational Database Property | Description |
|---|---|
| Driver Class | Name of the JDBC driver class used by the relational database.
|
| JDBC Connection String | Connection string to use to connect to the database.
|
| Username | User name for the JDBC connection. The user account must have all privileges on the database. |
| Password | Password for the user account. To protect the password, store the password in an external location and then use a function to retrieve the password. |
System Data Collector Configuration
| System Data Collector Property | Description |
|---|---|
| System Data Collector URL | URL of the system Data Collector. |
| System Data Collector Username | Data Collector user account with the admin or creator role. The system Data Collector uses Data Collector authentication unlike registered Data Collectors, which use Control Hub authentication. Default is |
| System Data Collector Password | Password for the Data Collector user account. To protect the password, store the password in an external location and then use a
function to retrieve the password. Default is |
Time Series Database Configuration
| Time Series Database Property | Description |
|---|---|
| Metrics Database URL | Metrics database URL using the following
format:For
example: |
| Metrics Database Name | Name of the Metrics database. For example, sch. |
| Metrics Database Username | User name for the database. The user account must have all privileges on the database. |
| Metrics Database Password | Password for the database user account. To protect the password, store the password in an external location and then use a function to retrieve the password. |
| Application Metrics Database URL | Application Metrics database URL using the following
format:For
example: |
| Application Metrics Database Name | Name of the Application Metrics database. For example, sch_app. |
| Application Metrics Database Username | User name for the database. The user account must have all privileges on the database. |
| Application Metrics Database Password | Password for the database user account. To protect the password, store the password in an external location and then use a function to retrieve the password. |
Step 7. Enable PostgreSQL for the Scheduler Application
org.quartz.jobStore.driverDelegateClass = org.quartz.impl.jdbcjobstore.PostgreSQLDelegateStep 8. Build Schemas in the Relational Databases
Run the Control Hub database initialization script to create the required tables for each database in the relational database instance. Then, run a command to add the required indexes to the LATEST_METRICS table in the Time Series database.
-
Use the following command to run the database initialization script from the
$DPM_HOME directory:
dev/01-initdb.sh - Use the appropriate MariaDB, MySQL, or PostgreSQL command to verify that tables were created for each database.
-
Run the following command based on the database vendor to add the required
indexes to the LATEST_METRICS table in the Time Series database:
- MariaDB or MySQLConnect to MariaDB or MySQL as a user who can modify databases. Run the following command where
<database_name>is the name of the Time Series database:alter table <database_name>.LATEST_METRICS add index comp_idx (JOB_ID, LAST_UPDATED_TIME);For example, if the database is named timeseries, run the following command:alter table timeseries.LATEST_METRICS add index comp_idx (JOB_ID, LAST_UPDATED_TIME); - PostgreSQLConnect to PostgreSQL as a user who can modify databases. Run the following PostgreSQL command where
<database_name>is the name of the Time Series database:create index comp_idx on <database_name>.LATEST_METRICS (JOB_ID, LAST_UPDATED_TIME);For example, if the database is named timeseries, run the following command:create index comp_idx on timeseries.LATEST_METRICS (JOB_ID, LAST_UPDATED_TIME);
- MariaDB or MySQL
Step 9. Generate Authentication Tokens for Applications
Run the security script to generate a unique authentication token for each Control Hub application.
Control Hub uses authentication tokens to authenticate each message or request sent by an application. The application includes the authentication token when it issues authenticated messages or requests to other applications.
dev/02-initsecurity.shStep 10. Activate the Control Hub License
Each Control Hub system requires an active license before you can start Control Hub.
-
Retrieve the Control Hub system ID by
running the following command from the $DPM_HOME directory:
bin/streamsets dpmcli security systemId -cThe command returns the system ID and temporarily activates the Control Hub license for seven days. This way, you can start and log in to Control Hub while you wait for your permanent activation key from StreamSets.
- Open a StreamSets support ticket or contact your StreamSets sales representative to request the permanent activation key for your Control Hub system ID.
-
After you receive the activation key, run the
following command from the $DPM_HOME directory to activate the license:
bin/streamsets dpmcli security activationKey -i activationKey.txt
Step 11. Start Control Hub
Start Control Hub from the command prompt, using the required command for your installation type.
Tarball Installation for a Manual Start
When you install Control Hub from the tarball for a manual start, you start Control Hub manually from the command line. Control Hub runs as the system user account logged into the command prompt when you run the start command. You can alternatively impersonate another user account when you run the command.
bin/streamsets dpmnohup bin/streamsets dpm &sudo -u <user> bin/streamsets dpmTarball or RPM Installation for a Service Start
When you run Control Hub as a service, Control Hub runs as the system user account and group defined in environment variables. The default system user and group are named dpm.
- For CentOS 6.x, Oracle Linux 6.x, Red Hat Enterprise Linux 6.x, or
Ubuntu 14.04,
use:
service dpm start - For CentOS 7.x, Oracle Linux 7.x - 8.x, or Red Hat Enterprise Linux
7.x - 8.x,
use:
systemctl start dpm
Step 12. Log Into Control Hub
After launching Control Hub, log in to Control Hub using the default system administrator account.
-
Enter the Control Hub base URL in the address bar of your browser.
You defined the base URL when you ran the Control Hub setup script. After you start Control Hub, the first URL listed in the command output is the base URL:
http://<host name>:18631The second URL listed in the command output is the URL to the Control Hub Admin tool, which you can use to monitor and troubleshoot Control Hub issues. No need to log into that tool now, we'll explore it in more detail in Control Hub Admin tool.
-
Use the following credentials to log in as the default system administrator:
admin@admin / admin@admin.
Control Hub displays the default dashboard:
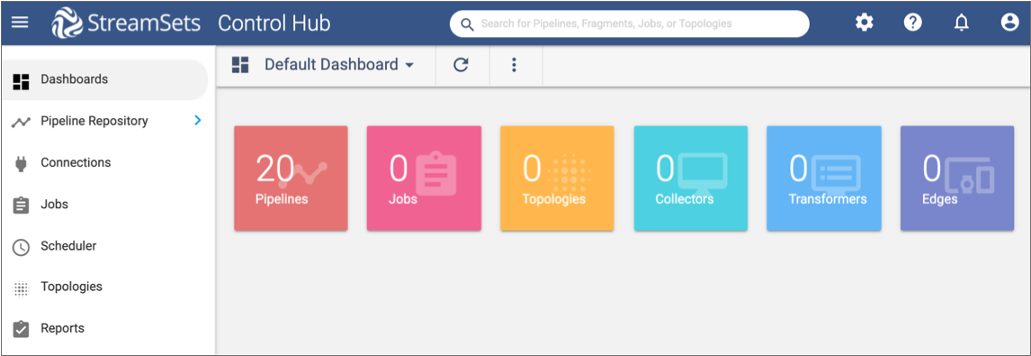
The system administrator is a user account that belongs to the system organization. The system administrator can complete tasks across all Control Hub organizations.
-
Immediately after logging in as the system administrator, change the default
password for the account to ensure the integrity of your data.
- In the Navigation panel, click .
- Click Update Password.
- Enter the current and new password, and then click Save.
Step 13. Create a Backup System Administrator
Log into Control Hub and create a backup system administrator for the system organization - in case you lose the password for the default system administrator.
-
Log into Control Hub as the system administrator, using the admin@admin
user account and the Control Hub password for that account.
Note: If you enabled LDAP authentication, the admin@admin system administrator is still authenticated by Control Hub using Control Hub credentials.
- In the Navigation panel, click .
-
Click the Add New User icon:
 .
.
- Enter a user ID in the following format: <ID>@admin.
- Enter a display name.
-
If you did not enable LDAP authentication, enter an email address.
When LDAP authentication is enabled, Control Hub retrieves a user's email address from the LDAP provider.
- If you enabled LDAP authentication, enter the name of the LDAP user account to map to this backup system administrator in the LDAP User Name property.
-
Clear all of the default roles, and then select the following roles:
- Organization User
- System Administrator
-
Click Save.
Control Hub sends an email to the specified email address so that you can change the password for this backup system administrator account.
Step 14. Create Organizations
An organization is a secure space provided to a set of Control Hub users. All Data Collectors, pipelines, jobs, topologies, and other objects added by any user in the organization belong to that organization. A user logs in to Control Hub as a member of an organization and can access data that belongs to that organization only.
When you create an organization, you create an organization administrator that can perform administrative tasks for that organization only.
Control Hub includes a system organization with an ID of admin that includes the default system administrator user account. The system administrator can complete tasks across all Control Hub organizations. We recommend creating at least one backup system administrator account, as described in the previous step.
You can add additional non-admin users to the system organization. However, as a best practice, create one or more organizations for your enterprise separate from the system organization.
For example, you might create a single organization named My Company for your enterprise where you add all user accounts. When you log in to Control Hub as the system administrator, you can see both the system and the My Company organizations:
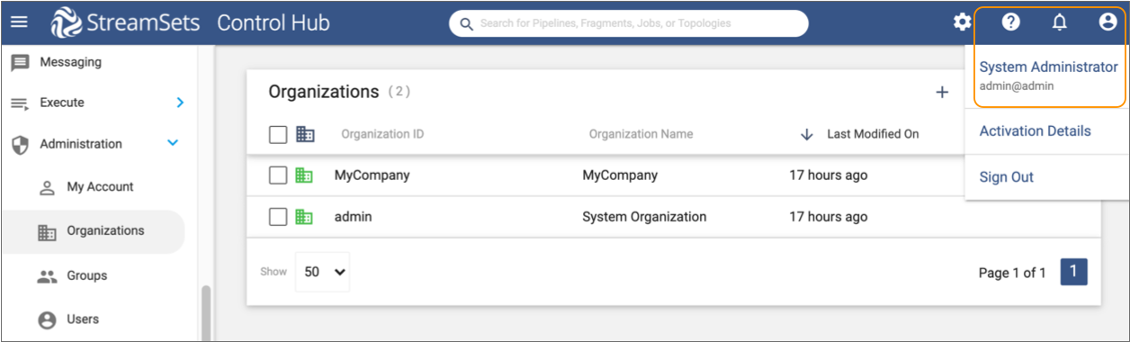
When the organization administrator for the My Company organization logs in, the organization administrator can see the My Company organization only.
You can create multiple organizations for your enterprise. For example, you might create one organization for the Northern Office and another organization for the Southern Office. Users in the Northern Office organization cannot access any data that belongs to the Southern Office organization.
For more details about the system organization and creating multiple organizations, see Organizations.
Creating Organizations
Create organizations before creating additional user accounts or registering Data Collectors. When you create an organization, you also create an organization administrator that can perform administrative tasks for that organization only.
- In the Navigation panel, click .
-
Click the Add New Organization icon:
 .
.
-
On the Add Organization window, configure the following
properties:
Organization Property Description Organization ID ID that uniquely identifies the organization. Organization Name Display name for the organization. Admin User ID ID that uniquely identifies the organization administrator. Use the following format: <ID>@<organization ID>Admin User Display Name Display name for the organization administrator. Admin User Email Address If LDAP authentication is not enabled, email address for the organization administrator. When LDAP authentication is enabled, Control Hub retrieves a user's email address from the LDAP provider.
LDAP User Name If LDAP authentication is enabled, name of the LDAP user account to map to this organization administrator. Default User Password Expiry Time Maximum number of days that a user password is valid. Users in the organization must reset their password when the maximum number of days is reached.
Valid Domains List of trusted domains that can make authentication requests to Control Hub on behalf of the organization. Active Enables access to Control Hub. When disabled, users belonging to the organization cannot log in to Control Hub or any Data Collector registered with the organization.
- Click Save.