Working with Data Governance Tools
You can configure Data Collector to integrate with data governance tools, giving you visibility into data movement - where the data came from, where it’s going to, and who is interacting with it.
Data governance tool integration is available with a paid subscription. For details, contact IBM.
- Apache Atlas
- If you have Apache Atlas installed, you can configure Data Collector to publish metadata about running pipelines to Apache Atlas. When publishing metadata, Data Collector uses Apache Kafka to send the metadata to Apache Atlas. The data is sent in JSON format.
- Cloudera Navigator
- If you use Cloudera Manager and have Cloudera Navigator installed, you can configure Data Collector to publish metadata about running pipelines to Cloudera Navigator. When publishing metadata, Data Collector makes an HTTPS request to Cloudera Navigator using basic authentication. The data is sent in JSON format.
- Collibra
- If you use Collibra Platform, you can configure Data Collector to publish metadata about running pipelines to Collibra. When publishing metadata, Data Collector passes data to Collibra using the Collibra import API. The data is sent in JSON format.
You then use one of the data governance tools to explore the pipeline metadata, including viewing lineage diagrams of the metadata.
Data Collector uses separate threads to publish metadata to data governance tools - so enabling metadata publishing has minimal effect on the running pipeline threads. Every pipeline publishes metadata when the pipeline starts and when it stops. Some origins and destinations publish metadata only once, typically when they initialize. However, some stages publish metadata each time they create a new object - for example, when the Hadoop FS or Local FS destination creates a new output file.
Supported Stages
At this time, only some pipeline stages support publishing metadata to data governance tools.
Data Collector publishes metadata for all supported stages in all running pipelines. If you have multiple Data Collectors that run pipelines, configure each Data Collector to publish metadata to the same governance tool instance.
- Amazon S3 origin
- Dev Data Generator origin
- Directory origin
- JDBC Query Consumer origin
- Kafka Multitopic Consumer origin
- Kinesis Consumer origin
- SFTP/FTP/FTPS Client origin
- Hadoop FS destination
- Local FS destination
- HBase destination
- Kafka Producer destination
- Kudu destination
When a pipeline includes an unsupported stage, the data governance tool does not display that stage as an input or output in the lineage diagram. For example, if a running pipeline includes an unsupported origin and the Hadoop FS destination, then the data governance tool displays the pipeline as having 0 inputs and multiple outputs - one output for each generated output file. If a running pipeline includes no supported origins or destinations, the data governance tool displays the pipeline as having 0 inputs and 0 outputs.
Apache Atlas
You can configure Data Collector to publish metadata about running pipelines to Apache Atlas. You then use Apache Atlas to explore the pipeline metadata, including viewing lineage diagrams of the metadata.
Data governance tool integration is available with a paid subscription. For details, contact IBM.
| Stage Library | Description |
|---|---|
| streamsets-datacollector-apache-atlas_0_8_1-lib | Use when working with HDP version 2.6.x and Apache Atlas 0.8.1. |
| streamsets-datacollector-apache-atlas_1_1_0-lib | Use when working with HDP version 3.1.x and Apache Atlas 1.1.0. |
You then configure Data Collector to connect to Apache Atlas. You also must deploy the StreamSets data model to the machine where the Apache Atlas server is installed.
Prerequisites
Before you enable Data Collector to publish pipeline metadata to Apache Atlas, you must complete the following prerequisites:
- Verify that Data Collector has a required Hortonworks Data Platform (HDP) stage library installed
- To connect to and publish metadata to Apache Atlas, Data Collector requires HDP versions 2.6.x or 3.1.x.
- To verify that Data Collector has a valid HDP stage library installed, click the Package Manager icon
(
 ) to display the list of installed stage libraries.
If a required library version is not installed, install
the library before configuring Data Collector to publish pipeline metadata to Apache Atlas.
) to display the list of installed stage libraries.
If a required library version is not installed, install
the library before configuring Data Collector to publish pipeline metadata to Apache Atlas. - Configure the required settings in Apache Atlas
- To connect to and publish metadata to Apache Atlas, you must configure the
following required settings in Apache Atlas:
- Configure Apache Atlas to use HBase as a persistence engine.
- Configure Apache Atlas to use Apache Kafka for notifications.
- Ensure that the graphing engine is enabled for Apache Atlas.
Step 1. Download and Install the Stage Library
Download and install the appropriate Apache Atlas stage library as a custom stage library.
- Using the link provided by email, download the tarball containing the Apache Atlas stage library.
-
Extract the tarball.
The tarball is extracted into the following directory:
<stage library name>/lib/For example, the Apache Atlas version 0.8.1 stage library is extracted to:streamsets-datacollector-apache-atlas_0_8_1-lib/lib/The Apache Atlas version 1.1.0 stage library is extracted to:streamsets-datacollector-apache-atlas_1_1_0-lib/lib/ -
Create a local directory external to the Data Collector installation directory for the custom stage libraries. Use an external
directory to enable use of the libraries after Data Collector upgrades.
For example, if you installed Data Collector in the following directory:
/opt/sdc/you might create the custom stage library directory at:/opt/sdc-user-libs -
Copy the Apache Atlas stage library to this custom stage library directory, as
follows:
For example, for Apache Atlas version 0.8.1:/opt/sdc-user-libs/<stage library name>/lib//opt/sdc-user-libs/streamsets-datacollector-apache-atlas_0_8_1-lib/lib/For Apache Atlas version 1.1.0:/opt/sdc-user-libs/streamsets-datacollector-apache-atlas_1_1_0-lib/lib/ -
Add the USER_LIBRARIES_DIR environment variable to the appropriate file and
point it to the custom stage library directory.
Modify environment variables using the method required by your installation type.
Set the environment variable as follows:
export USER_LIBRARIES_DIR="<custom stage library directory>"For example:
export USER_LIBRARIES_DIR="/opt/sdc-user-libs/" -
When using the Java Security Manager, which is enabled by default, update the
Data Collector security policy to include the custom stage library directory as
follows:
- Restart Data Collector.
Step 2. Configure the Connection to Apache Atlas
- Data Collector configuration file
- Add lineage publisher properties to the Data Collector configuration file,
$SDC_CONF/sdc.properties. - Apache Atlas application properties file
- If Data Collector is installed on a separate machine from the Apache Atlas server, copy the atlas-application.properties file to the Data Collector machine. Modify the Apache Atlas application properties file as needed, and then specify the location of the file in the SDC_JAVA_OPTS environment variable.
-
To enable metadata publishing to Apache Atlas, modify the Data
Collector configuration file,
$SDC_CONF/sdc.properties. -
Add lineage publisher properties to the configuration file.
For Apache Atlas 0.8.1, add the following lines to the file:
# Lineage Publisher # lineage.publishers=atlas lineage.publisher.atlas.def=streamsets-datacollector-apache-atlas_0_8_1-lib::com_streamsets_pipeline_stage_plugin_atlas_AtlasLineagePublisherFor Apache Atlas 1.1.0, add the following lines to the file:# Lineage Publisher # lineage.publishers=atlas lineage.publisher.atlas.def=streamsets-datacollector-apache-atlas_1_1_0-lib::com_streamsets_pipeline_stage_plugin_atlas_AtlasLineagePublisher1_1_0 -
If Data Collector is installed on a separate machine from the Apache Atlas server, copy the
atlas-application.properties file to the Data Collector machine.
Store the atlas-application.properties file in the
$SDC_CONFdirectory. For example, for an RPM installation of Data Collector, store the file in the /etc/sdc/ directory. -
Verify that the atlas-application.properties file is
correctly configured.
For example, if you copied the atlas-application.properties file to the Data Collector machine, you might need to modify the following properties which specify the Kafka installation on the Apache Atlas server:
atlas.kafka.zookeeper.connect=localhost:9026 atlas.kafka.bootstrap.servers=localhost:9027For more information on the properties in this file, see the Apache Atlas documentation.
-
On the Data Collector machine, define the
-Datlas.confsystem property in the SDC_JAVA_OPTS environment variable.Modify environment variables using the method required by your installation type.
The
-Datlas.confsystem property defines the location of the local atlas-application.properties file. Define the Atlas system property as follows:export SDC_JAVA_OPTS="${SDC_JAVA_OPTS} -Datlas.conf=<configuration directory> -Xmx1024m -Xms1024m -server"The defined configuration directory must end in a forward slash (/). For example, if you stored the file in the $SDC_CONF directory for an RPM installation of Data Collector, define the Atlas system property as follows:export SDC_JAVA_OPTS="${SDC_JAVA_OPTS} -Datlas.conf=/etc/sdc/ -Xmx1024m -Xms1024m -server" - Restart Data Collector for the changed properties to take effect.
Step 3. Deploy the StreamSets Data Model to Apache Atlas
Download the StreamSets data model and deploy the data model to the Apache Atlas server.
-
Using the link provided by email, download the data model for Apache
Atlas:
0090-streamsets_model.json -
Deploy the data model to the machine where the Apache Atlas server is
installed.
On the Apache Atlas server, copy the data model to the same directory that contains the Sqoop data model.For example, if using Hortonworks version 2.6.1 for testing, copy the data model to the following directory:
/usr/hdp/2.6.1.0-129/atlas/models/0090-streamsets_model.json - Restart the Apache Atlas server so that the server can recognize the newly deployed data model.
Viewing Published Metadata
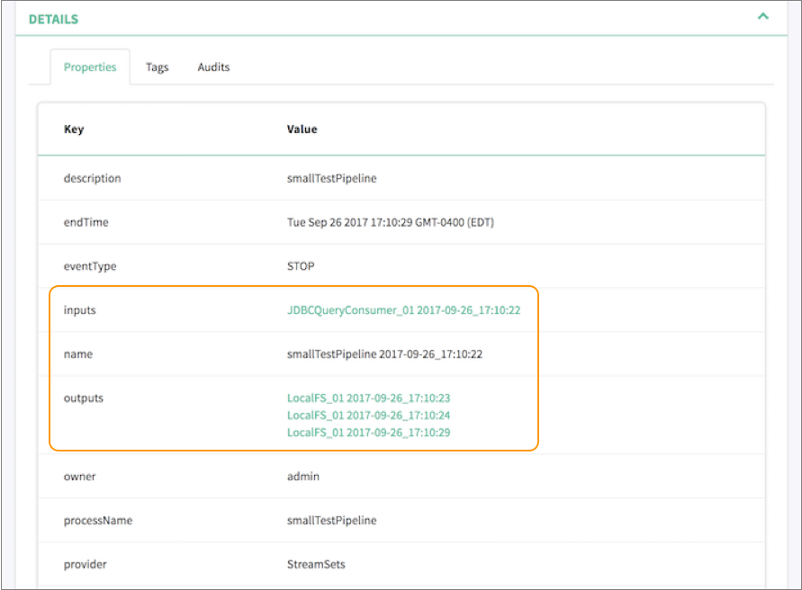
Data Collector publishes pipeline metadata to Apache Atlas when a pipeline stops. Apache Atlas lists each pipeline by pipeline title and displays supported origins as inputs and supported destinations as outputs. Apache Atlas also includes other metadata, such as the pipeline description, version, labels, and the user who started the pipeline.
For example, let's assume that you run a pipeline that includes a JDBC Query Consumer origin and a Local FS destination. Apache Atlas displays a single input representing the JDBC Query Consumer origin. As the pipeline runs, the Local FS destination creates multiple output files. Apache Atlas displays multiple outputs, each output representing one of the generated output files.
Apache Atlas displays the details of the published pipeline metadata as follows. Note how our example pipeline is listed with 1 input and 3 outputs - one output for each generated output file:
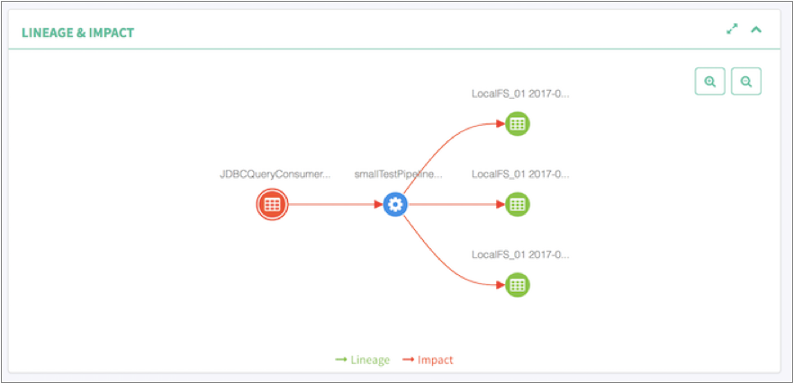
Apache Atlas displays the pipeline lineage diagram as follows:
Cloudera Navigator
You can configure Data Collector to publish metadata about running pipelines to Cloudera Navigator. You then use Cloudera Navigator to explore the pipeline metadata, including viewing lineage diagrams of the metadata.
Data governance tool integration is available with a paid subscription. For details, contact IBM.
To integrate Data Collector with Cloudera Navigator, download and install one of the following Cloudera Navigator stage libraries as a custom stage library:
| Stage Library | Description |
|---|---|
| streamsets-datacollector-cm_5_10-lib | Use when working with Cloudera Manager version 5.10. |
| streamsets-datacollector-cm_5_11-lib | Use when working with Cloudera Manager version 5.11. |
| streamsets-datacollector-cm_5_12-lib | Use when working with Cloudera Manager version 5.12. |
| streamsets-datacollector-cm_5_13-lib | Use when working with Cloudera Manager version 5.13. |
| streamsets-datacollector-cm_5_14-lib | Use when working with Cloudera Manager version 5.14. |
| streamsets-datacollector-cm_5_15-lib | Use when working with Cloudera Manager version 5.15. |
| streamsets-datacollector-cm_6_1-lib | Use when working with Cloudera Manager version 6.1. |
You then configure Data Collector to connect to Cloudera Navigator.
Prerequisites
Before you enable Data Collector to publish pipeline metadata to Cloudera Navigator, complete the following prerequisites:
- Verify that Data Collector has a required Cloudera CDH stage library version installed
- To connect to and publish metadata to Cloudera Navigator, Data Collector requires Cloudera Manager versions 5.10 through 5.15 or version 6.1.
- To verify that Data Collector has a valid Cloudera CDH stage library installed, click the Package Manager
icon () to display the list of installed stage libraries.
If a required library version is not installed, install
the library before configuring Data Collector to publish pipeline metadata to Cloudera Navigator.
- Add the Cloudera Navigator data management roles to your Cloudera Manager cluster
- Add the following Navigator roles to the Cloudera Management Service:
- Cloudera Navigator Audit Server role
- Cloudera Navigator Metadata Server role
Step 1. Download and Install the Stage Library
-
Using the link provided by email, download the tarball containing the Cloudera
Navigator stage library for your version of Cloudera Manager.
For example, if Data Collector has the Cloudera CDH stage library version 5.14 installed, download the streamsets-datacollector-cm_5_14-lib-1.6.0.tgz file.
-
Extract the tarball.
The tarball is extracted into the following directory:
<stage library name>/lib/For example:streamsets-datacollector-cm_5_14-lib/lib/ -
On every node that runs Data Collector, create a local directory for the custom stage libraries.
For example, you might create the custom stage library directory at:
/opt/sdc-user-libs -
On every node that runs Data Collector, copy the extracted Cloudera Navigator stage library to the directory defined
for the USER_LIBRARIES_DIR environment variable as follows:
/opt/sdc-user-libs/<stage library name>/lib/For example:/opt/sdc-user-libs/streamsets-datacollector-cm_5_14-lib/lib/ - In Cloudera Manager, select the StreamSets service and then click Configuration.
-
On the Configuration page, in the Data
Collector Advanced Configuration Snippet (Safety Valve) for
sdc-env.sh field, add the USER_LIBRARIES_DIR environment
variable and point it to the custom stage library directory, as follows:
export USER_LIBRARIES_DIR="<custom stage library directory>"For example:export USER_LIBRARIES_DIR="/opt/sdc-user-libs/" -
When using the Java Security Manager, which is enabled by default, update the
Data Collector Advanced Configuration Snippet (Safety Valve) for
sdc-security.policy property to include the custom stage library
directory as follows:
// custom stage library directory
grant codebase "file://<custom stage library directory>/-" {
   permission java.security.AllPermission;
};
For example:// custom stage library directory grant codebase "file:///opt/sdc-user-libs/-" { permission java.security.AllPermission; }; - Restart Data Collector.
Step 2. Configure the Connection to Cloudera Navigator
Add lineage publisher properties to the Data Collector configuration file,
$SDC_CONF/sdc.properties, and then configure the properties as needed. When administering Data Collector
with Cloudera Manager, configure the Data Collector
configuration properties through the StreamSets
service in Cloudera Manager. Manual changes to the configuration file can be overwritten
by Cloudera Manager.
Configuring the properties includes enabling metadata publishing and defining the connection to Cloudera Navigator.
If Cloudera Navigator is configured for TLS/SSL, configuring the properties also requires specifying the local truststore file that Data Collector uses to verify the identity of the Cloudera Navigator Metadata Server.
-
To enable metadata publishing, modify the Data Collector
configuration file,
$SDC_CONF/sdc.properties. -
Add the following lineage publisher properties to the configuration file:
# Lineage Publisher # lineage.publishers=navigator lineage.publisher.navigator.def=streamsets-datacollector-cm_5_14-lib::com_streamsets_pipeline_stage_plugin_navigator_NavigatorLineagePublisher lineage.publisher.navigator.config.application_url=http://localhost:18630 lineage.publisher.navigator.config.navigator_url=http://navigatorhost:7187 lineage.publisher.navigator.config.namespace=sdc lineage.publisher.navigator.config.username=user lineage.publisher.navigator.config.password=passwd lineage.publisher.navigator.config.autocommit=false -
To define the connection to Cloudera Navigator, modify the default values of
the following properties:
Metadata Publisher Property Description lineage.publishers Application to publish metadata to. Use the default value,
navigator.lineage.publisher.navigator.def Stage library name used to connect to Cloudera Navigator, entered in the following format: <stage library name>::com_streamsets_pipeline_ stage_plugin_navigator_NavigatorLineagePublisherDefine the appropriate Cloudera CDH stage library name to enable metadata publishing. For example, if you downloaded version 6.1 of the stage library, define the stage library name as follows:streamsets-datacollector-cm_6_1-libDo not modify the second half of the property value.
lineage.publisher.navigator. config.application_url
URL to Data Collector. For example: http://<hostname>:18630/lineage.publisher.navigator. config.navigator_url
URL to the Cloudera Navigator UI. For example: http://<Navigator Metadata Server host>:<port number>/<Navigator Metadata Server host>is the name of the host on which you are running the Navigator Metadata Server role.<port number>is the port configured for the role.lineage.publisher.navigator. config.namespace
Namespace that Cloudera Navigator uses to uniquely identify Data Collector properties. lineage.publisher.navigator. config.username
User name to connect to Cloudera Navigator. lineage.publisher.navigator. config.password
Password for the Cloudera Navigator account. To protect the password, store the password in an external location and then use a function to retrieve the password.
lineage.publisher.navigator. config.autocommit
Enables Cloudera Navigator to immediately process the published metadata. In most cases, use the default value of
false. Setting to true can use a large number of resources on the Cloudera Navigator machine. -
If Cloudera Navigator is configured for TLS/SSL, add the following lines to the
Lineage Publisher section of the Data Collector configuration file and then modify the default values of the properties:
lineage.publisher.navigator.config.ssl_truststore_location=truststore.jks
lineage.publisher.navigator.config.ssl_truststore_password=changeit
Metadata Publisher Property for TLS/SSL Description lineage.publisher.navigator. config.ssl_truststore_location
Path to the truststore file containing the Cloudera Navigator Metadata Server certificate. Enter an absolute path to the file or a path relative to the Data Collector resources directory:
$SDC_RESOURCES.lineage.publisher.navigator. config.ssl_truststore_password
Password to the truststore file. To protect the password, store the password in an external location and then use a function to retrieve the password.
- Restart Data Collector for the changed properties to take effect.
Viewing Published Metadata
You can view published pipeline metadata in near real time in Cloudera Navigator. Cloudera Navigator lists each pipeline by pipeline title and displays supported origins as inputs and supported destinations as outputs. Cloudera Navigator also includes a URL to the pipeline within Data Collector along with other metadata, such as the pipeline ID, version, labels, and the user who started the pipeline.
For example, let's assume that you run a pipeline that includes a JDBC Query Consumer origin and a Local FS destination. Cloudera Navigator displays a single input representing the JDBC Query Consumer origin. As the pipeline runs, the Local FS destination creates multiple output files. Cloudera Navigator displays multiple outputs, each output representing one of the generated output files.
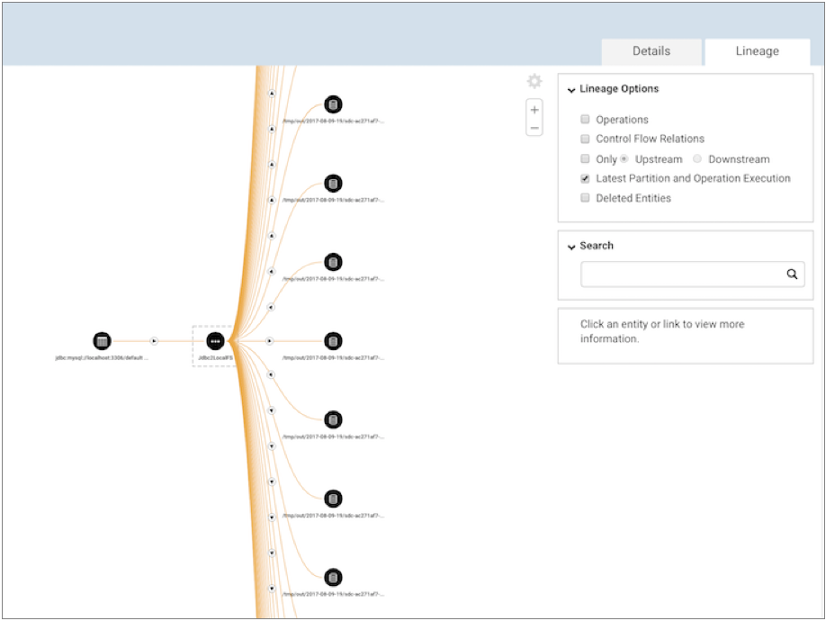
Cloudera Navigator displays the details of the published pipeline metadata as follows. Note how our example Jdbc2LocalFS pipeline is listed with 1 input and 42 outputs - one output for each generated output file:
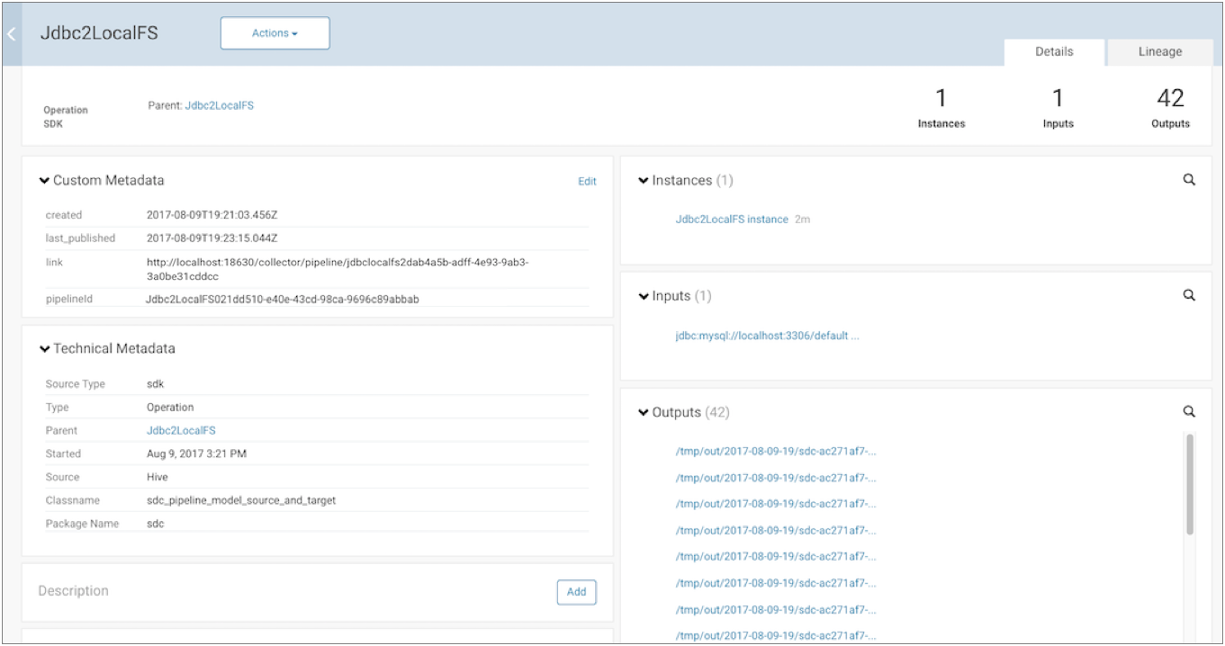
Cloudera Navigator displays the pipeline lineage diagram as follows:
Collibra
You can configure Data Collector to publish metadata about running pipelines to Collibra. You then use Collibra to explore the pipeline metadata, including viewing lineage diagrams of the metadata. You can configure Data Collector version 3.20.x or later to publish metadata to the latest version of Collibra.
Data governance tool integration is available with a paid subscription. For details, contact IBM.
| Stage Library | Description |
|---|---|
| streamsets-datacollector-collibra-lib | Use to work with Collibra Platform. |
You then configure Data Collector to connect to Collibra. You also must deploy the StreamSets data model to the machine where the Collibra server is installed.
Prerequisites
Before you enable Data Collector to publish pipeline metadata to Collibra, complete the following prerequisites.
This document includes steps for performing tasks in Collibra for your convenience. For the latest steps, see the Collibra documentation.
- Import StreamSets Collibra resources
- To connect to Collibra from Data Collector, you must download and import the Collibra resource file.
- If necessary, place a request with customer support for access to
the Collibra resource file,
streamsets-collibra.cma. - In the Collibra user interface, from your Collibra instance, click , then upload the
streamsets-collibra.cmafile.
- If necessary, place a request with customer support for access to
the Collibra resource file,
- Create a community in the Collibra instance
- To connect to Collibra from Data Collector, you must create a community in Collibra for Data Collector, and assign the Community Manager role to a user account. You use the Community Manager user account to configure the connection to Collibra.
Step 1. Download and Install the Stage Library
Download and install the Collibra stage library as a custom stage library.
- Using the link provided by email, download the tarball containing the Collibra stage library.
-
Extract the tarball.
The tarball is extracted into the following directory:
<stage library name>/lib/For example, the Collibra version 1.0.0 stage library is extracted to:streamsets-datacollector-collibra-lib/lib/ -
Create a local directory external to the Data Collector installation directory for the custom stage libraries. Use an external
directory to enable use of the libraries after Data Collector upgrades.
For example, if you installed Data Collector in the following directory:
/opt/sdc/you might create the custom stage library directory at:/opt/sdc-user-libs -
Copy the Collibra stage library to this custom stage library directory, as
follows:
For example, for Collibra version 1.0.0:/opt/sdc-user-libs/<stage library name>/lib//opt/sdc-user-libs/streamsets-datacollector-collibra-lib/lib/ -
Add the USER_LIBRARIES_DIR environment variable to the appropriate file and
point it to the custom stage library directory.
Modify environment variables using the method required by your installation type.
Set the environment variable as follows:
export USER_LIBRARIES_DIR="<custom stage library directory>"For example:
export USER_LIBRARIES_DIR="/opt/sdc-user-libs/" -
When using the Java Security Manager, which is enabled by default, update the
Data Collector security policy to include the custom stage library directory as
follows:
- Restart Data Collector.
Step 2. Configure the Connection to Collibra
Configuring Data Collector to connect to Collibra involves adding lineage publisher properties to the Data Collector configuration file.
-
To enable metadata publishing to Collibra, modify the Data
Collector configuration file,
$SDC_CONF/sdc.properties. -
Add the following lineage publisher properties to the configuration file:
# Lineage Publisher lineage.publishers=collibra lineage.publisher.collibra.def=streamsets-datacollector-collibra-lib::com_streamsets_pipeline_stage_plugin_collibra_CollibraLineagePublisher lineage.publisher.collibra.config.collibra_url=<collibra url> lineage.publisher.collibra.config.community=<community name> lineage.publisher.collibra.config.username=<user name> lineage.publisher.collibra.config.password=<password> -
To define the connection to Collibra, configure the properties as
follows:
Metadata Publisher Property Description lineage.publishers Application to publish metadata to. Use the default value: collibra.lineage.publisher.collibra.def Stage library name used to connect to Collibra. Use the default value:streamsets-datacollector-collibra-lib::com_streamsets_pipeline_stage_plugin_collibra_CollibraLineagePublisherlineage.publisher.collibra.config.collibra_url URL for your Collibra instance. Use the following format: https://<collibra host>:<collibra port>lineage.publisher.collibra.config.community Community that Collibra uses to uniquely identify Data Collector properties. Specify the community name that you created in the prerequisite tasks.
lineage.publisher.collibra.config.username User name to connect to Collibra. Specify the user account that you assigned to the Community Manager role in the prerequisite tasks.
lineage.publisher.collibra.config.password Password for the Collibra account. - Restart Data Collector.
Viewing Published Metadata
Data Collector publishes pipeline metadata to Collibra when a pipeline stops. Collibra lists each pipeline by pipeline title and displays supported origins as inputs and supported destinations as outputs. Collibra also includes other metadata, such as the pipeline ID, version, and the user who started the pipeline.
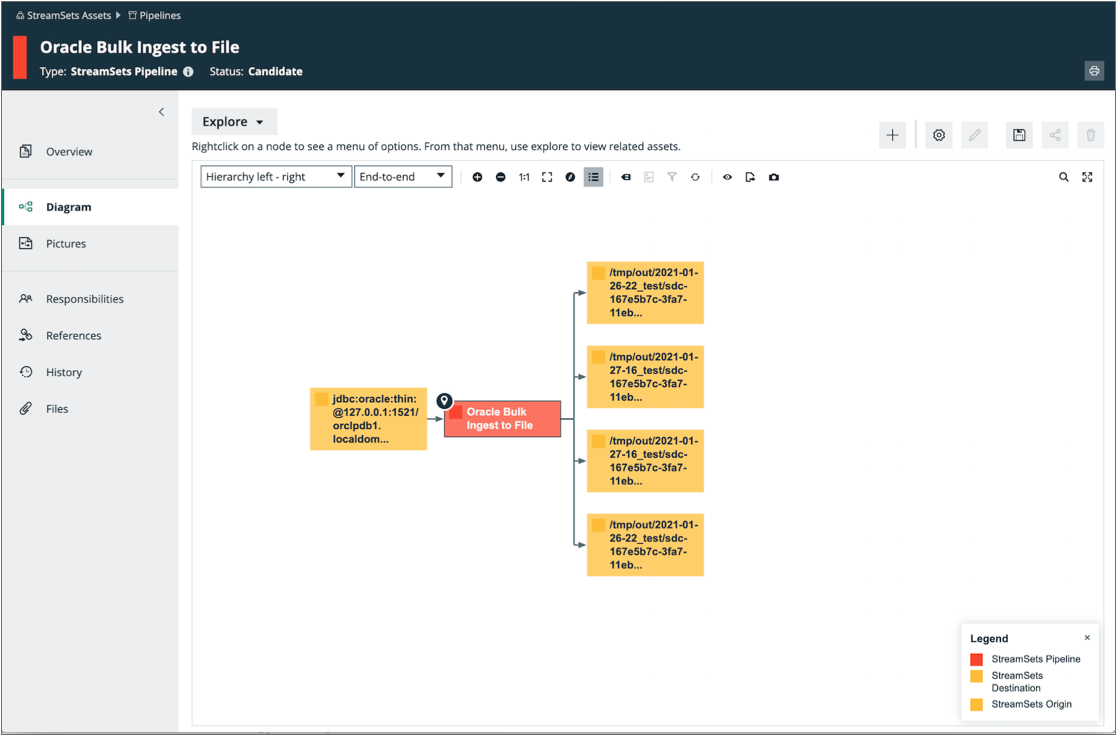
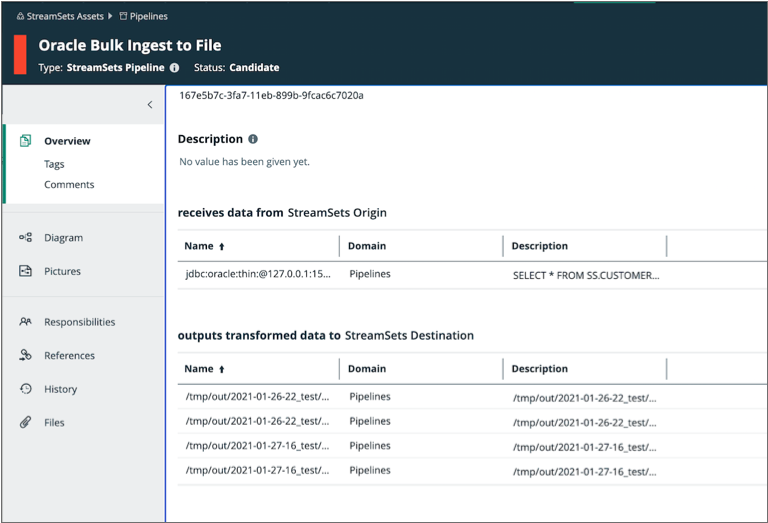
For example, say you run a pipeline that includes an Oracle Bulkloader origin and a Local FS destination. Collibra displays a single input representing the origin. As the pipeline runs, the Local FS destination creates multiple output files. Collibra displays multiple outputs, each output representing one of the generated output files.
Collibra displays the details of the published pipeline metadata as follows. Note how the pipeline is listed with 1 input and 4 outputs - one output for each generated output file:
Collibra displays the pipeline lineage diagram as follows: